

|
| BenJ |
|
||
|
{USERNAME} wrote: Nice work BenJ! I admit I have been reading thru the PBR book @ work (repco), looking for a reasonable priced master & slave cyl setup that would do the job. Now knowing what throw I need, this is looking like something I could afford to do sometime soon. You ingenuity & modding ability never cease to amaze me! Cheers ToranaGuy Well, if you have access to the specs, can you see if you can identify an alternative slave cylinder option? It would take some of the guessing out of the process. Cheers BenJ
_________________ {DESCRIPTION} - Current Ride |
||
| Top | |
||
| Rick's EF Fairmont Wagon |
|
||
|
Head on down to the wreckers and see what you can adapt. My old mini had hydro clutch which I had to put a seal kit into. The Nissan Bluebird was hydro too If I remember correctly? I think I had to seal kit that also.... 18 years ago!
_________________ BF3 Egas XT Wagon |
||
| Top | |
||
| ToranaGuy |
|
|||
|
I will see if I can get a chance to go over a few specs tomorrow, depends on how busy we are.
Cheers ToranaGuy
_________________ I am the ToranaGuy!|74 Lh Torana Turbo|78 Hz PanelVan|86 Mighty Boy Ute|93 EB2 Ghia,GT Mockup,5spd,LPGI,Full Leather|2 x EB Xr8 5spd's|{DESCRIPTION}|{DESCRIPTION}|{DESCRIPTION}| |
|||
| Top | |
|||
| BenJ |
|
||
|
{USERNAME} wrote: I will see if I can get a chance to go over a few specs tomorrow, depends on how busy we are. Cheers ToranaGuy That is cool. No hurry. While I am keen to work out a viable cost effective solution that others can emulate, I will be buying a new clutch cable tomorrow. The current old 2nd hand spare is quite stiff, and I have no confidence in it for the long term. Cheers BenJ
_________________ {DESCRIPTION} - Current Ride |
||
| Top | |
||
| BenJ |
|
||
|
Clutch Cable
New clutch cable sourced and installed. Pedal is much lighter and easier to control. I will still be researching info to convert to a hydraulic setup. Steering Rack As previously mentioned, the steering rack was leaking worse than ever after Snap and I installed new seals on the pinion housing. Due to the age of the rack, being original fitment to the wagon, I believe the pinion shaft has worn a grove in it, meaning that it needed to be replaced. Not having a lot of spare $$$$$ at the moment I decided to swap in the steering rack out of the ED Ghia Sedan as it looked to be in good condition, with no tell tale signs of fluid leaks etc. The danger of this is that the rack seals could have dried out and I will still be stuck with a leaking rack. A quick inspection proved that despite the long term absence of a power steering pump, there was still fluid in the rack, which should indicate the seals are still in good condition. The theory is that, I install the ED Ghia rack, hope it doesn't leak, but if it does, replace it with a reco rack and use the original rack as the exchange item. I had heard that replacing the steering racks can be somewhat of a PITA, but found it to be relatively straight forward. I also swapped in another Pwr Steering Pump so I could return that unit back to SWC. (Cheers Mate and thanks for the long term loaner) A week on and there are no signs of a leak, the fluid looks like it should, and the steering feel is much better than it was being lighter and more direct. LPG Plumbing While working on the car I have noticed the faint smell of LPG, and I could hear a faint hissing from around the filter/lock off valve section. After fitting the clutch plate where I had to move a few of the LPG lines out of the way for better access, it seemed to get worse. I decided it would be a good idea to re seal the joins from the feed line to the converter. I purchased some Gas thread tape and after turning the tank feed off started dismantling things. I had acquired a spare filter/lock off assembly previously and had disassembled it to see how it all went together. Imagine my surprise when I removed my filter housing to find an O-ring was missing. Luckily the O-ring was present in the spare assembly. As a result, there is now no smell of LPG in the engine bay after turning the car off, and I seem to be getting between 20 and 30 kms better from a tank. Funny that. Cheers BenJ
_________________ {DESCRIPTION} - Current Ride |
||
| Top | |
||
| Shifteh |
|
||
|
mitsubitshi magnas like older boxy style are hydrolic clutched
_________________ Crank Assembly balanced, HV oil pump, ACL Trimetal bearings, "1 extra oil clearance taking to around 0.0650-0.0700 on mains and big ends, Moly rings,, Xr6 Cam, POD ( Possibly oversize injectors), Block, Head, Timing cover, belt idler, Alternator,painted in ford light blue |
||
| Top | |
||
| ToranaGuy |
|
|||
|
{USERNAME} wrote: mitsubitshi magnas like older boxy style are hydrolic clutched There is a thought. So are Telstar Tx5's, and I think the mitsubishi express van's are too. Have not been able to get time to look any serious specs up, sorry guys. Which reminds me, my g/f has a tx5 ghia manual as a parts car. I wonder if the hydraulic bits are a candidate for a falcon of mine? Cheers ToranaGuy
_________________ I am the ToranaGuy!|74 Lh Torana Turbo|78 Hz PanelVan|86 Mighty Boy Ute|93 EB2 Ghia,GT Mockup,5spd,LPGI,Full Leather|2 x EB Xr8 5spd's|{DESCRIPTION}|{DESCRIPTION}|{DESCRIPTION}| |
|||
| Top | |
|||
| 89S-PACK |
|
|||
|
just a thought on hydraulic clutch..
planning on using the mustang clutch fork too if you go down that path? as the location of the slave rod would place itself where the rubber damper used to be. my guess is that wouldnt be able to be used in the same fashion as the cable driven setup i would think. could always get a bit of steel welded over or washers but i doubt that would work reliably for long though. as you have put the thought in my head trying to chase the mustang bits for the box at least and sort out a underdash master unit.. but then on the other hand i havent yet had issues with the cable setup so i may leave it till i break something i suppose |
|||
| Top | |
|||
| BenJ |
|
||
|
IGNITION ISSUES - AGAIN!!!!!
Soooo, I get up on Monday morning, get ready for work, climb in the car, crank it . . . . . . . and crank it . . . . . . . . . . &$(@^(#(#*^$%#@(#)#(*$#(*&#@*$& Not again SIGH Same issue on either LPG or Petrol - spark is the culprit again. At least I am at home this time. Swap in spare coil, no start. Bugger. TFI? Ok have a spare one of them. Manage to swap the TFI without taking the dizzy out WIN!! But, still no start. And, the battery is now giving up. Call NRMA. NRMA arrive 45mins later. He confirms no spark. Then checks for power at coil and fuel injectors. Power there, but no pulse. Hmmmmm I swap ECU for spare EL Ghia ECU. Nope, that didn't help either. NRMA dude again checks for power at coil and injectors. Now, no power. WTF????? I notice the LPG lockoff is not clicking. Hmmm, that gets power from the ECU 12v line. Check ECU relay. Pull plug off relay and it is a tad melted and corroded. That is not good. NRMA has to go and leaves me to fix the ECU relay issue. I cut off the old plug, crimp on some spade connectors and install a std 12v relay. Try to start car, but battery says NO. I give up and catch the train to work. I hit the phone while on the train and EVL098 kindly agrees to meet me at my place at 4.30 so I can jump start the car. YAY!!! You the man Matt. Matt rocks up, and we hook up the jumper leads, but the battery doesn't want to play nice. Luckily I asked Matt if he could bring a spare good battery, which he had. Swap in good battery and she cranks away . . . . . . . . and cranks away BUGGER. Swap coils again, still no joy. Swap TFI modules again (getting good at this now), still nothing. Have power at coil and injectors now but no pulse. Hmmm. Think for a bit (this is quite a strain). Hmmmmm, what controls the ignition and fuel. ECU. OK. What is the ECU. EL Ghia. Hmmmmm, in an EB1. AHHHHHHH!!!!!!! Could it be? No, don't be silly. I tell Matt my suggestion, and he doesn't think I am that crazy. After a bit of digging around in my parts bins, I locate the original EB1 ECU, pull out the EL Ghia ECU, swap in the old one. Crank, and VROOOOOOM. Bloody car fires right up. #@$% Only one reason that would be the case. Smartlock Bypass Module = FAIL!!!! Locate the module, and the rag I had wrapped around it to prevent rattling is damp. Not a good sign. Rip open the module to inspect the insides, and I find one of the components is broken. Theory is that some water got inside caused a short and caused the leg to separate off the component. I went to visit a good mate with electronics skills. He soldered in a replacement part, but this did not help. Have now ordered a new Smartlock Bypass Module and expect it to be here on Friday. Will update after I install it. The Wagon actually drives OK with the EB1 ECU. Dash behaves a bit funky with no DATA LINE, no water temp, tacho reads low (odd) and the A/C won't behave correctly, BUT even without the BBM working it actually goes quite good. The Log Manifold cars have a base timing of 10 degrees BTDC, and LPG likes more timing. EL has 0 degrees BTDC. Bloody Cars. BenJ
_________________ {DESCRIPTION} - Current Ride |
||
| Top | |
||
| ToranaGuy |
|
|||
|
Far out BenJ, what a hassle. Sounds like the issue was 2 main faults, the smartlock bypass & the ecu relay..... That's bad luck there man.
I'm hearing you on this one. I took my mighty boy out last weekend, and on the cruise the timing somehow jumped 180deg without managing to damage anything at all. Managed to reset the distributor, in a car park in Albury at 9am saturday morning lol. On sunday the carby started to play up badly. Damn carby's. It's an omen to get my EFI conversion in & running...... I'd personally like to know why/how the smartlock bypass got wet? Cheers ToranaGuy
_________________ I am the ToranaGuy!|74 Lh Torana Turbo|78 Hz PanelVan|86 Mighty Boy Ute|93 EB2 Ghia,GT Mockup,5spd,LPGI,Full Leather|2 x EB Xr8 5spd's|{DESCRIPTION}|{DESCRIPTION}|{DESCRIPTION}| |
|||
| Top | |
|||
| BenJ |
|
||
|
Good Question.
The Bypass Module, the LPG Wiring, Computer, relays etc, all live in the passenger pillar cavity behind the ECU. I am thinking in heavy weather conditions, some water makes its way inside. The LPG parts are all wrapped in bubble wrap and electrical tape, so should be fine, but the bypass module just had a rag taped around it. Cheers BenJ
_________________ {DESCRIPTION} - Current Ride |
||
| Top | |
||
| ToranaGuy |
|
|||
|
Any rust in the bottom of the plenum? Drain tubes are not blocked up are they? Otherwise, if there was really, really heavy rain, maybe the tubes couldn't flow enough & some come into the car?
Cheers ToranaGuy
_________________ I am the ToranaGuy!|74 Lh Torana Turbo|78 Hz PanelVan|86 Mighty Boy Ute|93 EB2 Ghia,GT Mockup,5spd,LPGI,Full Leather|2 x EB Xr8 5spd's|{DESCRIPTION}|{DESCRIPTION}|{DESCRIPTION}| |
|||
| Top | |
|||
| 89S-PACK |
|
|||
|
wet ecu.. um got a place to look first as mine in the eb kept getting wet.
in the doorjamb where the electrics pass from the shell of the car to the door there is a rubber sock\grommet. it may not be sealing well anymore so removing it and wiping some sealant around the edge of the boot and refitting works a treat. where the boot would be making contact with the shell of the car. and wipe with your finger around to make it look neater when fitted. i havent had issues since i did that back in january. looking further up the plenum drain is above this.. a bit of a stupid design by ford i reckon it had me stumped as i thought i killed a manual ecu and mine always started after being swapped dried out one thing i did also was. i took out the sound deadner bags out of that pillar behind the ecu as mine were soaked and didnt smell that nice. i havent noticed a difference in road noise being louder at all so it may be something you may want to remove aswell but sucks to hear it damaged a few things though. mines still presmartlock atm. im thinking of keeping it that way |
|||
| Top | |
|||
| fairlane6970 |
|
|||
|
Hopefully you're on the right track now, you think we'd know better than to play(modify) cars at our age!
_________________
|
|||
| Top | |
|||
| BenJ |
|
||
|
XB GT Bonnet - Refresh Time
After 40000+ kays and 1000s of heat cycles the XB GT Bonnet needs a bit of love and attention. I will begin by stating that as this bonnet is a one off custom build, with half of the work done by myself, I did expect to correct any issues that showed over time. To be clear, the current problems with the bonnet are in no way connected with SWCs workmanship and I expect to continue working with SWC with some other future mods for the Wagon. **************************************************************** The following photos show most of the issues that I will be correcting. As you can see, from a short distance the bonnet looks fine. 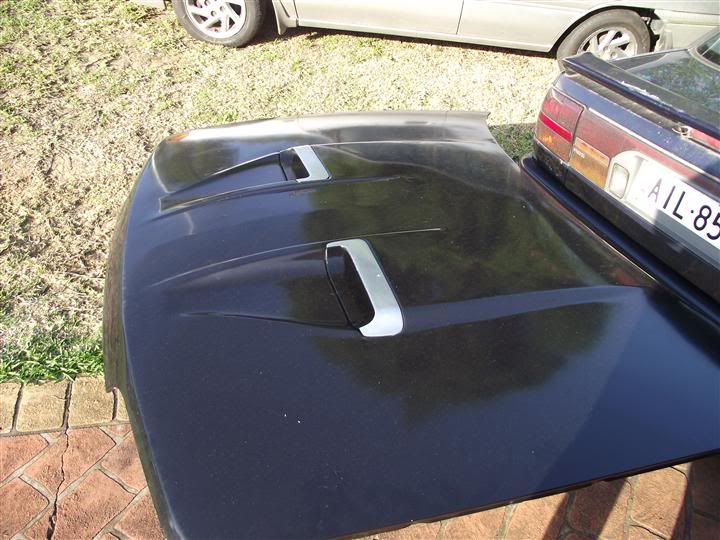 However, from very early on there was a bubble under the paint, that I believe was caused by a nasty bird leaving me a present while I was painting it. 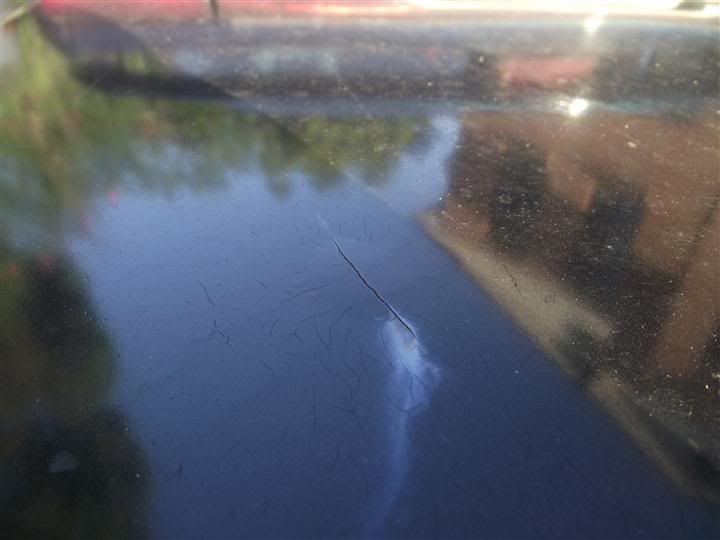 Also from early on it was obvious that I did not prep the edges of the bonnet very well at all. 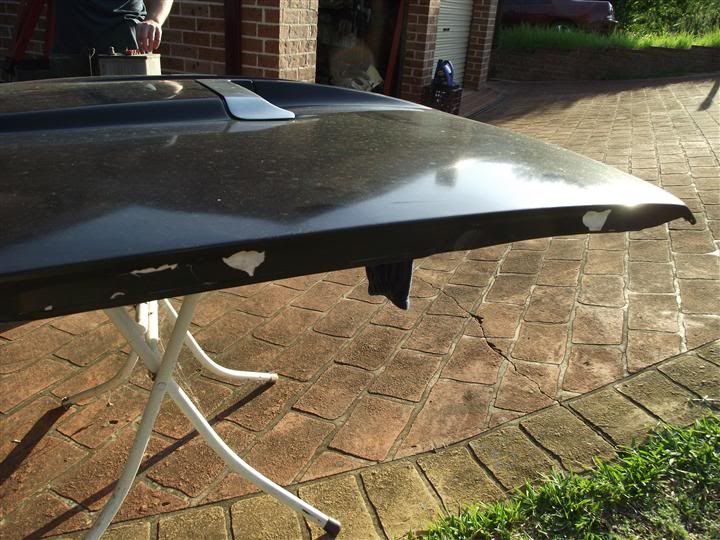 And more recently there has been some paint crazing. 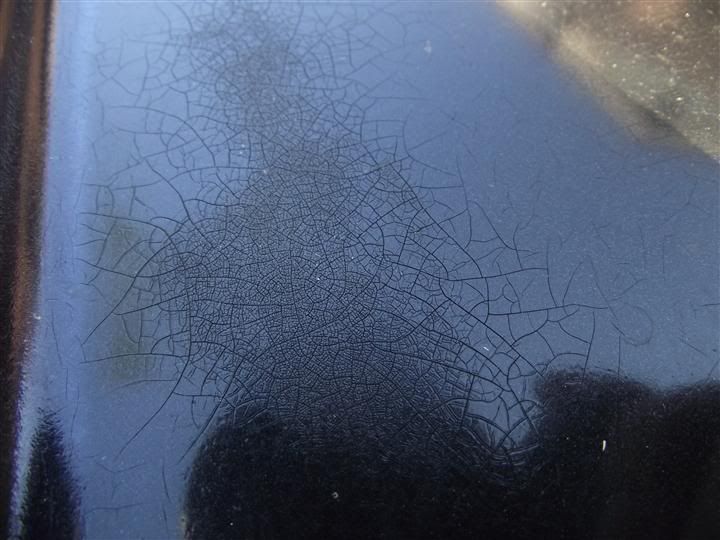 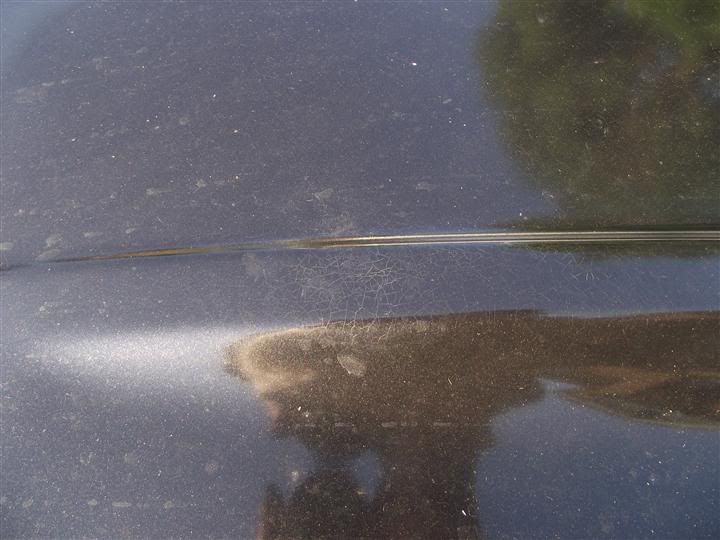 Other areas have also shown signs of heat and fatigue. 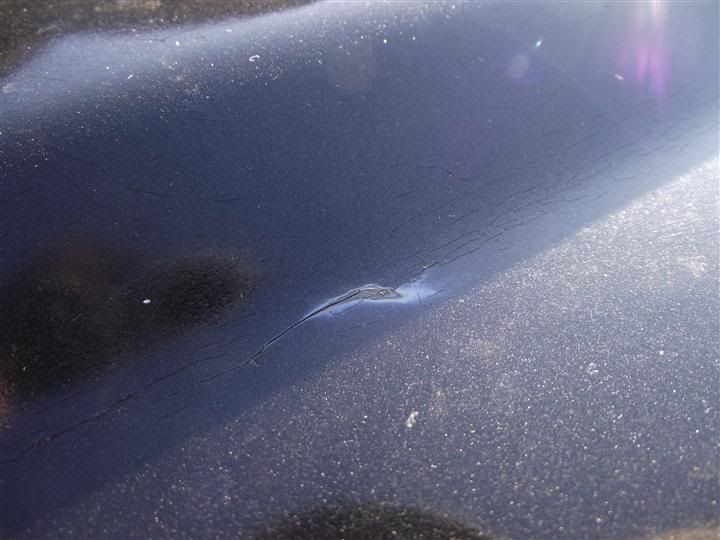 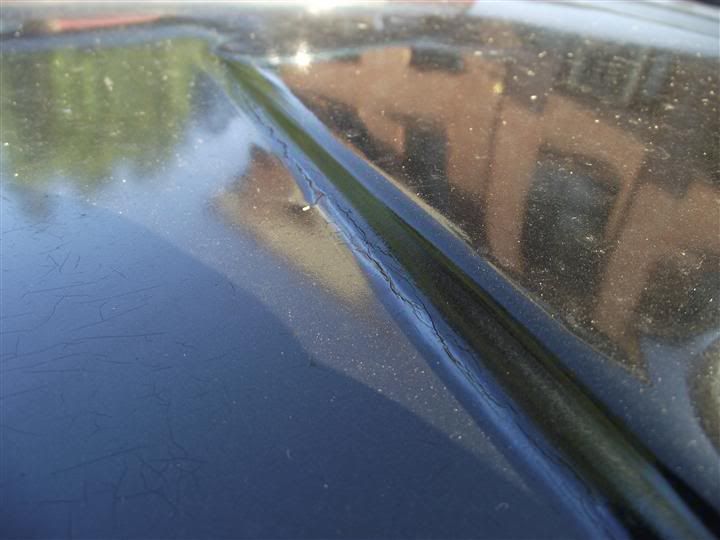 The most obvious area is here. 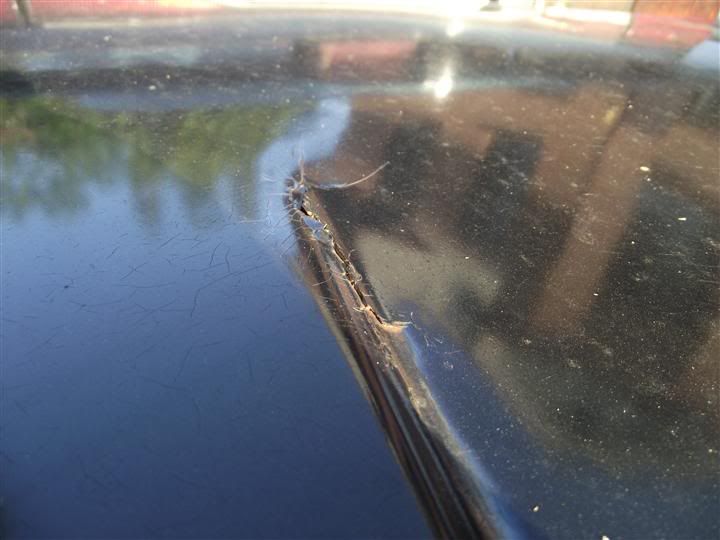 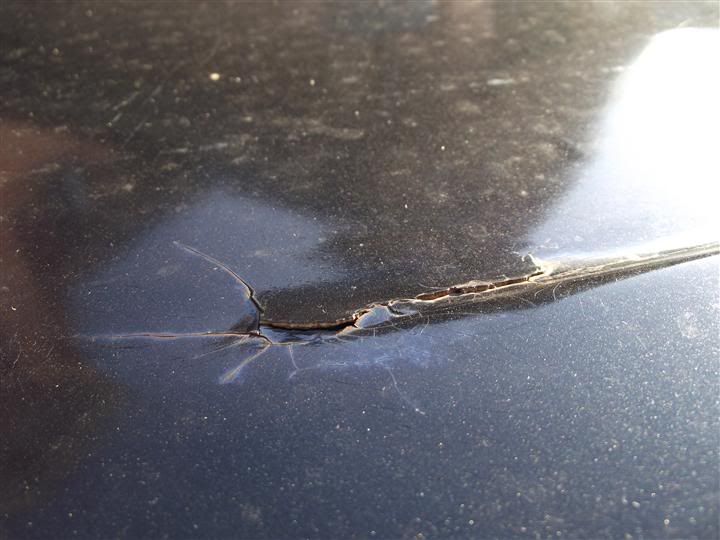 The plan is to sand back the entire bonnet, until the relevant areas are removed, and in some instances I will need to go back to bare metal. New filler will be applied, before I repaint the bonnet. Previously, I did not really look at the sides or underneath the bonnet. This time I want to make some small changes to the engine side as well. Some of the changes are just to tidy it all up, and others will be an attempt to do something about the heat and prevent repeat issues. Only time will tell if I have any success. Here is a photo of the bottom area of the bonnet. 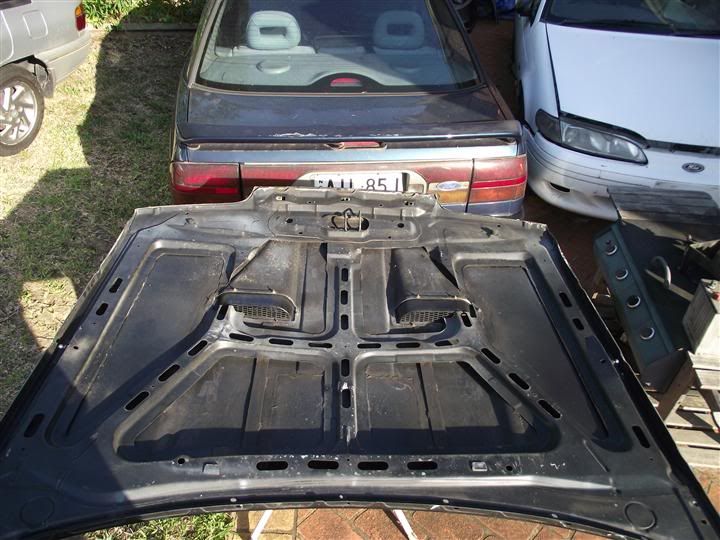 I want to make some filler panels for the areas between the supports, and may attach pieces of the std bonnet liner. The support structure near the bonnet vents I would like to trim a bit and weld in a cap. This photo gives an idea of what I mean. 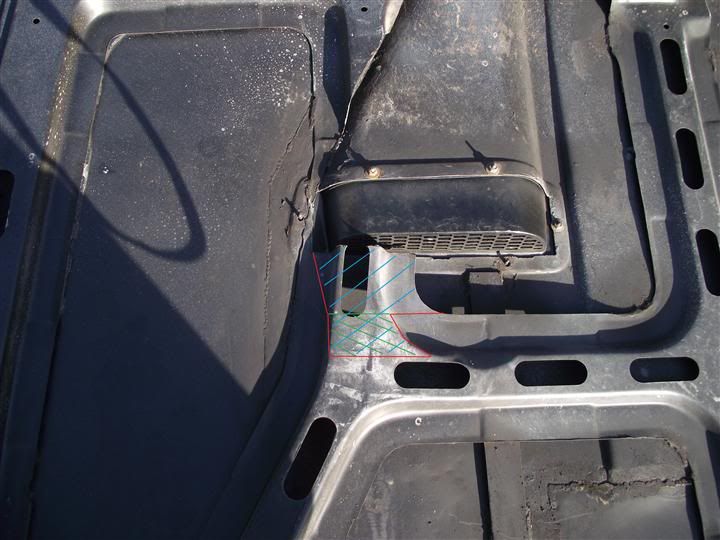 The red marks indicate where I want to cut, with the blue area being removed. The green lines show where I want to weld in a cap to tidy up that area. The final step will be to paint the entire area in body colour. Now, you may be wondering what I am going to use as a bonnet on the Wagon while I work on the GT one. I had originally thought I could use the Poly Green bonnet on the ED Ghia here, but, then the engine bay would be exposed to the weather, and, the wagon would look like crap. Then I started looking around for a cheap bonnet I could give very quick coat of paint, but there was not much available. Luckily for me, while on holidays in QLD, I noticed SVOMatt had put up a bonnet for sale. And the best part is that not only is it already Black Pearl, it has received the SWC touch. So for $50 I scored this. 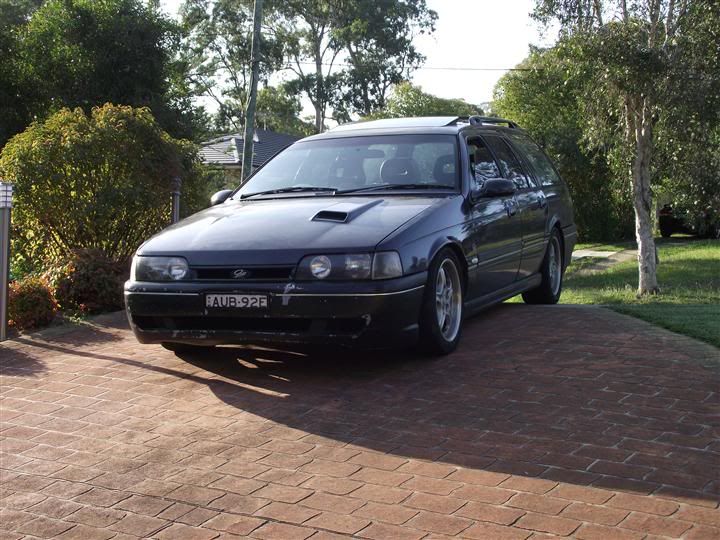 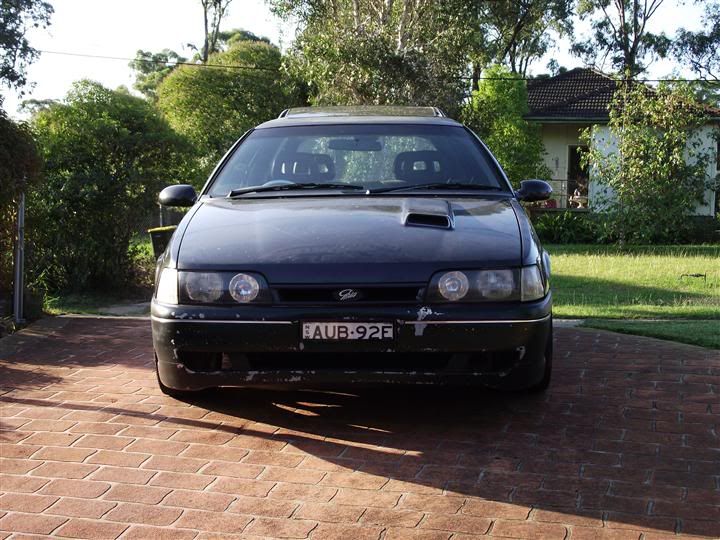 At least the Wagon will be getting around in style. Cheers BenJ
_________________ {DESCRIPTION} - Current Ride |
||
| Top | |
||
| Who is online |
|---|
Users browsing this forum: No registered users and 24 guests |