
|
| Rumble1983 |
|
||
|
G'day my 1995 beloved red ef falcon has been diagnosed with combustion gases getting into the coolant unfortunately
I'm quite the novice on mechanics but don't mind giving things a go if i have good instructions. I've seen this site regarding a replacement of a head gasket on an e series falcon and am semi-willing to give it a go. {DESCRIPTION} Are the combustion gases getting in to the coolant likely to be a gasket or cracked head? or i wont know until unbolting relevant parts? At the moment it seems scary to me taking this leap to fix it myself but if there's a better step by step tutorial out there with images it would definitely assist me to have the balls to give it a go |
||
| Top | |
||
| phongus |
|
|||
|
Have a read through this, might give you a heads up of what's involved.
fordmods-technical-documents-diy-f38/head-gasket-doco-t99962.html You probably won't know for sure until you pull the head off to check what is wrong with it. I would think head gasket blown at cylinders 5 and 6. If the head is cracked, I think you're better off finding a second hand motor and just dropping it in. It is risky though to buy a second hand motor. It isn't really a hard task to change the head gasket, just tedious. As long as you have a good set of tools available, it can be done over a weekend (not including getting the head checked/straightened). Give the document a read and if you feel confident, give it a go. If worse comes to worse and you can't finish the change over, tow it to the mechanic...either way you will tow it there if you do it yourself or not, but at least you can say you tried.
_________________ phongus = Post whore 2006 |
|||
| Top | |
|||
| Rumble1983 |
|
||
|
Awesome phongus, you have given me the motivation to give it a go. I will aim to get the tools required and begin the destruction of my beast by the weekend. I'll more then likely be back here to ask somewhat "dumb" questions i assume.
Thanks mate. |
||
| Top | |
||
| phongus |
|
|||
|
{USERNAME} wrote: Awesome phongus, you have given me the motivation to give it a go. I will aim to get the tools required and begin the destruction of my beast by the weekend. I'll more then likely be back here to ask somewhat "dumb" questions i assume. Thanks mate. No problem. All the best
_________________ phongus = Post whore 2006 |
|||
| Top | |
|||
| Rumble1983 |
|
||
|
G'day just an update and query on a few items as i worked on my ef 95 falcon today.
I have removed so far Air intake Thermo fans Belt cover Throttle cable Released the tension and took off the belt Power steering pump and bracket catalytic converter (i think) i took a photo of it just below  i then unbolted the Exhaust from the block (im trying to avoid getting under the car, is this ok left like it is?)  ive been reading your notes and doing everything you say to the tee until the exhaust and intake, because where you say its straight forward to someone like me it isn't lol. I then moved on to the intake manifold removing bolts wherever i could see them attached to the block but theres so many "parts" around the intake manifold i really cant identify the names of things with guide ie "TB" & "BBM" to remove, i ideally would like to just move it to the side like the exhaust manifold just to get to the head and see the problem. are you able to pin point things i need to remove to set aside the inlet manifold? thanks  Cheers, any other tips would be awesome as i'm as novice as they come |
||
| Top | |
||
| phongus |
|
|||
|
Looks like you're doing a good job there.
Firstly, the metallic looking cover that was over your exhaust manifold which I believe you called a catalytic converter...is in fact just a heat shield cover. The catalytic converter is further down the exhaust and forms part the exhaust system. Letting the exhaust hang like that is fine, if you want to be safe you can always help support it from underneath with a jack stand...to stop it from sagging. Intake manifold is held on by bolts along the top and bottom straight onto the head which you have already removed. It also has 2 support rods held by 2 bolts at the front and rear of the BroadBand Manifold (BBM)...a.k.a intake manifold. If you look under the BBM, you will see a support rod/beam that is connected to the engine block (not head). You can remove the bolt from the block or from the BBM, freeing it from the head. You can push it to the side just like the exhaust manifold. If you decide to remove the bolt off the BBM (ie leaving the rod attached to the block) you will have to do it by touch. From memory it is a 10mm nut and should be in a similar position as the front one which you can see sitting centred to the BBM if you look at it head on. Also TB = Throttle body...which has the air intake system connected to it. Also pictured in your photo of the intake manifold Another tip...probably best to get some zip lock bags or small plastic containers to put nuts/bolts in them for each part you remove. Better to have labelled bags/containers than a bucket full of nuts/bolts and not knowing where they go. Hope that helps. PS: Might need to update the file to include definitions...
_________________ phongus = Post whore 2006 |
|||
| Top | |
|||
| Rumble1983 |
|
||
|
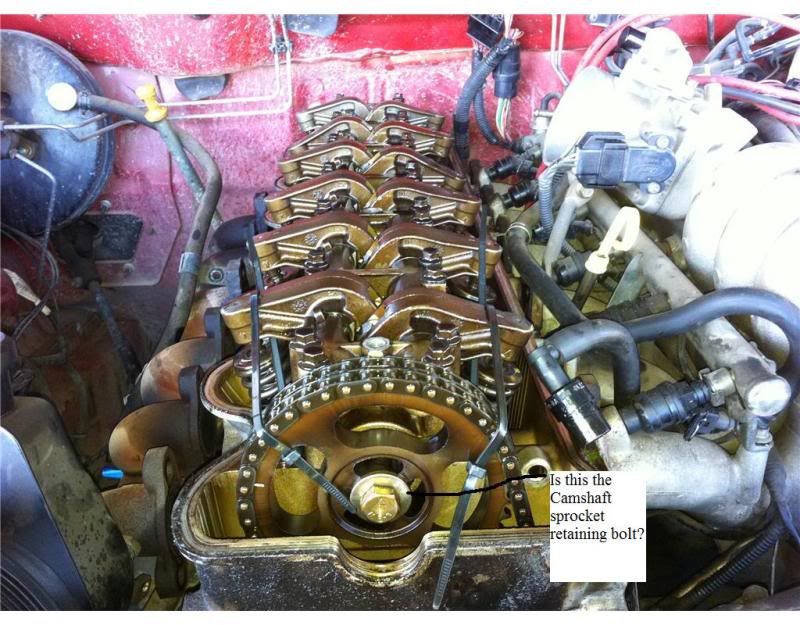
Gday again, I've spent a bit more time on my falcon and have some other questions regarding the camshaft sprocket retaining bolt and the removal of it.
Page 11 reads. You will need to crack the bolt first before you can remove it. A quick snap of the T-bar should crack the bolt open. I found doing this can cause the sprocket to move and I failed many times in trying, so I resorted in using another T-bar and jammed it through the top gap of the sprocket and using the rocker pedestal (the end of the rocker assembly) as a leverage to hold the sprocket still, worked just fine without any damages to the rocker pedestal. Remove the bolt completely and give it a good clean. The sprocket can now be removed from the camshaft. It should just slide off and you can just rest it against the head…but to be on the safe side, you can slide something through the sprocket hole and rest it against the mating surface of the head (be careful not to do any damages to the mating surfaces) to give a bit more tension on the chain. There have been stories where the chain has skipped a tooth on the bottom sprocket inside the timing case. I may have been lucky after just resting the chain on the head and using the guides to just hold it up. Sorry to be a pain but could you go into further detail as to what you mean here by snapping and cracking a bolt open. I can't make much sense of those two paragraphs I was able to remove the TCT and rotate the pulley to line up with the timing case, i used a 3/4 inch drive with 22mm socket to move the pulley. "camshaft sprocket marker should be level with the head, but 3mm above the head on the RIGHT hand side of the head" I haven't done this as it's a bit confusing, maybe another explanation would be great. I'm just struggling to identify parts and know where to look. Thanks again, oh and dismiss my silly cable ties attached to the camshaft. they're only supposed to be looped around the chain aren't they? 
|
||
| Top | |
||
| Krytox |
|
|||
|
marks are as noted.
Cracking the bolt just means Hold the sprocket with a steel iron, and hit the spanner on the sprocket bolt. they're not that tight.
_________________ Carefree, we may not be number one, but we're up there. |
|||
| Top | |
|||
| Rumble1983 |
|
||
|
Oh, i forgot to mention i got the intake manifold pretty much off, all the bolts barring i think one invisible at the back on a possible bar attached to the head which i think was in your notes. I couldn't spot or feel the sonofa
I've been bagging all the bolts and parts to help identifying things when i go to put it back together "if i get that far" I purchased a hydrolic jack and a pair of stands to assist my little project. Cheers |
||
| Top | |
||
| phongus |
|
|||
|
As krytox said, cracking the bolt is just giving the spanner/T-bar or whatever you're using to remove the bolt a good whack to give the bolt a rapid jolt. It may be necessary to push a spare T-bar or something through the sprocket hole and onto the pedestal to hold the camshaft sprocket steady. As mentioned above, the bolt isn't on that hard.
Also have a look at the picture posted up by krytox. The sprocket marker should on the right (when facing the engine...so passenger side of the head) as shown in the picture. Don't worry about the other markers in the image, since you are not going to remove the cam chain cover thing. Another thing, yes the cable ties are only meant to be around the sprocket and the chain...not the rocker arms and sprocket.
_________________ phongus = Post whore 2006 |
|||
| Top | |
|||
| Rumble1983 |
|
||
|
Thanks guys i understand now.
many many thanks |
||
| Top | |
||
| Rumble1983 |
|
||
|
Gday, back again.
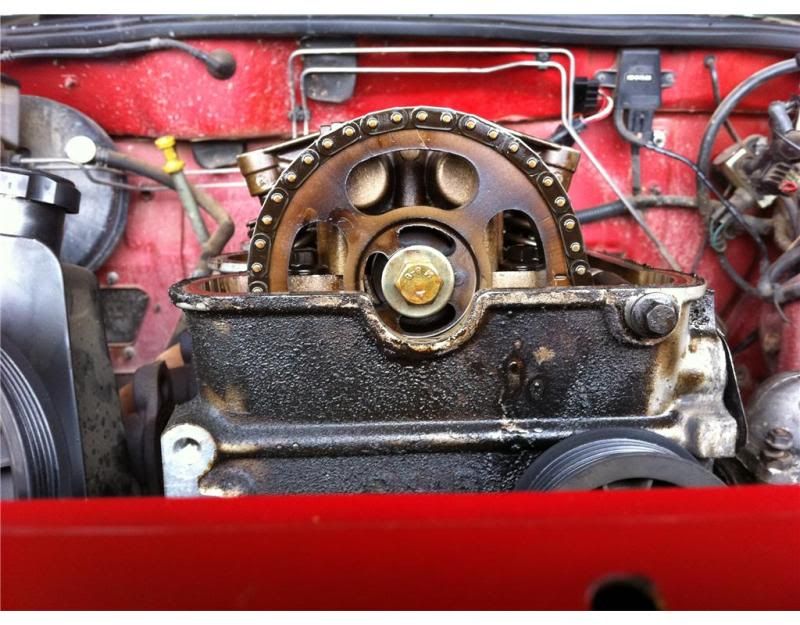
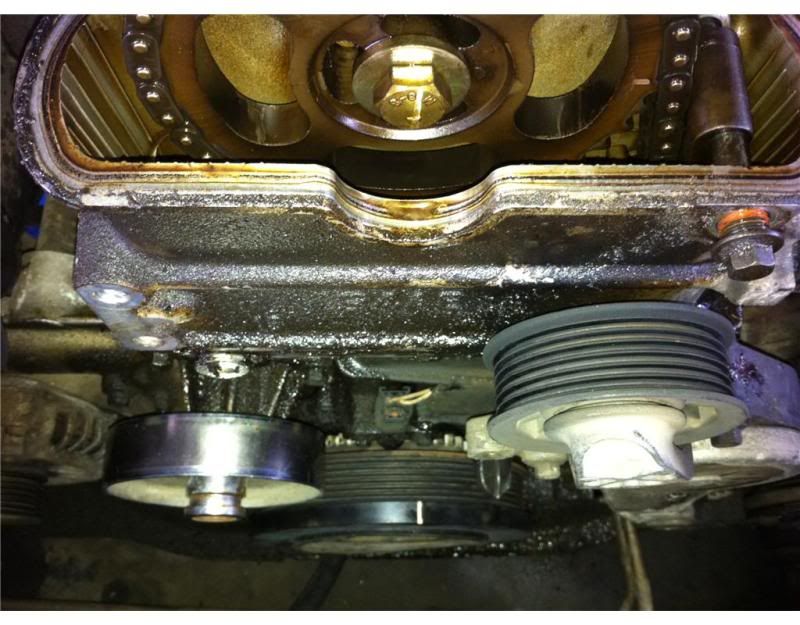
I'm having trouble matching up the camshaft sprocket marker with the crank marker. I've attached photo's to show the closest i could line them up, which is out a fair way. What should i do? is this a significant problem? is the timing screwed up in my vehicle? Also i'll note if turned the crank over probably 50x, of which i noticed by around 20-30 that it wasn't getting any closer and holding belief it was The markers get a lot closer to matching if the arrow was pointing to the left hand side of the head. I managed to get the intake manifold off remarkably, putting it back together especially putting on that rear bolt is going to be a whole other ball game. It took 1-2hrs i think for me to get that loose in the first place. I'll worry about that when the time comes   Hmm, I just re-read your post. Just confirming i need not worry about the other marker because I'm not going to remove the cam chain like you said? Just have the camshaft sprocket marker lining up above the head? Cheers |
||
| Top | |
||
| phongus |
|
|||
|
hmmm....that balancer marker is way off
By the way, don't forget to remove the chain guide bolt in the first picture before you remove the head, or else you will break the chain guide.
_________________ phongus = Post whore 2006 |
|||
| Top | |
|||
| bry40l |
|
|||
|
when all them markers are lined up where they are ment to be isnt number 1 cyl at tdc therefore if his balancer has slipped he can always check if number 1 cyl is top dead centre whether the balancer is lined up with the timing mark or not, once the numbr 1 cyl is tdc you can check the cam timing is where the lines ment to be regardless if the balancer has slipped
_________________ BF XR6 |
|||
| Top | |
|||
| SWC |
|
||
|
{USERNAME} wrote: when all them markers are lined up where they are ment to be isnt number 1 cyl at tdc therefore if his balancer has slipped he can always check if number 1 cyl is top dead centre whether the balancer is lined up with the timing mark or not, once the numbr 1 cyl is tdc you can check the cam timing is where the lines ment to be regardless if the balancer has slipped True, but if the balancer has slipped it means that it is on the way out and will only cause further issues at a later date. |
||
| Top | |
||
| Who is online |
|---|
Users browsing this forum: No registered users and 77 guests |