
|
| KWIKXR |
|
|||
|
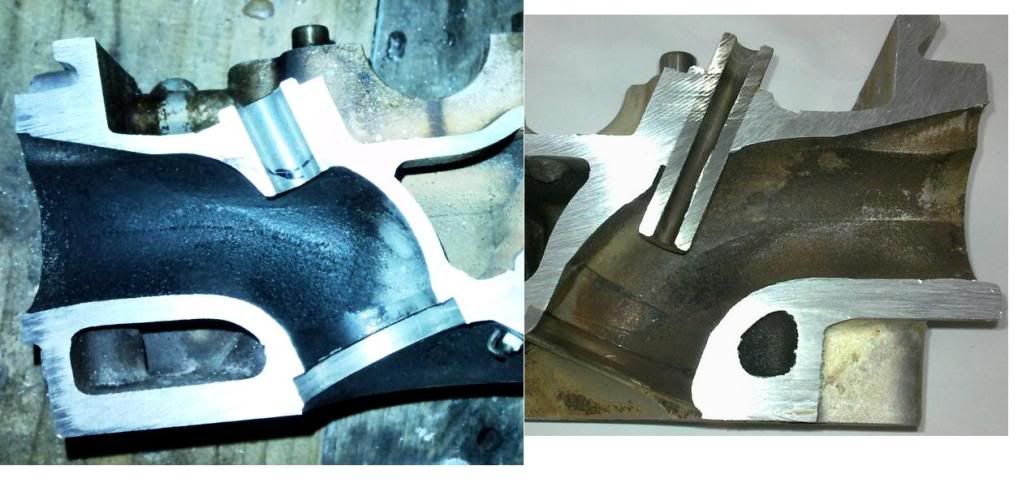
Nice one!! Those last three are the money shots for me, was very keen to see how much meat was under that short side.
Will be interesting to see what the more knowledgeable members will say about improving the exhaust side. |
|||
| Top | |
|||
| xcabbi |
|
||
|
Yep that's the head in question. Big thanks to hans hartman for sourcing the head and chopping it up for me. Also a big thanks to PK Head servicing for supplying the head in question.
|
||
| Top | |
||
| tickford_6 |
|
||
Posts: 6449 Joined: 11th Nov 2004 |
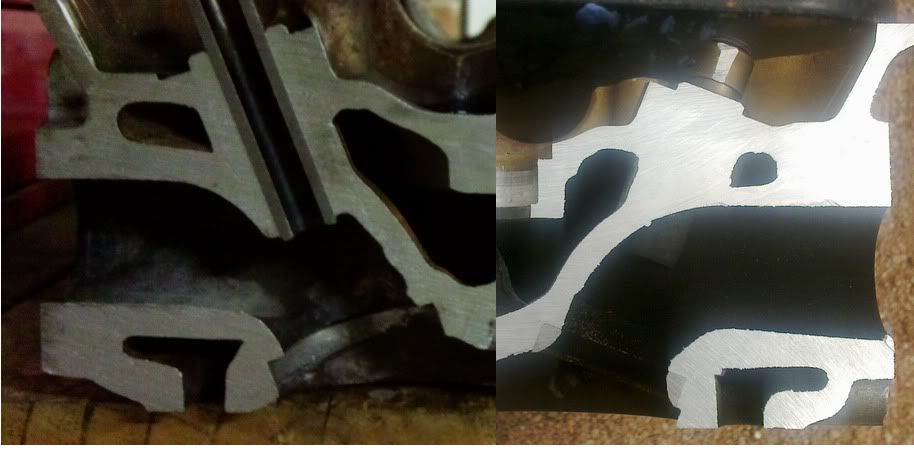
94AB intake port next to AU VCT intake port

|
||
| Top | |
||
| tickford_6 |
|
||
Posts: 6449 Joined: 11th Nov 2004 |
{USERNAME} wrote: Nice one!! Those last three are the money shots for me, was very keen to see how much meat was under that short side. Will be interesting to see what the more knowledgeable members will say about improving the exhaust side. For a start on the exhaust on that 94AB head. Smooth the transition from the steel seat to alloy port. Remove as much as posible the valve shrouding from the chamber Narrow and 'tear drop' the guide boss. Widen the area around the guide boss to have as little X-sectional area change as posible - while doing this you can releave the 'kink' next to the guide. 'Lay back' the short turn Polish the crap out of it and DO NOT GASKET MATCH THE PORT. leaving the step into the header creates an anti reversion effect. |
||
| Top | |
||
| gogetta |
|
|||
|
||||
| Top | |
|||
| tickford_6 |
|
||
Posts: 6449 Joined: 11th Nov 2004 |
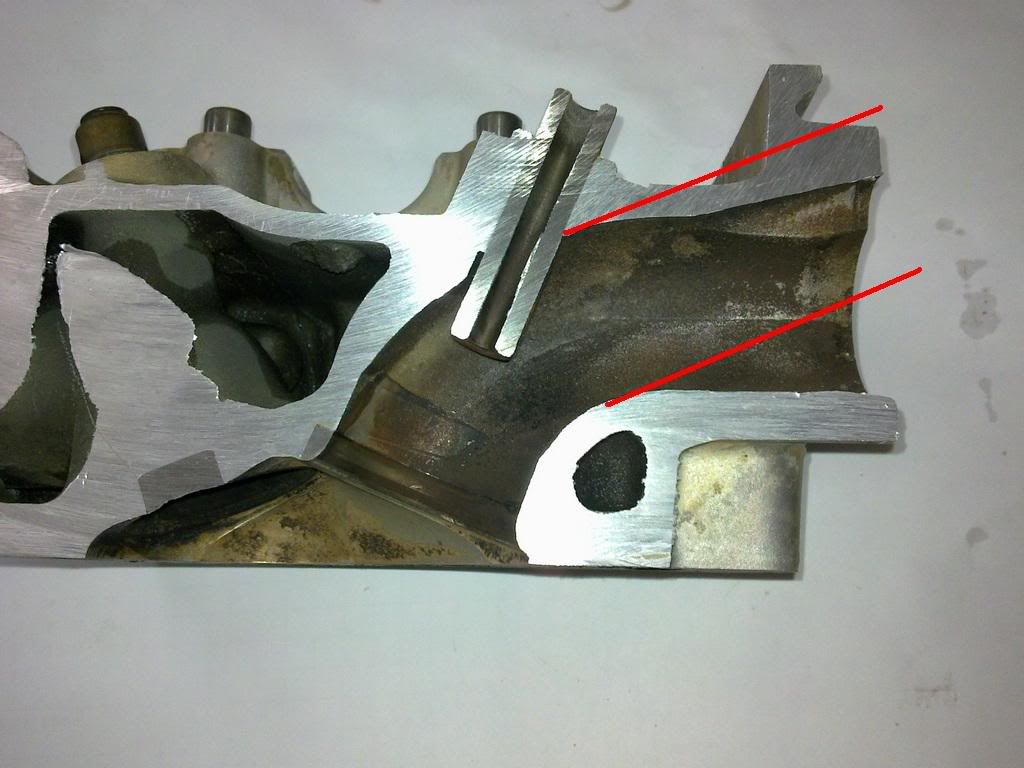
{USERNAME} wrote: the biggest gains come from "laying back the short turn"... just to clarify , would it look something like this on the intake? thats pretty much it. |
||
| Top | |
||
| tickford_6 |
|
||
Posts: 6449 Joined: 11th Nov 2004 |
 earlier in the thread i mad mention about 'down draughting' the intake port. It's not a new idea and has been done on many heads. In the above pic the head would be bored along the redline and an alloy sleave inserted and welded in, redirecting the port. the 90degree turn in the port is not good, no mater how generous the short turn radius is. there is enough metal there to raise the roof alot, with out inserts, the floor would be raised equal amounts by welding or using epoxy such as Devcon. I have used Devcon in port and manifolds a number of times, preparation is key. (not good for exhaust ports) |
||
| Top | |
||
| gogetta |
|
|||
|
yeah at work at the moment is chev 292 CI straight 6...it has an aftermarket "duggan" head on it and the ports are angled down like that...virtually straight at the valve....
the head is completely custom...owner claims close on 400rwhp this chev 6 is a monster...has 6 ITB's and is also backed by hollinger 6 speed...
_________________ |
|||
| Top | |
|||
| KWIKXR |
|
|||
|
{USERNAME} wrote: For a start on the exhaust on that 94AB head. Smooth the transition from the steel seat to alloy port. Remove as much as posible the valve shrouding from the chamber Narrow and 'tear drop' the guide boss. Widen the area around the guide boss to have as little X-sectional area change as posible - while doing this you can releave the 'kink' next to the guide. 'Lay back' the short turn Polish the crap out of it and DO NOT GASKET MATCH THE PORT. leaving the step into the header creates an anti reversion effect. Awesome!! Thanks for that tickford_6, that'll come in handy for tomorrow At the moment, i'm the blending the valve seats into the bowl, so once that is done i'll get onto those short turns and guide bosses. The exhaust ports i have already done so no problem-o there, just smoothed the casting dags back, ground the port smooth with a good sized stone and polished the ex. ports with a flapper wheel so they are pretty much the exact same size as stock Have also de-shrouded a bit, mostly around the intake valve and a little around the exhaust, but was a bit reluctant to take too much out after reading something that WagonDad mentioned in another thread. I have used an EF gasket to scribe the bore outline onto the head to mark out the area around the chambers as a guide. Apparently the AU gasket bores are slightly smaller (2mm IIRC) than the usual E-series gaskets i think, and WagonDad noticed the gasket sticking out into the chamber after de-shrouding using an EF gasket so that's something to consider when marking out the gasket bores on the head as a guide, use the AU gasket to mark your guide lines |
|||
| Top | |
|||
| Slick |
|
|||
|
This is what I'll like to try one day. the only problem with his a ideal is you gonna need ton's of JB welds to build up the port surface before reshaping it. either that take it for resurfacing by cold or hot spray wilding... if they can get it in the ports that is.
 
_________________ Mind f**k!!! it works on feeble minded ignorant sheeples... there's plenty of em on this site... some are very intelligent but by god they are so thick!!! {USERNAME} wrote: You can buy them seppertly
|
|||
| Top | |
|||
| Slick |
|
|||
|
{USERNAME} wrote:  earlier in the thread i mad mention about 'down draughting' the intake port. It's not a new idea and has been done on many heads. In the above pic the head would be bored along the redline and an alloy sleave inserted and welded in, redirecting the port. the 90degree turn in the port is not good, no mater how generous the short turn radius is. there is enough metal there to raise the roof alot, with out inserts, the floor would be raised equal amounts by welding or using epoxy such as Devcon. I have used Devcon in port and manifolds a number of times, preparation is key. (not good for exhaust ports) This should help others understand the concept a bit. 
_________________ Mind f**k!!! it works on feeble minded ignorant sheeples... there's plenty of em on this site... some are very intelligent but by god they are so thick!!! {USERNAME} wrote: You can buy them seppertly
|
|||
| Top | |
|||
| tickford_6 |
|
||
Posts: 6449 Joined: 11th Nov 2004 |
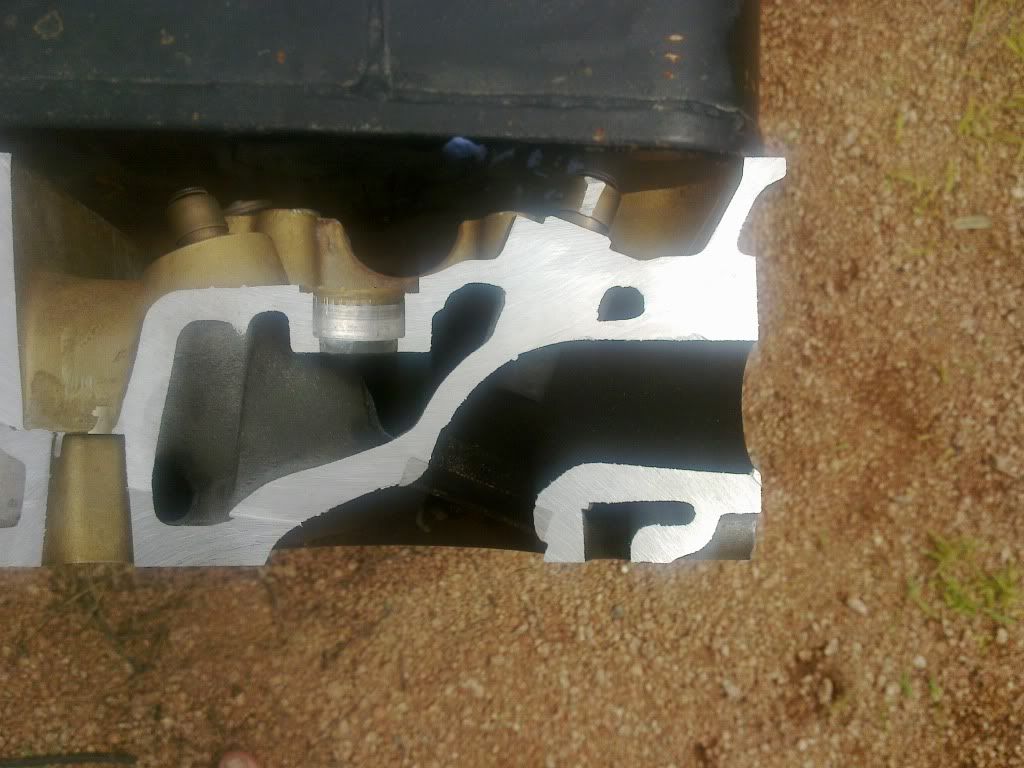
as promised the exhaust of an AU VCT head.
it has been cut through the center line of the port opening, not through the valve guide. the port is offset from the valve, cutting through the vlave guide was going to loose to much detail. I'm going to take this stuff to work and bead blast all of it. the carbon makes it hard to see.  94AB vs. AUVCT exhaust port.  EFXR6 valve spring next to AU valve spring  pre AU intake valve next to AU intake valve 
|
||
| Top | |
||
| cjh |
|
|||
|
[quote="tickford_6"]as promised the exhaust of an AU VCT head.
it has been cut through the center line of the port opening, not through the valve guide. the port is offset from the valve, cutting through the vlave guide was going to loose to much detail. I'm going to take this stuff to work and bead blast all of it. the carbon makes it hard to see.  94AB vs. AUVCT exhaust port. Looks like not much can be taken out in the top of the ex port on the AU VCT, eh?
_________________ http://youtu.be/jJTh9F3Vgg0 |
|||
| Top | |
|||
| galapogos01 |
|
|||
Posts: 1139 Joined: 27th Feb 2005 Ride: Supercharged EF Fairmont Location: T.I. Performance HQ |
Loving this thread. Would be great to see someone doing balls out heads for these things based on the knowledge here, bigger intake valves and the right port work to get them flow at least close to the DOHC. 190rwkw N/A (as per the DOHCs) would be fun!
_________________ {DESCRIPTION} - {DESCRIPTION}, {DESCRIPTION}, {DESCRIPTION}, {DESCRIPTION} and more! |
|||
| Top | |
|||
| Slick |
|
|||
|
Just by looking at the valve seat inserts there is enough meat there tap larger ones in, which I believe would require relieving the pistons as well for the extra large diameter intake valve.
can't do one without addressing the other I reckon. sorta like a domino effect process, it takes a lot of time to completely alter something that was restricted for emission purposes.
_________________ Mind f**k!!! it works on feeble minded ignorant sheeples... there's plenty of em on this site... some are very intelligent but by god they are so thick!!! {USERNAME} wrote: You can buy them seppertly
|
|||
| Top | |
|||
| Who is online |
|---|
Users browsing this forum: No registered users and 78 guests |