
|
| Moph |
|
|||
|
This has now been added online in the Technical Documents section. See here documents.php?d=75
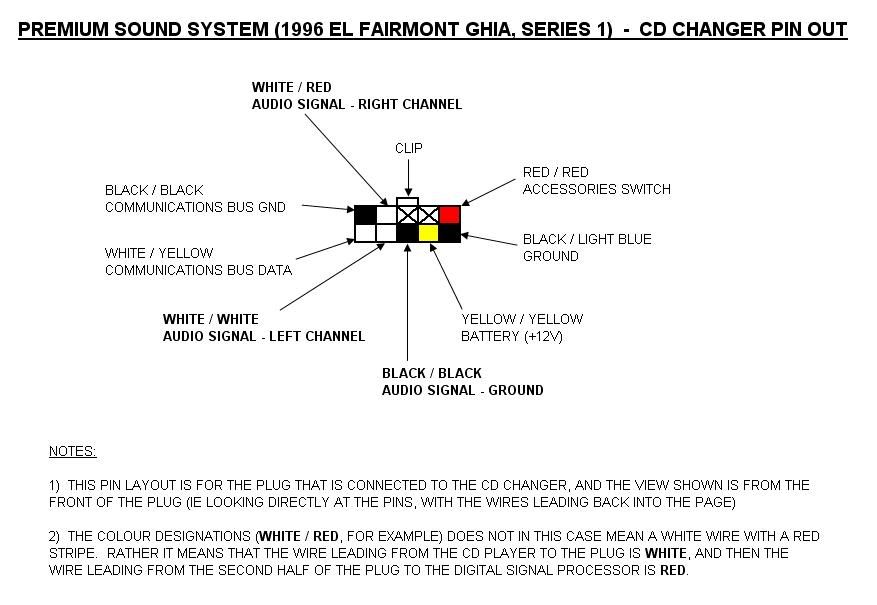
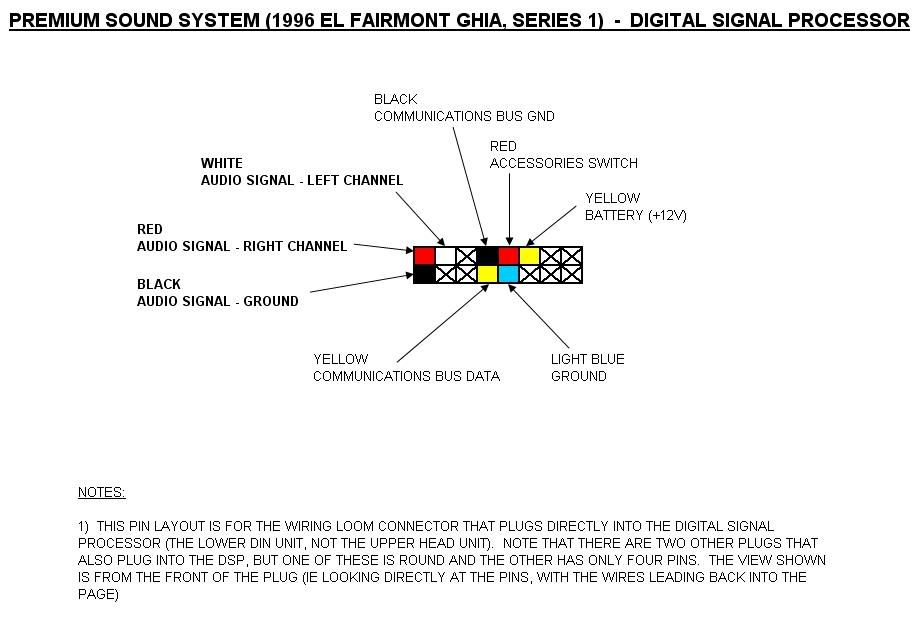
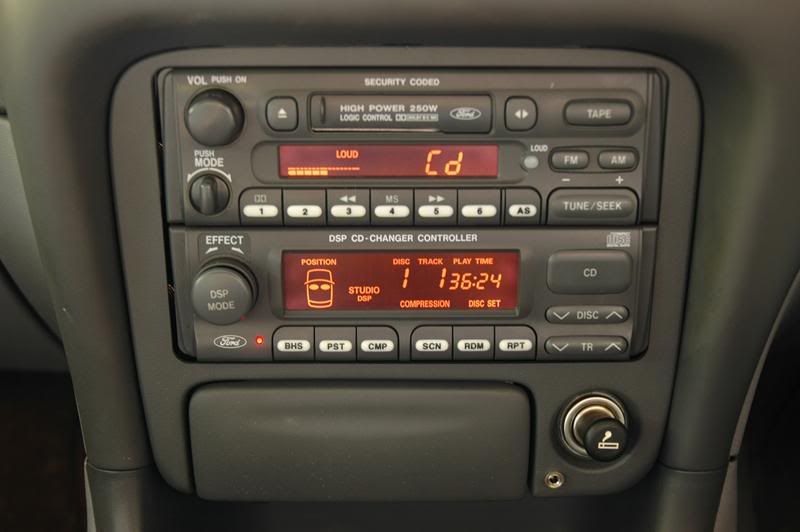
Big thanks to Moph for the effort!! DISCLAIMER: The following instructions are presented for information only. These instructions worked for my car, but be warned that you risk frying your Digital Signal Processor or CD stacker if you make a mistake or if your wiring loom differs from mine. ADD AN AUXILIARY INPUT TO YOUR PREMIUM SOUND SYSTEM WHY? The release of MP3 compatible head units have made boot mounted CD stackers pretty much obsolete, and many people choose to replace their standard factory stereo with an MP3 compatible CD player. But what if you like the premium head deck and Digital Signal Processor (DSP) that some EL’s are fitted with and would prefer not to replace it? WHAT? The answer is an iPod or portable MP3 player. I have a 1GB MP3 player that is slightly larger than a matchbox, plays 10 hours on a single rechargeable AAA battery, and takes only 6 minutes to upload 16 hours of high quality music from my computer. There are two ways by which an MP3 player can be used through the existing sound system. You could use an FM transmitter which plugs into the headphone port on the MP3 player and transmits the sound on an FM radio frequency, but these in most cases are horrible inventions that crackle, scratch and drift off frequency. The other option is to add an auxiliary input to the existing stereo system, so that you can plug the MP3 player into the stereo directly. This means no loss of sound quality, and is the option we’ll investigate below. HOW? The easiest way to add an additional input is to patch into the existing audio cables from the CD stacker. This can be done either in the boot or behind the DSP, or at any point along the wires connecting the two; it just depends where you want your auxiliary input to be placed. In my case, I wanted the MP3 player to plug into the dash next to the head unit, and therefore had to work out which wires leading into the DSP were the audio signals (left channel, right channel and signal ground) from the stacker. In order to identify the audio signal wires leading into the DSP, I pulled apart the in-boot CD stacker and was able to establish the pinout from the CD stacker. This is shown below for those who want to cut into the wires at this point and have their auxiliary input located in the boot.  I then chased the wires to the front of the car, behind the DSP, and the pin layout for the plug that inserts into the DSP is shown below.  To connect the auxiliary input, you need to cut into the existing Left Channel, Right Channel and Signal Ground wires, and join in a new stereo input plug. The standard wiring for a 2.5mm / 3.5mm stereo plug is as shown below, and this can be used to work out your connections to the auxiliary input socket.  Either an open socket or a switched socket can be used, but they are slightly different in the way they work as explained below. A switched socket is without doubt the more elegant solution, but in my case I was unable to obtain a switched socket that fitted my requirements. Switched Socket A switched socket actually switches inputs when an audio plug is inserted into the socket. Thus when no plug is in the socket, the CD stacker line in is connected to the DSP, and the auxiliary input is disconnected. When a plug is then inserted, the CD stacker line in is disconnected and the auxiliary input is connected. This means that you only ever have one set of audio signals going to the DSP at a time, and therefore you will never hear the auxiliary input overlaid on the CD stacker output. An example of a 3.5mm switched stereo socket is Jaycar PS-0133 ($1.00). Open Socket If you use an open socket connector, both the CD stacker and the auxiliary input will be connected at the same time. Thus if you have a CD playing and your MP3 player connected to the auxiliary input, then you will hear both tracks playing at once, overlaid on each other. An interesting effect, but not what we’re after!!! Originally I had hoped that the pause function on the CD player (hit the CD button while one is playing to pause / play) would simply pause the CD, allowing the MP3 player to be heard on its own. Unfortunately the pause function also mutes the stereo, so that the MP3 player cannot be heard either! The solution is to use your computer to burn a CD which has a single, completely silent track. I used Nero Wave Editor (NWE) to record 30 seconds of sound while I had my computer’s microphone unplugged, which gave me a silent track. I then used NWE to copy and paste this 30 second audio clip a number of times until I had a 70 minute blank audio file. I then saved this as a .wav and used Windows Media Player to burn it to CD. I have this CD permanently located in the Disc 1 position in my stacker, and whenever I want to use the MP3 player I simply set the stacker on Disc 1. The sound coming from the stacker and the MP3 player are still overlaid, only the sound coming from the stacker is silence. The socket I used is a 3.5mm open stereo chassis socket, Jaycar PS-0132 ($1.60). WHERE? I installed the Jaycar PS-0132 socket just below the cigarette lighter socket and slightly to the left, as shown in the photo below. This socket requires a 6mm diameter hole, but make sure that you start off with a smaller drill bit (say 3mm), then slightly larger (say 4.5mm), and then either a 5mm or 5.5mm before using the 6mm drill bit. The 3mm drill bit allows you to accurately position the pilot hole, and then increasing in size in a couple of steps avoids tearing around the edges of the hole, resulting in a neat finish. Also, make sure that you do not use too many revs on the drill or the drill bit will heat up, melting the plastic nicely …  The plastic surround is a little too thick for this stereo socket to protrude properly, so I used a hot soldering iron with a chisel tip to *carefully* melt away some of the plastic on the non-visible side of the surround, thinning out the plastic in that area. Note that the socket must protrude sufficiently for the plug to go all the way into the socket, or you will have contacts breaching across the insulators on the plug and may end up with only one channel working, no channels working or other weird effects. USING IT Obtain a stereo cable that has the required plug to fit your MP3 player on one end (either 2.5mm or 3.5mm), and the correct plug to fit your auxiliary input socket on the other end (I recommend you use a 3.5mm socket as they are much sturdier). Plug one end into your MP3 player and the other into your new auxiliary input socket. Press “CD� on the car stereo. If you’ve used a switched socket, you’re up and away! If you’ve used an open socket, select “Disc 1� on the stacker, and set the player to “Repeat Disc�. Then press play on your MP3 player, and digital tunes will start cranking!
_________________ Elly - '96 EL Fairmont Ghia] |
|||
| Top | |
|||
| Andrew J |
|
|||
|
Nice article! Brad might even make it a techinical document. Bit dodgy with the cd, but it looks good! Would it be possible to remove power from the stacker instead with a switch, allowing the MP3 player to do as it wishes?
_________________ The problem with America is stupidity. I'm not saying there should be a capital punishment for stupidity, but why don't we just take the safety labels off of everything and let the problem solve itself?
|
|||
| Top | |
|||
| Happy |
|
|||
|
beatiful mate ... what are the chances of something similar for the EF series of permo sound???
_________________ Owning 1 of 67612 EF GLi Sedans made
|
|||
| Top | |
|||
| uglybob |
|
|||
|
{USERNAME} wrote: beatiful mate ... what are the chances of something similar for the EF series of permo sound???
surely they can't be too dis-similar?
_________________ R.I.P. Scotty |
|||
| Top | |
|||
| Andrew J |
|
|||
|
Permo sound? Whats that? Are you not previewing your posts gregory?
_________________ The problem with America is stupidity. I'm not saying there should be a capital punishment for stupidity, but why don't we just take the safety labels off of everything and let the problem solve itself?
|
|||
| Top | |
|||
| Trick Flow EL |
|
|||
|
Nicely done there Moph!
Well done!
_________________ EL2 XR8 Auto 13.64 @ 100.76 MPH with a 2.05 60ft. Now sold! |
|||
| Top | |
|||
| Happy |
|
|||
|
certainly is .. and for a very first post you've left yourself big shoes to ifll for your next one lol ... I said my car was finished but I've now got one more mod to do - hook up my iriver with this setup!!
_________________ Owning 1 of 67612 EF GLi Sedans made
|
|||
| Top | |
|||
| Moph |
|
|||
|
Thanks for the positive feedback
AndrewJ ... the EL uses an Alpine stacker and amp. The significant thing about this is that it uses the Alpine bus system to communicate with the stacker, and the moment that the stacker is powered down, the DSP brings up a "CD Err" msg or similar. So there's no way around it but to have the stacker up and running, and then just cut in your own audio feed. I was initially hoping that the CD pause function would do the job as this would have been really neat, but Alpine have done too thorough a design with their head unit Happy ... I only have the EL, but I would suggest that the EF may well be similar. Going out on a limb, I would think that any Ford Falcon models that (1) have a double DIN premium stereo that looks the same as in my photo; and (2) have plugs and wiring colouring the same as I've detailed, would work. The easiest way is to check the CD stacker plug, as you can see this by just dropping the rear seat forward. I believe that Ford did play around with several different stackers across the EF-ELs, with some having a round plug. If so, you'd need to do some tracking of your own to work out the pin config.
_________________ Elly - '96 EL Fairmont Ghia] |
|||
| Top | |
|||
| Happy |
|
|||
|
mine has a round plug yes which goes into the stacker ... exactly how do you go about finding out which wire does what. At a guess I would say it maybe very similar to the example you used above - just a different shaped plug ?
_________________ Owning 1 of 67612 EF GLi Sedans made
|
|||
| Top | |
|||
| Moph |
|
|||
|
PS AndrewJ ... if you use the switched stereo socket, then there is no dodgy CD required. The switched stereo socket does all the switching required. When you plug in your MP3 player, the sound from the CD stacker will automatically be cut and the MP3 player will be fed through to the stereo, although admittedly the display will continue to show the CD playing. Nothing I could do about that sorry!!
I will be pulling mine apart and changing it to a switched socket as soon as I find one that is a chassis mount. Chassis mount ones have the nice screw-on bezel, whereas the only switched sockets I could find were PCB mount, and just have a plastic socket. By the way, the actual mod only took about two hours (remove stereo shroud, remove head unit / DSP, splice new wires in, solder socket, drill hole in surround, reinstall all). It was the five hours that it took to chase down the pin configs that was the killer!!
_________________ Elly - '96 EL Fairmont Ghia] |
|||
| Top | |
|||
| Happy |
|
|||
|
how many poles does the switch need to have - I'll see if I can find anything ?
_________________ Owning 1 of 67612 EF GLi Sedans made
|
|||
| Top | |
|||
| Moph |
|
|||
|
Happy,
The best way of working out what pinout you have is to pull apart the stacker. Don't panic ... mine was very easy to get back together again! The stacker should be attached to the bracket via four Torx screws (the weird ones with six points which Ford seem to love). Remove it from there and dismantle the rest inside where you won't lose any screws. Mine had 8 - 10 small Phillips head screws around the outside ... remove these and the shroud around the top, sides and rear will lift off. You can now see the guts of the stacker. Follow the path of the wires that lead into the stacker. If it's like mine, they will all connect onto a small PCB that clips onto the main PCB via a small connector. Alpine were thoughful enough to print the pinouts on this small PCB. If you can get at the PCB without stripping it down any further, then great. I had to flip mine over and remove four retaining screws from the bottom of the stacker. This releases the entire stacker mechanism from the case. The front panel of the case should just slip off ... give it a bit of a wriggle. You can then lift the mechanism out which will let you get at the small PCB. By the way, the mechanism holds together as a unit pretty well, so don't stress about things springing out of place. Once you can get at the small PCB, disconnect it from the main mechanism. You then need to use a multimeter to track the pins on the round connector back to the plug. I presume you know how to do this? Let me know if you don't, and I can explain. This will let you draw a pinout diagram like I have for mine, as you can read the functions of the various wires off the small PCB. I presume that the connection to the DSP is the same as mine ... if it looks at all different though, with a different connector or different coloured wires to what I have shown, then a bit more work might be necessary. Let us know how you go ... an EF pinout would make this article all the more useful! Cheers, Tim
_________________ Elly - '96 EL Fairmont Ghia] |
|||
| Top | |
|||
| Moph |
|
|||
|
It would be a double pole, double throw, I think. It should have five solder legs ... one for the common ground (non-switched), one pair for the CD left and right, and one pair going to the left and right channel inputs to the DSP.
_________________ Elly - '96 EL Fairmont Ghia] |
|||
| Top | |
|||
| Moph |
|
|||
|
NOTE FOR EF OWNERS:
Have done some more research on the Web, and it seems like even though the stacker is different (round plug not rectangular), the DSP is the same. So if you want to have your auxiliary input near the deck then you don't have to worry about what the pinout on the CD stacker is, because *the connector that attaches to the DSP will be the same as shown above for the EL*. Thus you can still cut into the wires leading into the pins shown and it will work perfectly. Cheers, Tim
_________________ Elly - '96 EL Fairmont Ghia] |
|||
| Top | |
|||
| Happy |
|
|||
|
so all we need to do is find an asthetically pleasing DPDT 5pole 2 position switch ?
_________________ Owning 1 of 67612 EF GLi Sedans made
|
|||
| Top | |
|||
| Who is online |
|---|
Users browsing this forum: No registered users and 13 guests |