

|
| XR-Lane |
|
|||
|
So is there Blanked out holes in the floor or at the bottom of the pillars or did you need to drill holes for this?
cheers |
|||
| Top | |
|||
| BenJ |
|
||
|
{USERNAME} wrote: So is there Blanked out holes in the floor or at the bottom of the pillars or did you need to drill holes for this? cheers Patience young Master. All will be revealed. Cheers BenJ
_________________ {DESCRIPTION} - Current Ride |
||
| Top | |
||
| XR-Lane |
|
|||
|
What was I thinking, this is a BenJ thread after all, Ill check back later |
|||
| Top | |
|||
| fiend |
|
|||
|
Do I detect some dents in the roof just back from the window? Hmmm... They could have been there already mind you --- I know mine has dents there from using the roof racks... Silly bloody roof rack design....
Good stuff though BenJ. I'd follow suit, but that would run clearance issues with my 15" LCD monitor from the roof install. Have spent the last five minutes trying to figure it out, it is impossible. Got sideskirts yet? |
|||
| Top | |
|||
| KWIKXR |
|
|||
|
Looks the goods there BenJ, sunroofs are wonderful things aren't they
Wish i had a sunroof in my EF. Even if i had one laying around, i still dont think id be game enough to go and cut a massive hole out of the roof |
|||
| Top | |
|||
| BenJ |
|
||
|
Thanks all for the kind comments.
Fiend, Yep, plenty of dents in the roof, which were there when I purchased it. ************************************************************ After getting home, a good 45min drive, two things needed to be completed before calling it a day. Step 7 - Drainage This style of sunroof is designed to allow water past the sides of the glass and into the cassette. From each corner a drainage pipe is situated to allow the water to drain away. I went to my local Bunnings and grabbed some 10mm tubing. This tubing was then fed down the A Pillars at the front, and exits through an unused grommet near the front door hinges, and the C Pillars at the back, out over the wheel and through a spare grommet. Lucky we did that yesterday, as it has rained most of today. I am happy to report the drainage system works well. One word of advice however, is if your car is wet, don't tilt up the back of the sunroof and then reverse up a steep driveway. My shirt is still wet. LOL. I only have pics of the front tubing, and where it exits. There rear exit is hidden up under the car. 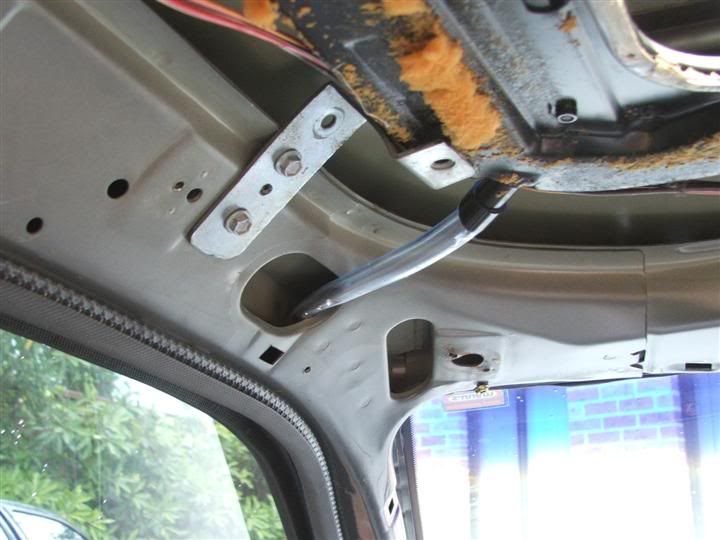 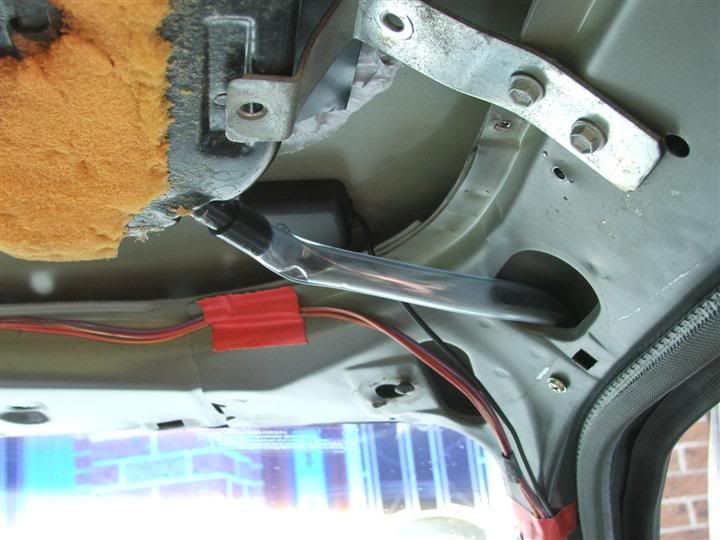 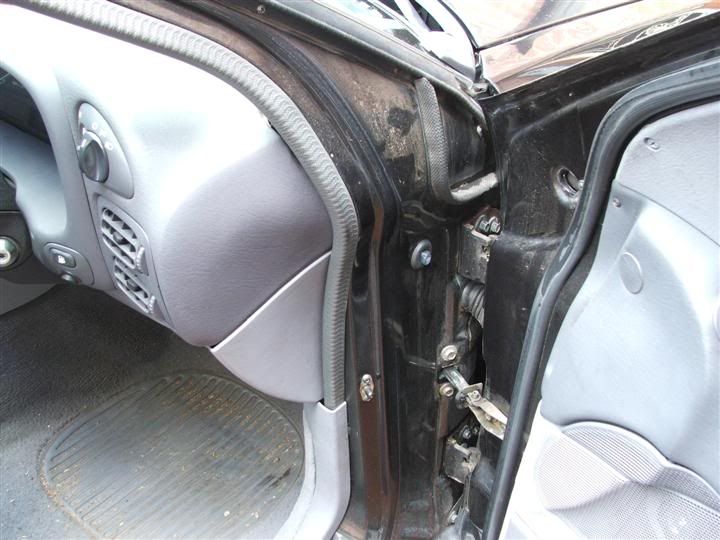 Step 8 -Wiring The factory wiring has three wires. The first is constant 12V, the second is ACC and the third is the smartlock sense wire, which signals the auto close feature of the sunroof when you lock your car. I decided to not to hook up the ACC and instead supplied it constant 12v too. This allows the sunroof to be operated from within the car, without the need for the keys to be in the ignition. I used an inline fuse, just to be safe, and I also plan to relocate the switch from the roof mount position to a dash or console location, as it interferes with where my AU map lights will mount. No pics of the wiring at this stage. ******************************************************** Once the above steps are completed, the sunroof is installed, secured, won't let water in and will open and close etc. The last major step is the hood lining. I was hoping to mod the existing hood lining, but initial trial fittings have proved that while it will be possible for a temporary solution, it is not a long term option. Yes, SWC, you were right. I might actually have to spend some dollars on this installation. I also have adjusted the normally closed position of the rear of the sunroof so it sits a bit higher. I still have to finish trimming the roof hole edges with a Dremel, and then fit the roof trim piece. Cheers BenJ
_________________ {DESCRIPTION} - Current Ride |
||
| Top | |
||
| fourL6 |
|
|||
|
{USERNAME} wrote: One word of advice however, is if your car is wet, don't tilt up the back of the sunroof and then reverse up a steep driveway. My shirt is still wet. LOL. I also plan to relocate the switch from the roof mount position to a dash or console location, as it interferes with where my AU map lights will mount. could only imagine the water coming in lol, and with the mapping lights, is there enough room to mount the switch in the middle of them? even if there is it probably still more convenient to have it on your dash somewhere... I wondered why this thread had only had 3 posts but 181 views today... great effort benJ Cheers Cam
_________________ Was - {DESCRIPTION} |
|||
| Top | |
|||
| racedirector |
|
|||
Age: 63 Posts: 1584 Joined: 20th Mar 2005 Ride: EDL Fairmont Wagon/AU XR8 Ghia Location: Riverstone |
So Ben - "I can see the sky now" - J, you finally did it! Great job matey and well done to the rest of the crew. Musta been scary drilling that first hole!
Oh, and had to chuckle at the water down the back trick, now that would have been funny to witness Cheers RD
_________________ =1994 ED Wagon GLi body/EL Fairmont spec with *ALL* EL running gear.= |
|||
| Top | |
|||
| BenJ |
|
||
|
After a couple of wet days, the weather dried up enough yesterday afternoon for me to break out the Dremel and a couple of Reinforced Fibreglass Cutting Discs.
I trimmed the roof cut out even with the edge of the cassette frame. This created a flush finish that allowed me to install the Rubber Roof Trim. Now the Sunroof looks finished externally. In addition, adding the Trim has reduced the wind noise to a negligible level when in the normally closed position. I want to make some final adjustments to the glass and move it rearwards approx 1mm, to even out the front and rear gaps. A couple of pics. Yes, it needs a wash. LOL It HAS been raining. 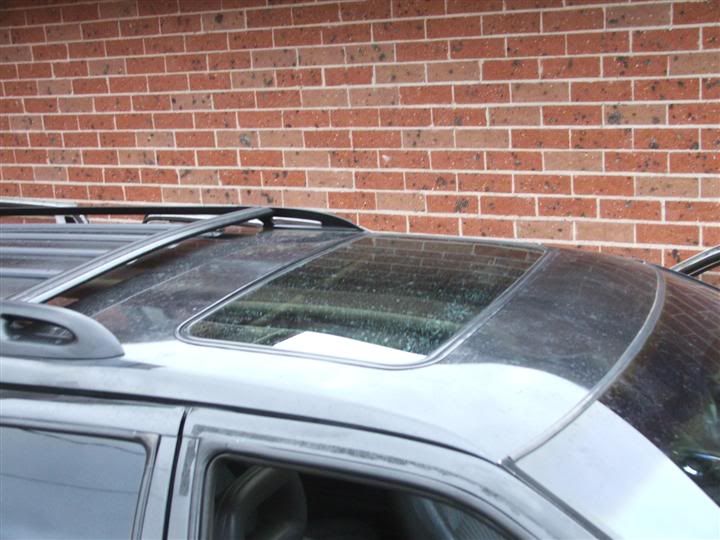 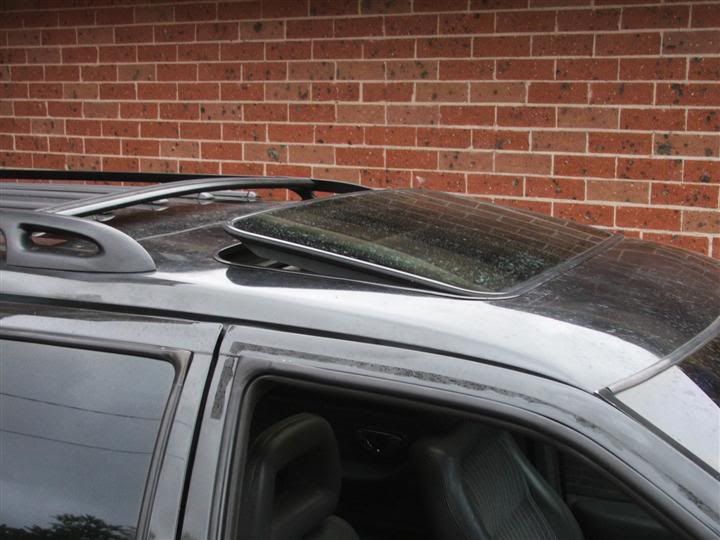 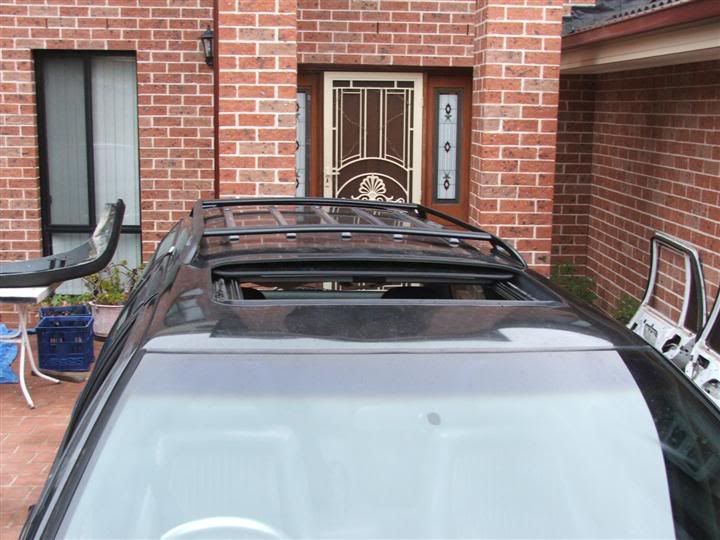 Cheers BenJ
_________________ {DESCRIPTION} - Current Ride |
||
| Top | |
||
| Mar55s |
|
|||
|
Excellent work!! Looks mad!! and by the looks of the Background... "Another bar bites the dust"
|
|||
| Top | |
|||
| easpak91 |
|
|||
|
Nice work BenJ thought i would bring this to your attention, with the tubing make sure it has a high heat resistance or make sure the tubing has no kinks...as a friend of mine had installed a sunroof just as you did and found out the hard way....to cut a long story short when tempreture rises the tubing gets soft and any slight kinks become major kinks and close the opening of the tubing and when tubing cools it stays in that formation thus creating blockages or restricts the drainage flow.
Keep on modding......
_________________ WHO EVER SAID "TWOS COMPANY THREES A CROWD" OBVIOUSLY NEVER HAD A THREESOME |
|||
| Top | |
|||
| BenJ |
|
||
|
{USERNAME} wrote: Excellent work!! Looks mad!! and by the looks of the Background... "Another bar bites the dust" Thanks Mate. That 'Bar' is the BA Bar waiting for me to paint it. {USERNAME} wrote: Nice work BenJ thought i would bring this to your attention, with the tubing make sure it has a high heat resistance or make sure the tubing has no kinks...as a friend of mine had installed a sunroof just as you did and found out the hard way....to cut a long story short when tempreture rises the tubing gets soft and any slight kinks become major kinks and close the opening of the tubing and when tubing cools it stays in that formation thus creating blockages or restricts the drainage flow. Keep on modding...... Ahhh, now that I believe is a very valid point. There is one kink I am concerned about, but have an idea on how to remedy it. And yes, the modding will keep happening. Cheers BenJ
_________________ {DESCRIPTION} - Current Ride |
||
| Top | |
||
| Mar55s |
|
|||
|
{USERNAME} wrote: Thanks Mate. That 'Bar' is the BA Bar waiting for me to paint it. BenJ Ah!! Good times |
|||
| Top | |
|||
| XR-Lane |
|
|||
|
Look great from the outside now buddy.
So the EB bumper is back on at present? |
|||
| Top | |
|||
| Papa Smurf |
|
||
|
Ben, I love all the work you have done to your wagon.
Last edited by Papa Smurf on Mon Nov 09, 2009 9:16 pm, edited 1 time in total. |
||
| Top | |
||
| Who is online |
|---|
Users browsing this forum: Majestic-12 [Bot] and 22 guests |