

|
| fiend |
|
|||
|
{USERNAME} wrote: It is fun to drive again! And that is worth a ton of money in my book. BenJ It is fun to drive. That is worth a ton of money in LPG or PETROL terms. It is also fun to do burnouts. That is worth a ton of money in my book. |
|||
| Top | |
|||
| BenJ |
|
||
|
Whoooo, what a weekend.
Everything happening, all at once. Saturday I finally got some time to change the wheel bearings. It appears that I installed the seal backwards when I put the bearings in last time. The reason I did this, is the old seals were installed that way in the rotors I removed from the Wagon. So I plead ignorance, and not stupidity for such an elementary error. The car drives nice and quiet now. YAY!!!! Snap0964 was also visiting this weekend, and we did a bit of diagnosis on the LPG. We proved that gas was getting to the Lockoff valve, and that the Lockoff valve was working. We also established that no gas was getting through the convertor, leaving only one conclusion. The convertor was inoperative. I removed the convertor from the car as the ever resourceful Snap had the forsight to bring along an IMPCO convertor rebuild kit. So while Snap set about rebuilding it, I headed over to MRE-50L's place to have the bonnet cut and polished. And then it rained!!! We used 1200 wet and dry, in the rain (no hose needed really) to cut the clear back. The issue we were having was finding a dry spell suitable to buff the bonnet. After some discussion, it was decided to buff the bonnet while we had a break in the rain. In reality we would have preferred to keep sanding the clear to a perfectly flat finish, and could have spent a couple additional hours doing so, but the rain was so hard there for a while, I thought I was going to have to go to the All Ford Day (on Sunday) with a sanded bonnet. I have to say, I am really stoked with the finish we got on the bonnet. It is awesome!!! I headed home and it was near dark by the time I got there. It was still raining, but I washed the wagon quickly. Snap was keen on fitting all the LPG gear in, so in the rain, and dark we got to work. We got it all assembled, and back together. A couple of pressure tests showed the convertor was now behaving as expected, and a few moments later, the Wagon was running on LPG once again. While I am happy with this, I will not the fun factor is once again reduced slightly. I will be working towards designing and implementing my LPG Mixer Bypass setup, along with a custom J3 ECU chip, so I can have the best of both worlds. The BBM will also be installed as part of this project. Sunday - All Ford Day All Ford Day was held at Eastern Creek Raceway this year, for the first time. The morning started off wet, and due to my busy day on Saturday, I didn't get as much cleaned as I would have liked. So after I parked the Wagon in my allocated spot, I got busy with the Shammy, a sponge, some spray and wipe and a bunch of paper towels, and gave her a quick once over. I realised, as I was cleaning the dash, that I had not dusted it since I installed it. Bad BenJ!!! Anyway, here are some pics of the wagon that I took. I hope you like them. 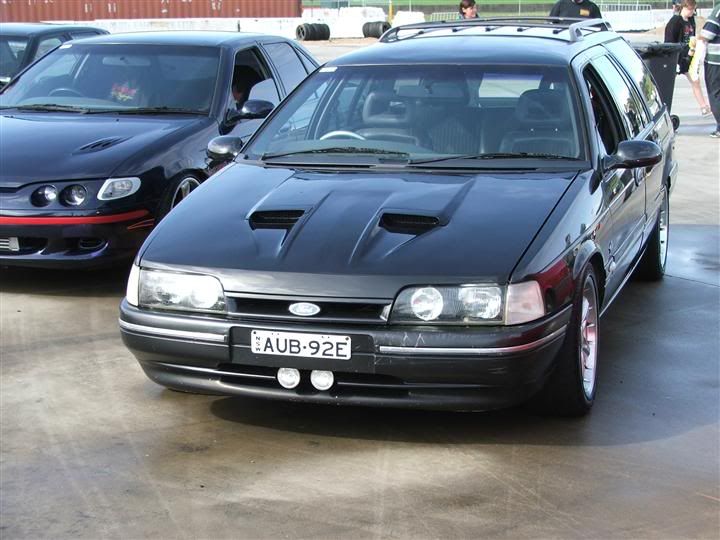 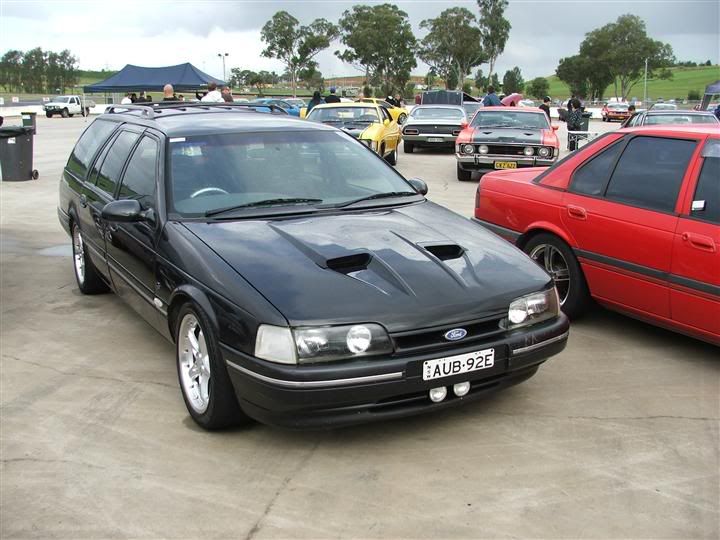 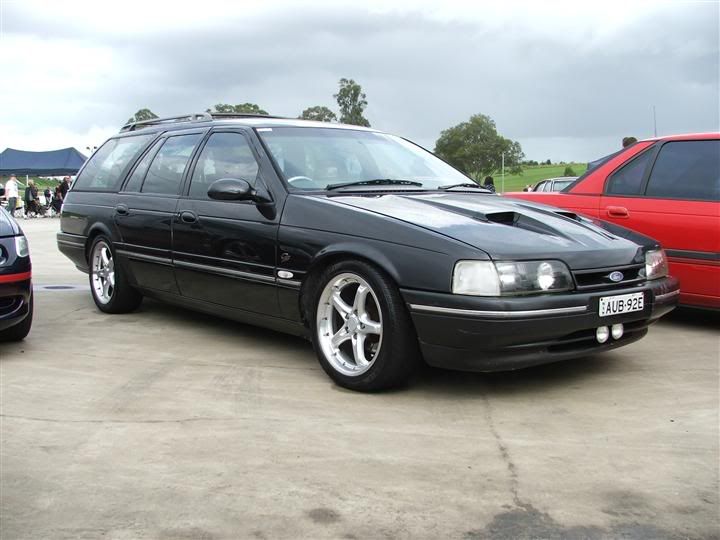 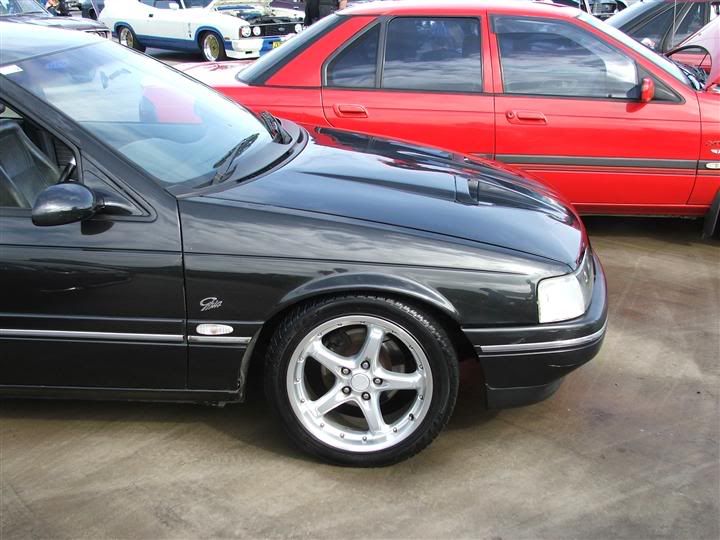 The bonnet has a great shine, and finally really blends in with the rest of the Wagon. I am yet to polish the Wagon since I have owned it, and will give it a going over soon, despite the numerous scratches and dints. We had a good day, and eventually got soaked with heavy rain after lunch. There were lots of nice cars to oogle at, and great company with the Fordmods entrants. Cheers BenJ
_________________ {DESCRIPTION} - Current Ride Last edited by BenJ on Wed Mar 10, 2010 11:17 am, edited 1 time in total. |
||
| Top | |
||
| Rick's EF Fairmont Wagon |
|
||
|
I knew it was the converter. I need another kit for my second OMVL converter.
Ben, you must be stoked with the finish of the bonnet I am impressed. My car is now beginning to run rough when first started and I am running for 2 mins on petrol before gas in the 3 degree mornings we have at the moment. Since I have almost never used petrol for the past year the injectors are getting blocked and sticky esp on startup. At first I thought it was a blown head gasket but it seems likely the injectors are the issue.
_________________ BF3 Egas XT Wagon |
||
| Top | |
||
| sexyr6 |
|
|||
|
wow ben, that bonnet looks awsome! glad you stuck with it through the bad luck... wagon is tough i'm very jelous...
|
|||
| Top | |
|||
| XR-Lane |
|
|||
|
The bonnet turned out fantastic mate job well done. I will have to pick your brain one day on the painting side of things, one amateur painter to another
Josh |
|||
| Top | |
|||
| huggiebear |
|
|||
|
damn thats neat... i want it
|
|||
| Top | |
|||
| BenJ |
|
||
|
{USERNAME} wrote: Yes, I have seen it. Bit pricey for me. And it is an eight. Looks like a good bit of gear though. BenJ
_________________ {DESCRIPTION} - Current Ride |
||
| Top | |
||
| BenJ |
|
||
|
Hi All.
On Wednesday, I waved farewell to my lovely daughter, as once again she jumped on a plane to the USA, to continue with her position with the Atlantic City Ballet Company. Yes, that is correct. My daughter is a Ballerina. 'Sigh' It is hard, but very rewarding, to watch your daughter leave to make her own way in life. ************************************************************* Well, enough of my paternal sentimentality. On to CAR STUFF!!!! At the end of last week I was starting to hear the now very familar grumbling of wheel bearing noise. Bloody Hell!!! I however surmised that they probably needed adjusting after settling in, and pulled the wheels off to find that there was a little play, and nipped the nut up and fitted new split pins as the original ones were now knackered. You would think that bearing kits would come with split pins. While I had the wheels off, I decided to tidy up the rotors, as the hubs were now a lovely shade of RUST, and with my wheels, were very visible and unsightly. I applied judicious use of the wire brush, followed by a coating of Black Engine Enamel that I had left over from painting the engine block. I also painted the outside edge. Looks quite good IMO. 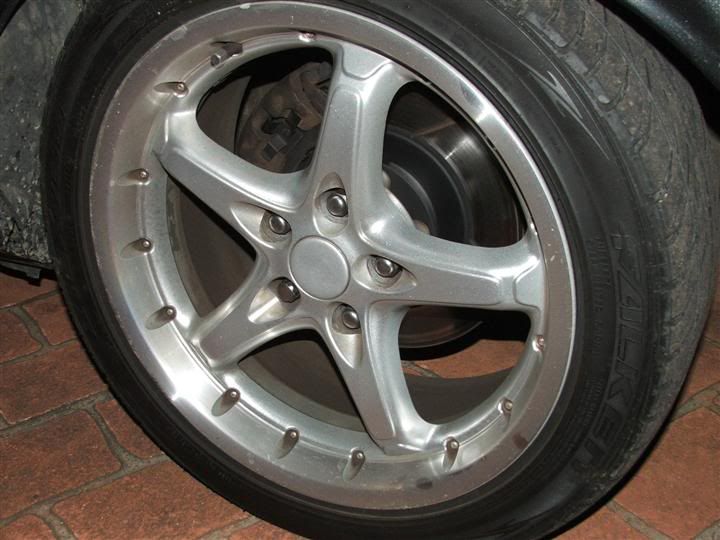 I didn't paint the caliper yet, as I have another colour in mind for it. ******************************************************* On to another small mod. Ever since I had put in the silver and black steering wheel, I had not been happy with the previous custom cruise control bracket and toggle switches. The still worked fine, but were now visible along the top of the steering wheel centre. 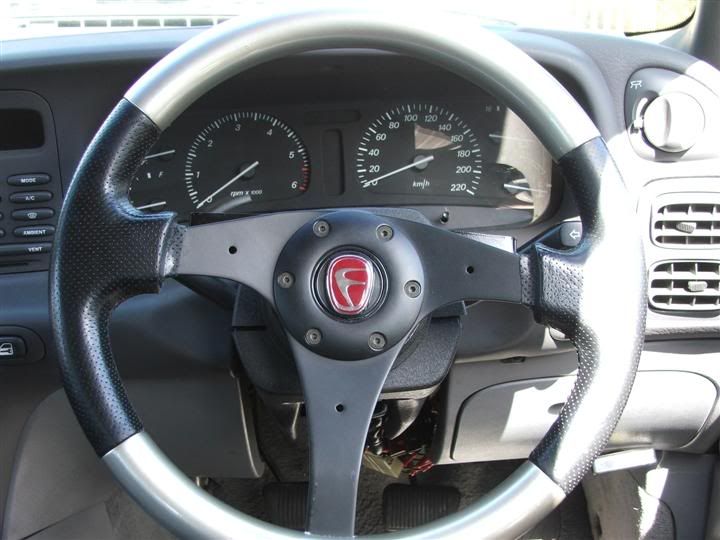 If you look closely you can see the bracket. You should also note the three holes in the wheel spokes. These gave me an idea on how to change the cruise control setup to suit this wheel. I had a bit of a rumage through the switches at the local Jaycar and found some suitable momentary push button examples. I then spent an afternoon with a drill, file and soldering iron and came out with this. 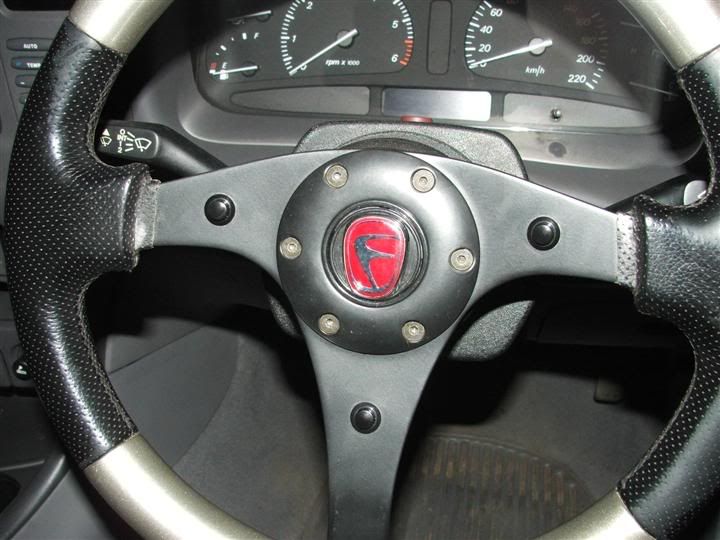 And from behind. 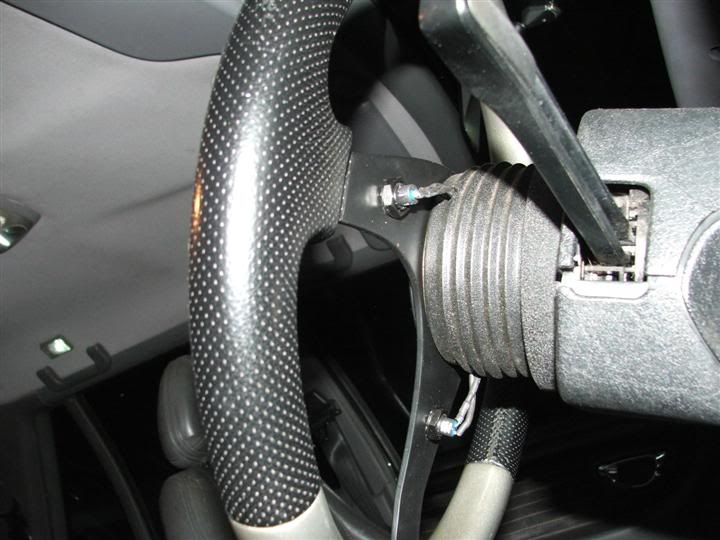 Much neater. The bottom button is the on switch. There is no off button anymore. I had found that after turning the cruise on, I never turned it off, so elected not to incorparate a fourth button. The right button is the SET/ACCELLORATE switch, and the left button is the RESUME/CANCEL button. As per my previous setup, I have already left out the DECCELLORATE function as found on the EL Cruise. The new system is working well and looks much cleaner an simpler than the previous one. ********************************************************** I made a trip to Pick N Payless last weekend and acquired a spare Impco LPG Convertor and an EL Tickford Dual Fuel ECU. The convertor will be used as a dummy to find a new position for it in the engine bay, and will be retained as a spare. I may also in the future need to run dual convertors. I fitted the ECU last weekend and have found there are significant gains to be had by doing so. The mid range and up is more responsive, and there are already signs of better economy as well. The only downfall at this stage is the standard petrol maps. But a custom J3 chip will fix this in the future. Well, hope you all are well. Until next time. BenJ
_________________ {DESCRIPTION} - Current Ride |
||
| Top | |
||
| fiend |
|
|||
|
Good work once again BENJ.... Oh, and some car stuff too....
----------------------------------------------------- That is a good setup on your cruise control. I never use the RES COAST button myself, but I do use the OFF. Good trick with the custom made "clockspring" too! I know I've been going on about it in my own thread from time to time, but WHITE KNIGHT PAINTS (from BUNNINGS) make a HIGH TEMP (500 degree +) paint in METALLIC CHARCOAL that has survived on my headers for quite some time and has been on the hubs and calipers for over a year. No rust and being a slightly metallic charcoal they just look like mighty clean steel all the time. Or - to put it another way, clean your caliper real good and put the paint on and it sparkles a tiny bit but still looks like bare original metal. Still looks like that in a years time. I love the stuff. Have bought another two cans just in case they stop making or selling it! Never got into the whole "paint the calipers bright" thing because even tho I have slotted and dimpled they still look like small disks through the wheel and therefore a bit less attention drawn to that, the better! Anyways, congrats for the much more aesthetic solution on the cruise control... And never mind the ballerina, she'll settle down and get a real job one day... |
|||
| Top | |
|||
| XFWAGON |
|
|||
|
That looks pretty cool Ben, i like your thinking, looks very clean. BTW what bosskit do you use? I have asked just about everyone possible over here and no one stocks them with cruise control. I have one from an EB Momo wheel that i'm using, which is quite good because it's slimline. Means i will have to cut into it to fit the cruise wires through the side.
|
|||
| Top | |
|||
| BenJ |
|
||
|
{USERNAME} wrote: That looks pretty cool Ben, i like your thinking, looks very clean. BTW what bosskit do you use? I have asked just about everyone possible over here and no one stocks them with cruise control. I have one from an EB Momo wheel that i'm using, which is quite good because it's slimline. Means i will have to cut into it to fit the cruise wires through the side. My boss kit is an Autotechnica branded one. Just ensure there are 3 contact rings. The third ring is for the cruise connection. BenJ
_________________ {DESCRIPTION} - Current Ride |
||
| Top | |
||
| duvauchellemotors |
|
|||
|
you have the same boss kit and steering whell as mine
|
|||
| Top | |
|||
| huggiebear |
|
|||
|
hey ben, how does it sent and recieve signals from 1 ring for 4 buttons? or is it one of those mysteries no one will every work out lol
|
|||
| Top | |
|||
| BenJ |
|
||
|
{USERNAME} wrote: hey ben, how does it sent and recieve signals from 1 ring for 4 buttons? or is it one of those mysteries no one will every work out lol It is quite simple actually. There is only one wire that goes from the steering wheel to the Cruise Control Module. The different buttons provide a specific resistance which is interpreted by the CCM and the required function is then performed. The other two wires are 12+ and Earth for the horn and supply power to the switches. BenJ
_________________ {DESCRIPTION} - Current Ride |
||
| Top | |
||
| ToranaGuy |
|
|||
|
Nice work on the cruise buttons Ben! I love it. I've been thinking about changing the wheel in my EB for a little while, but didn't want to loose my cruise..... Now i'm on the lookout for a wheel so i can mount the switches like yours!
Cheers ToranaGuy
_________________ I am the ToranaGuy!|74 Lh Torana Turbo|78 Hz PanelVan|86 Mighty Boy Ute|93 EB2 Ghia,GT Mockup,5spd,LPGI,Full Leather|2 x EB Xr8 5spd's|{DESCRIPTION}|{DESCRIPTION}|{DESCRIPTION}| |
|||
| Top | |
|||
| Who is online |
|---|
Users browsing this forum: No registered users and 16 guests |