

|
| SLO247 |
|
||
|
Thats an excellent Idea, I hadn't thought of that.
|
||
| Top | |
||
| fiend |
|
|||
|
Hey mate - You want any poo brown interior bits (cuppa / cuppacino)?? There's a car around here that has some bits left on it....
|
|||
| Top | |
|||
| KWIKXR |
|
|||
|
{USERNAME} wrote: Hey mate - You want any poo brown interior bits (cuppa / cuppacino)?? There's a car around here that has some bits left on it.... Hey Fiend, Hmm, i'll have to get back to you on that one. At the moment, im still processing -------------------------------------------------------------------------- Well, since i am here, i may as well make an update... Nothing much has changed since the last time i posted Boot install has been put on hold as i have had a few things i need to get done before April 11th which is Auckland All Ford Day. I am planning or hoping, to make an appearance there for the first time ever at it's new location - having not been to an AFD event since i was like 15 is quite slack, so i will do my best to make it this year. Should be special one too being it's 10th Anniversary I am planning to maybe put the Fairmont on display on the day, even though it's nothing special really, it's wearing the blue oval and looks half decent, so that's all that counts. Have decided to make a few changes in the engine bay before the big day, so the boot install is on the waiting list. Need to tidy up a few things in the engine bay, polish a few things, paint a few things and maybe add a thing or two. Also need to fix up a few things on the exterior, needs a good wash, polish and wax. Hopefully i can get it looking as best i can before AFD. Anyway, today i started working on a new mod which i will hopefully have finished by next weekend providing i can get all the materials before then. Will update when it's done |
|||
| Top | |
|||
| SLO247 |
|
||
|
Don't you need that vertical piece in the centre of the dash, under the glovebox? On the LHS of where the radio mounts? Has had holes drilled in it?
Preparing for the AFD will keep you busy. Be sure to get up lots of pics of the day, I'm keen to see what cars are there. I wonder if any of my family will be there. Look out for a Yellow XA GT 2 Door, blown 460, Powerglide, Tubs, etc. Plates are HYPOXA IIRC. |
||
| Top | |
||
| thepistonhead |
|
|||
|
Hey mate a question:
When you painted your dash black (i mean the from above your head unit to the cluster, that piece) How did you paint the trip computer and climate control unit to match? Do the buttons come out, or does the surround pop out so you can paint them separately?
_________________
|
|||
| Top | |
|||
| FordFairmont |
|
||
Posts: 6113 Joined: 8th May 2007 |
you can pull apart the trip/climate control so the buttons come out
|
||
| Top | |
||
| KWIKXR |
|
|||
|
{USERNAME} wrote: Don't you need that vertical piece in the centre of the dash, under the glovebox? On the LHS of where the radio mounts? Has had holes drilled in it? Preparing for the AFD will keep you busy. Be sure to get up lots of pics of the day, I'm keen to see what cars are there. I wonder if any of my family will be there. Look out for a Yellow XA GT 2 Door, blown 460, Powerglide, Tubs, etc. Plates are HYPOXA IIRC. Hey, you know what, you are absolutely right!! Jeez i have forgot all about that side of the dash as i'm always in the drivers seat, i have no idea what was there before, the original owner just filled the holes with 4 black screws I also have no idea how i will replace it though, iirc it looks as though it is part of the complete lower half of the dash - i will have to double check it all though. Cheers for pointing that out. Yeah for sure, if i make it, there will be stacks of pics. We have some really nice Ford's in NZ, from what i have seen from previous years pictures, there is a mixture of old school (XW, XY, XA, XB etc) and newer cars (AU, BA, BF etc). E-series Fords are very rarely modded around this part of NZ, you see the odd one lowered on nice rims, but that is about it. I'll be on the look out for HYPOXA, with plates like that it will be hard to miss {USERNAME} wrote: Hey mate a question: When you painted your dash black (i mean the from above your head unit to the cluster, that piece) How did you paint the trip computer and climate control unit to match? Do the buttons come out, or does the surround pop out so you can paint them separately? {USERNAME} wrote: you can pull apart the trip/climate control so the buttons come out Yep, as FF said, the units can be pulled apart so you can remove the faceplates and spray them. Once you remove the trip computer and climate control, just pull them apart. I can't remember now what exactly holds them together. I know you have to lever up the faceplate clips and then undo a few screws to remove the circuit boards, then remove the buttons etc. Best of luck with it mate |
|||
| Top | |
|||
| FordFairmont |
|
||
Posts: 6113 Joined: 8th May 2007 |
also a good idea to take a pic of climate control buttons before pulling them out, cause they all seem to be the same shape
|
||
| Top | |
||
| fiend |
|
|||
|
Pulling the climate apart (along with all other instruments in higher spec clusters) is do-able. Easy even. What is not quite so easy is changing the colour of the read-out on the climate control. You will need to remove about 30 solders that go through the circuit board in order to pull the screen part out (in which lies an amber diffuser.)
|
|||
| Top | |
|||
| thepistonhead |
|
|||
|
Cool thanks guys, will keep it in mind and add to the to do list.
I know you mentioned this before KWIK, but the paint you used on the dash was...? Any clear or primer used? Cheers.
_________________
|
|||
| Top | |
|||
| KWIKXR |
|
|||
|
{USERNAME} wrote: Cool thanks guys, will keep it in mind and add to the to do list. I know you mentioned this before KWIK, but the paint you used on the dash was...? Any clear or primer used? Cheers. Septone Plastic and Vinyl paint from Supercheap, in satin black. You could also use VHT Plastic and Vinyl paint which you can get at Repco, both do the same thing, and give a similar, if not the same finish. No, didn't use any primer on the vinyl areas, i.e dash pad, tops of door trims etc. Just wipe the vinyl areas over thoroughly with methylated spirits before spraying and you're good to go. For the plastics i used Septone Plastic Adhesion Primer, i have used it on everything plastic i have painted and it works well. I didn't bother using any clear coat either, basically because i wanted a "satin" finish it wasn't needed. You could use a clear coat on the plastics to give it a gloss finish i guess, but i'm not sure how well it would work on the vinyl dash. |
|||
| Top | |
|||
| KWIKXR |
|
|||
|
Hmm, time for a bit an update i think.. Just got back from Auckland All Ford Day. First proper AFD i have been too. What an awesome day!! Nice sunny day and there were lots of Ford's out in force
Spent the whole day yesterday getting the engine bay up to scratch and woke up at 5 this morning to get the car washed and cleaned before heading off at 7 to meet up with a couple of guys from NZFordForum.com Since last time i have made a few little changes... I made up a custom "carbon fibre" airbox housing a 3 inch pod filter. No longer using a snorkel so it just picks up air from behind the headlight and gets a bit of ram air from the 3" ducting from the front bar. Goes quite well, much louder induction noise and i think it looks better too. I made the box with future intentions of hitting the 1/4 mile in mind - i will also be gutting a spare headlight and fibreglassing a bellmouth type scoop to ram the air directly to the filter which will be swapped over for drag runs. The airbox is just made out of 4mm polycarbonate sheeting, cut and shaped to fit in nice and snug, then covered in 3M Di Noc carbon fibre film/vinyl. Was planning to paint it gloss black, but being plastic and being right there in the corner was just asking for any paint to be scratched very quickly. So i needed something that looked good and was durable, which is where the 3m Di Noc film came into play. The carbon fibre film actually looks very real which is the good thing, had a few guys come up and asking where i got the carbon fibre airbox from. The Di Noc film is textured and has a dry carbon appearance, it even reflects light at different angles. Very good stuff!! The box all made up and mounted in place. This shows how the filter sits inside the box. 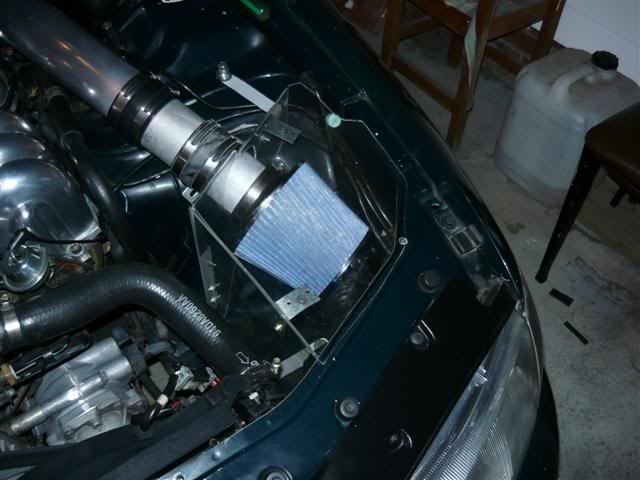 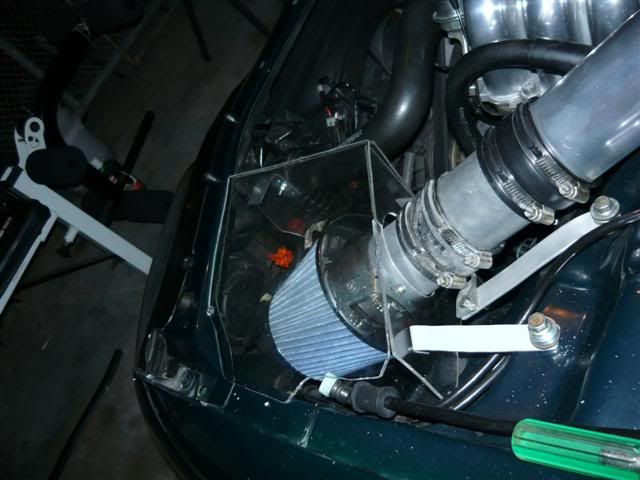 The box dismantled to apply the carbon fibre film. 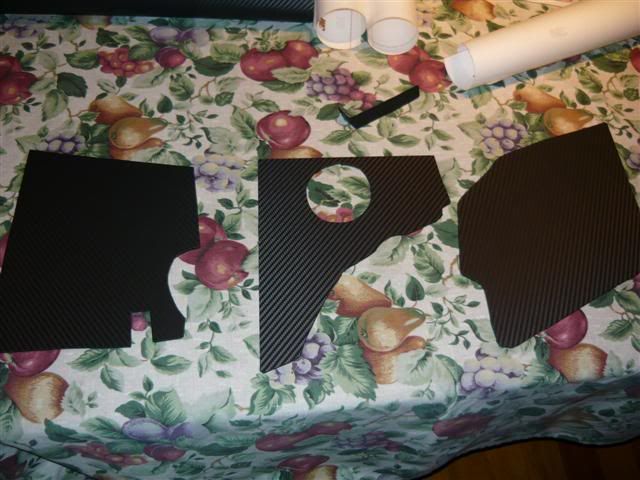 End result.. 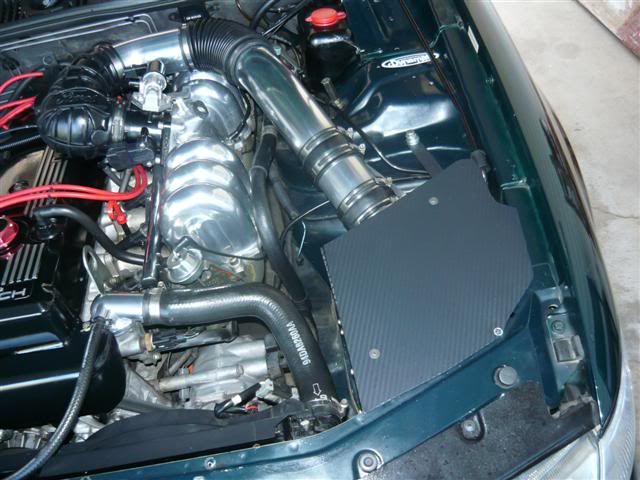 Finally sprayed my clear side repeater moulds, so fitted them up with the clear repeaters this morning. 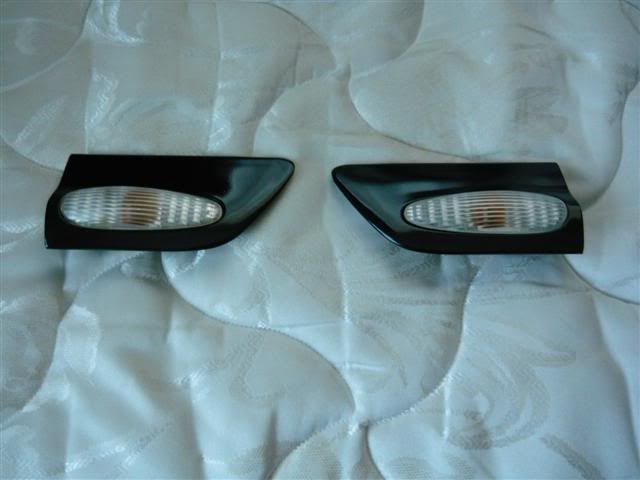 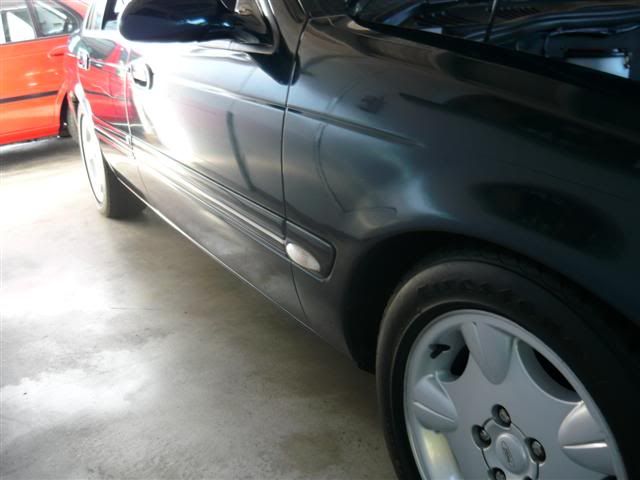 Got rid of the old oval exhaust tip i had on in favour of twin 3" rolled tips. Looks a bit better, but has a unique bark to it now, not sure if i completely like it as it sounds sort of hollow (from inside the cabin) when you plant it, but have been told it sounds pretty good from outside. 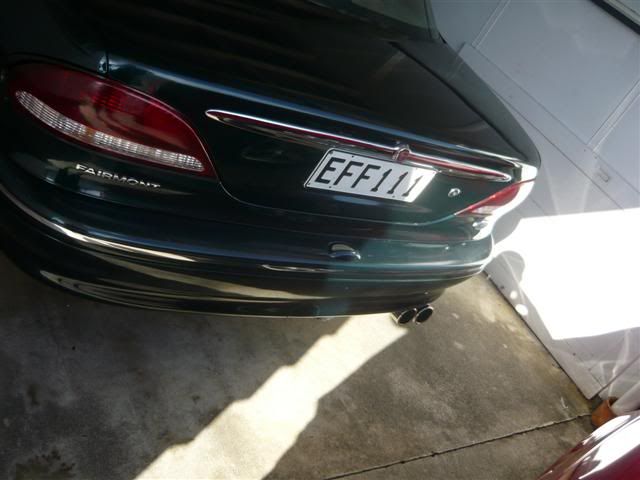 Also picked up an EL Fairmont Grill for $17!!! I was stoked, couldn't believe my luck when i saw a guy working on this Fairmont at Pick a Part, got a little closer and saw that he was taking the dissy out and thought "s**t, that's an EL". Was even luckier that it was pretty much mint condition considering the age, no cracks anywhere, no bubbling or pitting in the chrome, just a few little tiny marks that are barely noticeable. Quickly grabbed that grill quick smart 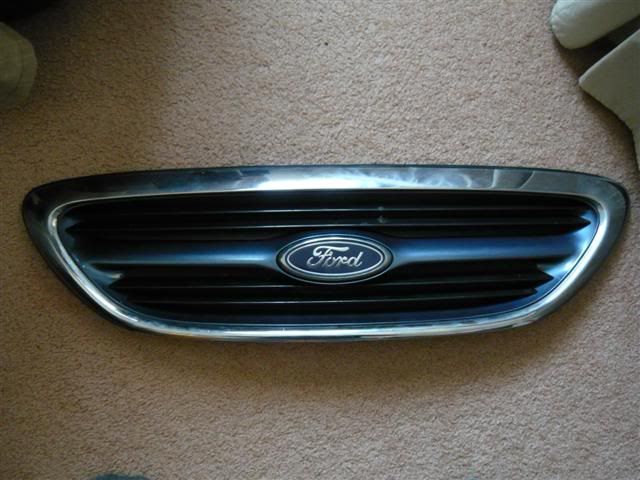 Sprayed the washer bottle and coolant reservoir in gloss black, makes the engine bay look a little more tidier, and sprayed the washer bottle cap and dipstick handle in red to match the leads - although they may turn to blue with the new set of blue Eagle 9mm leads i scored for $35 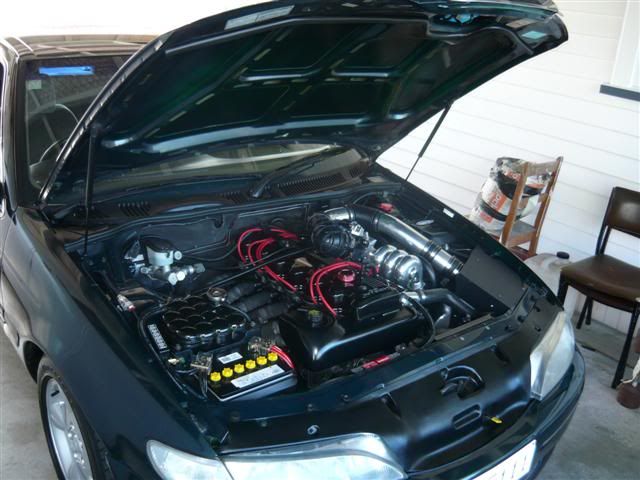 I guess i can say i will definitely be back ford AFD next year, hopefully with the car better presented next time around. A couple of pic's from today..                  A shot of the NZFF member's cars..  A couple of shots of old man's XR6 up against my Mont..    For the rest of the pic's from AFD, follow this link.. {DESCRIPTION}There's enough there to keep you happy |
|||
| Top | |
|||
| thepistonhead |
|
|||
|
$17 for that grille? Got to be kidding me!
I'm still looking for one. Here is something to consider:  I think that looks great with the middle tabs removed.
_________________
|
|||
| Top | |
|||
| SLO247 |
|
||
|
{USERNAME} wrote: $17 for that grille? Got to be kidding me! I'm still looking for one. Here is something to consider:  I think that looks great with the middle tabs removed. I agree, Looks great. KWIKXR, those pics make me happy in pants. You have impeccable taste with everything you have done, and I love the attention to detail. Well done. I quite like the look of the heatwrap on the exhaust manifold too, I don't know if thats weird haha I have a nice little update on mine to show you too, when I take some pics. |
||
| Top | |
||
| Papa Smurf |
|
||
|
Very good work there Kwik, love all your effort matey
A good range of Fords there in NZ, great to see that the old Trucks are still around, thanks |
||
| Top | |
||
| Who is online |
|---|
Users browsing this forum: No registered users and 8 guests |