
|
| hans hartman |
|
||
|
progress and pics?
_________________ R.I.P HANS HARTMAN |
||
| Top | |
||
| DA22LE |
|
|||
|
{USERNAME} wrote: progress and pics? hahaha....need one for the other.......lol..... Sorry, had to be said.....
_________________ BA XR8 Boss 260 |
|||
| Top | |
|||
| hans hartman |
|
||
|
{USERNAME} wrote: {USERNAME} wrote: progress and pics? hahaha....need one for the other.......lol..... Sorry, had to be said..... its ok,though he might bite,i was over his joint a few weeks ago,motivation.
_________________ R.I.P HANS HARTMAN |
||
| Top | |
||
| Johnson stroker |
|
|||
|
Project Stallrunner seems to have....
Stalled?
_________________
|
|||
| Top | |
|||
| tickford_6 |
|
||
Posts: 6449 Joined: 11th Nov 2004 |
{USERNAME} wrote: Project Stallrunner seems to have.... Stalled? At least it's not DOOMED |
||
| Top | |
||
| Johnson stroker |
|
|||
|
{USERNAME} wrote: {USERNAME} wrote: Project Stallrunner seems to have.... Stalled? At least it's not DOOMED I hope not. as much s**t as I hang on Nik, I want to see this finished, he is going to owe me a small amount at the end of this month as it is. where Nik is at right now with it, only he knows the way forward.
_________________
|
|||
| Top | |
|||
| xcabbi |
|
||
|
Its not doomed just on pause due to a few other things that needed financial attention before I resume with progress.
As for our bet Toddy I owe you a yellow beer ticket next time I see you. No more double or nothing. On a more positive note there is still the slightest chance it could make its debut at the August dyno day. |
||
| Top | |
||
| xcabbi |
|
||
|
Well Things have been happening, not as quickly as I would have liked but they are happening.
The Mounts have been cleaned up and modded. The gearbox crossmember has been moded. I just got my driveshafts back today after being modded. Now the only real things left to fabricate are the sump, exhaust and airbox. Because I'd like to run my crossover pipe for the exhaust under the sump instead of behind the transfer case I was wondering if I could remove the factory E series trans brace off the engine to give myself more room. |
||
| Top | |
||
| hans hartman |
|
||
|
popped in today and there is progress
_________________ R.I.P HANS HARTMAN |
||
| Top | |
||
| Matt_jew |
|
||
|
I see no reason why you cannot get rid of the factory gearbox brace.
I have never run one on mine and no dramas in 5 years. Touch wood.
_________________ {USERNAME} wrote: More people paid for a ride in a VT commodore then an AU Falcon so the VT is superior.
Based on that fact my Mum is the best around! |
||
| Top | |
||
| xcabbi |
|
||
|
Its staying in place and the exhaust will cross over between the gearbox and front driveshaft, or behind the transfer case.
Things have been progressing quite well lately. J3 chip came in yesterday and the radiator should be here within a week or so. I almost could have fitted the 55mm 2 row dimple core but the 4mm clearance between fand hub and core was too close for comfort. After discussions with pwr the radiator designed by ozrunner is now the standard offering for a 302w into 4runner engine conversion. Part number pwr 51727. This week is sump and pickup week. The pickup is now a mix and match of Falcon and F truck and the sump is a heavily modified rear hump sump from an F truck. Two things I wanted to ask everyone. 1. Heater pipes. Which one is the hot side and which one is the return? 2. Charcoal cannisters. How do they work and how are they controlled. The toyota unit seems to be venting to atmosphere by the looks of thing. Pics and a full detailed write up will come once its all done and running. |
||
| Top | |
||
| Matt_jew |
|
||
|
If you look on the thin black plastic tubing coming off the inlet manifold you will see a solenoid joined to it by a piece ofred(I think) hose. That is the feed to the canister.
_________________ {USERNAME} wrote: More people paid for a ride in a VT commodore then an AU Falcon so the VT is superior.
Based on that fact my Mum is the best around! |
||
| Top | |
||
| xcabbi |
|
||
|
Well I thought I might give you all a pictorial update as to where I'm at with things. The reason why it has taken me so long between updates is because I typically only have half day blocks to work with and I've been trying different things to see what works and what doesn't work.
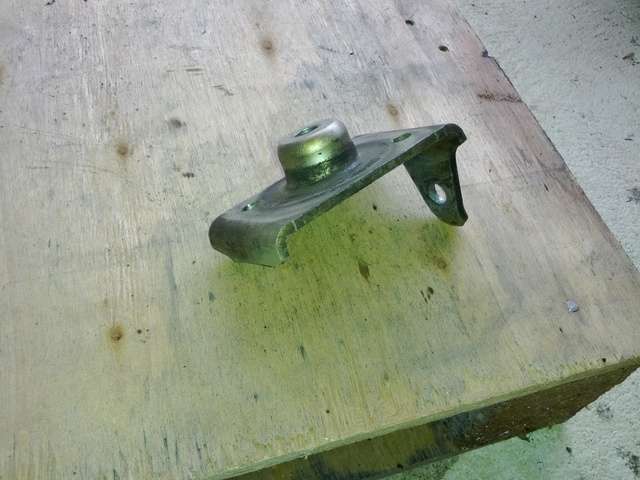
Take these engine mount brackets for example.  Because I need to move the engine forward in order to remove the box I sliced the back of the brackets off to enable forward movement with minimal lifting and ran bolts through the top. In theory it worked but in practise it was a royal pain in the a***. We persisted with this for a month or two untill we performed some firewall mods with a porter power (panelbeaters hydraulic ram to the unin itiated). This gave us some much needed room to work with. The 10mm behind the left hand head is now enough for me to fit my hole hand behind. Once that was done we found that we could weld on some pieces of flat bar on the back of the brackets and re-drill some bolt holes further up. I was hoping to re-weld the oiriginal pieces I had cut off the brackets but they went M.I.A. |
||
| Top | |
||
| xcabbi |
|
||
|
Not we move onto the gearbox crossmember.
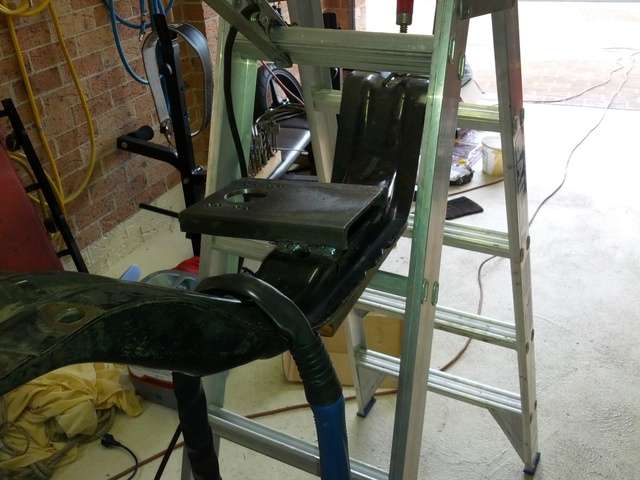
With the motor in the engine bay sitting on its revised and repositioned mounts, and the bearbox bolted up we looked at various angles of inclination by lowering or raising the box with a trolley jack. Once we were happy with the angle we bolted up the original cross member and found we needed to come up 25mm and back 105mm from the original location (remember this is for the V6 with the forward mounted gearbox. All the 4cyl owners interested would only need about 22mm or so rearward positioning. It was at this point I was starting to get ticked off big time with steel suppliers in Wollongong. No way in hell was I going to spend 400 bucks on an 8 metre length of 150 x 75 rhs when I needed less than 20cm. (If there was a shop that speciallises in metre lengths they'd make an absolute killing) Luckilly one of the fab shops was willing to give me some C section for free. Once it was cut to size and all the appropriate holes were drilled out it was welded into position like so. 
|
||
| Top | |
||
| xcabbi |
|
||
|
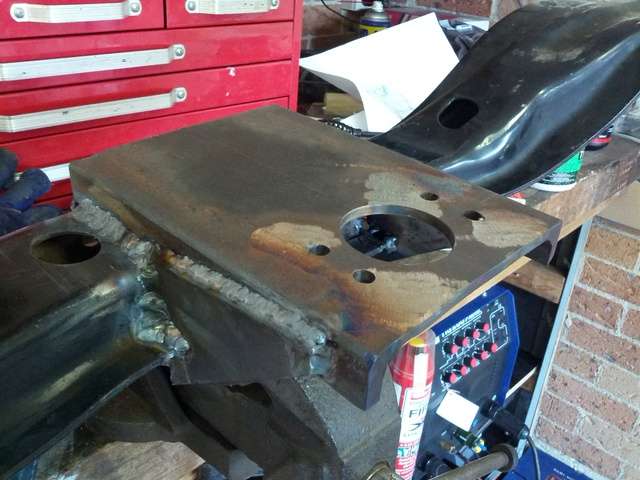
In true xcabbi overengineered style it needed some bracing and aditional welding.

|
||
| Top | |
||
| Who is online |
|---|
Users browsing this forum: No registered users and 56 guests |