

|
| smithykicks85 |
|
||
|
OK BA DASH INSTALL TIME part 2!!!!!!
If you want you could use the original sterring wheel coloum, when i was trial fitting it, it almost look like a perfect fit (may need some minor customizing) how ever its up to you if your gonna keep the old pirate ship wheel or upgrade to sleeker xr one, keep in mind if your doing the dash and keeping factory sound system id reckomend knocking up the BA steering coloum and wheel in to have the voloume controls, and if you have a EF/EL with cruise maybe you could rig up the cruise control to it??? just an idea. Any ways heres a gammin snap of the brace and sterring wheel: Attachment: ba dash 5.jpg Back to buisness, this job would be ezier with the windcreen out, as you can this is the top of the fire wall, iv removed the old brackets with a spot weld drill or angel grinder as you can see in the following picture, i believe there is about 3 or 4 of these which run along the top, i had some trouble trying to sit the front of the dash on with those things there. refer to photo Attachment: ba dash 6.jpg Now heres another before and after shot of what has to be cut away from under the dash, you will need to remove the front windscreen demister, PLEASE BECAREFUL, as its ezy to sut right threw the dash, use a air saw, grinder, disc sander or even a good soldering iron to cut or melt threw the vents, a fair bit of it has to go to as youll find it hits the top of the fire wall, GOOD NEWS thow, keep the old dimister peiping, iam not sure what the EF El's have but on the EB's theres a snorkel looking thing which has a bout 3-4 screws in it, its located just behind those lugs which i mentioned about removing, its heaps out of the way of the BA dash and iam thinking of rigging up some vacume pipe or PVC piping under it and connecting it to the BA climate box, up 2 u what you wanna do but i think thats the best way if you want the front windscreen dimister to work.... as i was saying look the photos and youll see what i mean by removing the vents, heres a pic of the dash up side down before it was cut: BEFORE: Attachment: ba dash 7.jpg AFTER, still even in this photo i had to remove more of the vents, just to give you an idea. Attachment: ba dash 8.jpg Now where talking, heres what it looks like now, still you can notice a gap between the windscreen and dash, iv still got to figure out how to take it back at least a inch.... i might need to carefully grind a little meat off the BA brasing bar and have a fiddel around with it... Heres what to expect: Attachment: ba dash 1.jpg Well ill do another post as iv reached my max photo limits for this one. You do not have the required permissions to view the files attached to this post.
_________________ Weapon of choice, EB shell with a EL XR front powered by a BA engine. |
||
| Top | |
||
| phantom |
|
|||
|
Nice work so far on the dash install. Have you decided on what you are going to do with your pedal box. I'm having some brackets made up for the sides of the dash so that the dash bolts to the A pillar properly.If you mount the the frame flush on the A pillar you will find that the dash angles to far forward and the console wont line up.
|
|||
| Top | |
|||
| smithykicks85 |
|
||
|
OK BA DASH INSTALL TIME part 3 !!!!
Just to go over prices with you, if you were smart youd buy a write off BA, that way youll have the necessary wirring and all the dash and pieces you need so that would come to about $1600-$3000 depending on type of ford (XT, Fairmont, XR) and KM's and condition, or you can pick up a complete dash minus cluster and CD for around $200-$300, then you can pick up a standard CD ICC unit off ebay from $100-$800 depending if you want premo sound and colour screen, and a cluster can range from $100-$500 depending on it being a FPV, XR, STOCK XT and also KM's. As for me this BA Dash project came to approx $600 roughly... So not a bad cheap mod that you can do in your garage. As i should have mentioned earlier i havent drilled into the A pillars and bolted the brace up that will be documented and taken care off in the next 2-3 weeks so keep an eye out for it. Heres a trial shot: Attachment: ba dash 2.jpg Also heres a pic of a singel zone climate box that i picked up for a cheap $50, however i need to invest on a HIM modual for it when the time comes: Attachment: ba dash 3.jpg Well that about finishs it off, mind you i havent yet trialed the console to fit... ill do a doco on that when i get the car back from the shop. thanks guys, You do not have the required permissions to view the files attached to this post.
_________________ Weapon of choice, EB shell with a EL XR front powered by a BA engine. |
||
| Top | |
||
| smithykicks85 |
|
||
|
{USERNAME} wrote: Nice work so far on the dash install. Have you decided on what you are going to do with your pedal box. I'm having some brackets made up for the sides of the dash so that the dash bolts to the A pillar properly.If you mount the the frame flush on the A pillar you will find that the dash angles to far forward and the console wont line up. Good question there phantom, iv got the original foot peddals, (thats something i should also have mentioned earler) any ways i was going to see if it was a simple mount up job or weather i need to get some steel and make up a reliable bracket that it can simply bolt on to. And thanks for the heads up on the console thing, ill see what happens over the next few weeks and let you's all know.
_________________ Weapon of choice, EB shell with a EL XR front powered by a BA engine. |
||
| Top | |
||
| smithykicks85 |
|
||
|
Also something i should have mentioned b4 about the DIY restor, once you get your pannels back to metal and you have a booking for your car to go in for a paint job in a few weeks time, go out and buy this stuff called paint grip. I dont know how much it cost but you can put it in a squirty bottel and spray all the bare metal down, and just wipe with a rag. As long as you park your car in a shed the car wont get any surface rust on it for months. Also wear some good cloves as this stuff will burn you.
_________________ Weapon of choice, EB shell with a EL XR front powered by a BA engine. |
||
| Top | |
||
| smithykicks85 |
|
||
|
HOW TO FIT BA DOOR TRIMS TO E-SERIES!!!!
Hey readers again, well i knocked off work at 4 thirty this sarv and couldnt help but ask to stay back and work on trying to fit my BA door trims on. I couldnt wait till the weekend to do it so heres how far iv got with them. I started with the drivers door, i can get them to sit ok, but at the back of the door i have a very narsty gap, however the front of the trim sits flush and same with the bottom. As for the top of the trim it needs something done to the top lip of the trim to make it fit a little better, but iam more worried about this gap.... Heres some step by step progess shots that i took, and PLEASE FEEL FREE TO COME UP WITH SOME IDEAS... as i really dont want to have to resort to EL door trims This may take me a few post coz i got a fair few photos i wanna show... Heres the back of the door trim, youll notice alot of pieces of plastic that stick out will have to be cut off at an appropriate amount. Take your time with this and keep trial fitting until none of the bolk plastic bits are pressed hard against the door. Attachment: door trim.jpg A quick trial fit to see how things are going: Attachment: trial fit.jpg Heres what i carnt make my mind up about, weather to have the door trim lip over this edge of metal, or weather to have it behind it as shown in the photo, Something has to be changed here weather the lip needs to be bent or folded OR slightly grinded down in the middle, becasue when the door trim is over the steel lip it seems to want to sit high in the middel, making the door trim sit a little wonky, any ideas??? Attachment: door trim outside lip.jpg Heres a shot of how the door trim sits at the front of the car.... veryyyy niccceee Attachment: front of door.jpg Now this is the GIGANTIC gap i have at the front, not very nice! Attachment: trim gap.jpg Ill have to start another post to show some more photos, You do not have the required permissions to view the files attached to this post.
_________________ Weapon of choice, EB shell with a EL XR front powered by a BA engine. |
||
| Top | |
||
| smithykicks85 |
|
||
|
HOW TO FIT BA DOOR TRIMS TO E-SERIES part 2 !!!!
Ok the gap does get better and ill show you what i did. here a few shoots of what the trim looks like when the door is shut.... enjoy this is the back off the door trim, looks really nice, keep in mind these arnt the trims thatll will end up on the car, they are stock BA XL trims that i got for dirt cheap and just using them as a trial... ill resort to a nice set of purple trims and seats when i come across a good set: Attachment: door shut back off.jpg Heres the door shut and what itll look like at the front: Attachment: door shut front off.jpg To make that gap close up a bit ive grinded those big ribberts off that hold the window winder handel, and as you can see in the following pic i then removed this buldge that was making the trim stick out. BEFORE: Attachment: before.jpg AFTER: Attachment: after.jpg After i did this, this is the gap iam now facing, not as bad but still not good, i dont want to have to resort to putting a plastic block or something in there.... but there must be another ezy methos... iam gonna have another crack at it on saturday and ill let yous know, but if any of yous have any ideas let me know... cheers guys, next post ill try and have the unused holes welded up and hopefully the trim sitting neat. Attachment: gap now.jpg
You do not have the required permissions to view the files attached to this post.
_________________ Weapon of choice, EB shell with a EL XR front powered by a BA engine. |
||
| Top | |
||
| smithykicks85 |
|
||
|
Heres a few other things that iv done, iv drilled out the old battery case under the bonnet, and the battery will then be relocated to the boot, and iv also dropped the fuel tank. Iam going to have a alloy tank in the wheel weld and have a proper twin exhaust system... should look sweet when done.
Attachment: 30042009260.jpg Attachment: 30042009262.jpg
You do not have the required permissions to view the files attached to this post.
_________________ Weapon of choice, EB shell with a EL XR front powered by a BA engine. |
||
| Top | |
||
| itlookslikeaxr6 |
|
|||
|
Cars looking great smithykicks85, very very interesting.
Quick question about the fuel tank, are you going to put a tank where the spare tyre goes? With the photo uploading try using this program, its free. http://photobucket.com Just use this to bulk upload your photos then copy and paste the IMG code into any of your reply's. Its will just look like a bunch or numbers which it is, but if you preview your post then you will see the pictures. Make sure you organise your photos into different folders ect before you post them other wise the codes will be different and you will have to do them again. The prgram is very fast and easy to use, plu theres no limit to how many photos you can have per reply. Just so you know you can edit posts and edit or add things you need to. Hope this helps if you have any questions post here as ill be watching for updates or PM me. Good luck with the build, Regards, Michael.
_________________
|
|||
| Top | |
|||
| smithykicks85 |
|
||
|
{USERNAME} wrote: Cars looking great smithykicks85, very very interesting. Quick question about the fuel tank, are you going to put a tank where the spare tyre goes? With the photo uploading try using this program, its free. http://photobucket.com Just use this to bulk upload your photos then copy and paste the IMG code into any of your reply's. Its will just look like a bunch or numbers which it is, but if you preview your post then you will see the pictures. Make sure you organise your photos into different folders ect before you post them other wise the codes will be different and you will have to do them again. The prgram is very fast and easy to use, plu theres no limit to how many photos you can have per reply. Just so you know you can edit posts and edit or add things you need to. Hope this helps if you have any questions post here as ill be watching for updates or PM me. Good luck with the build, Regards, Michael. O cheers mate, ill give it ago when i upload my BA door trim on e-series door photos. Yeah iam gonna put a alloy tank in the spare wheel area, or if i have to custom the spare wheel space up i will (hopefully not), i reckon the e series look sweet when theres a duel exahust in them. Also about the BA door trims, i got them to fit snug today.. but ALOT of work to get them to fit, and i mean ALOT. ill upload my doc in a few nights time.
_________________ Weapon of choice, EB shell with a EL XR front powered by a BA engine. |
||
| Top | |
||
| smithykicks85 |
|
||
|
HOW TO FIT BA DOOR TRIMS TO E-SERIES DOORS, part 3 !!!!
Well i had another crack at it this weekend, and yes i had a very successful day.... however it involves alot of work. Ill start where i last left off. For some of you who are doing this project you may be happy with leaving the rather large gap at the back of the door and finding a block or a piece of cut out plastic to fill it in, how ever i kinda wanted a flawless job and a snug fit, so i kinda went to extremes here..... Call me crazy or call me a guiness but i couldnt bare spending another minute trying to make the BA trims fit, and i really wasnt wanting to resort to EL ones as the BA dash sits pretty nicely and it would look a bit out of wack... so a light bulb went off in my head, i drove down to a local wrecking yard and picked up 4 Ford Au doors (as some may know AU doors are pretty much the same as BA ones besides 2 holes that have to be drilled in for the 2 screws in the door trim arm rest handle thing) any ways, i picked up 4 doors and started with the drivers door to see how it would turn out: 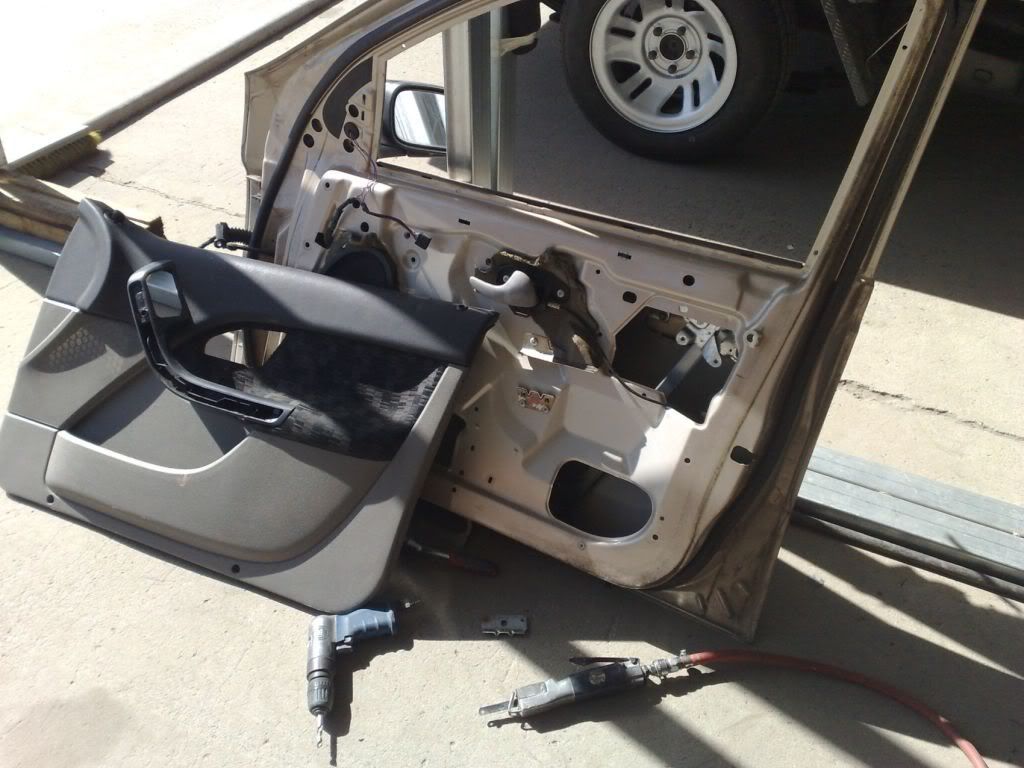 This little project requires time and patients, if you have neither i wouldnt bother attempting it, also you will need to get your hands on a welder and a few basic cutting tools like a air hacksaw, grinder, sanders... ect. If you carnt afford to have your e-series car off the road for a while then i would suggest picking up some 2nd hand doors for your model and taking your time cutting them up. Also be prepared to spend a long long day just on one door. Now with my AU door (or BA one, what ever you can pick up cheap) Iv done a quick check to make sure the BA trim sat nicely, now that all is good the execution can begin: 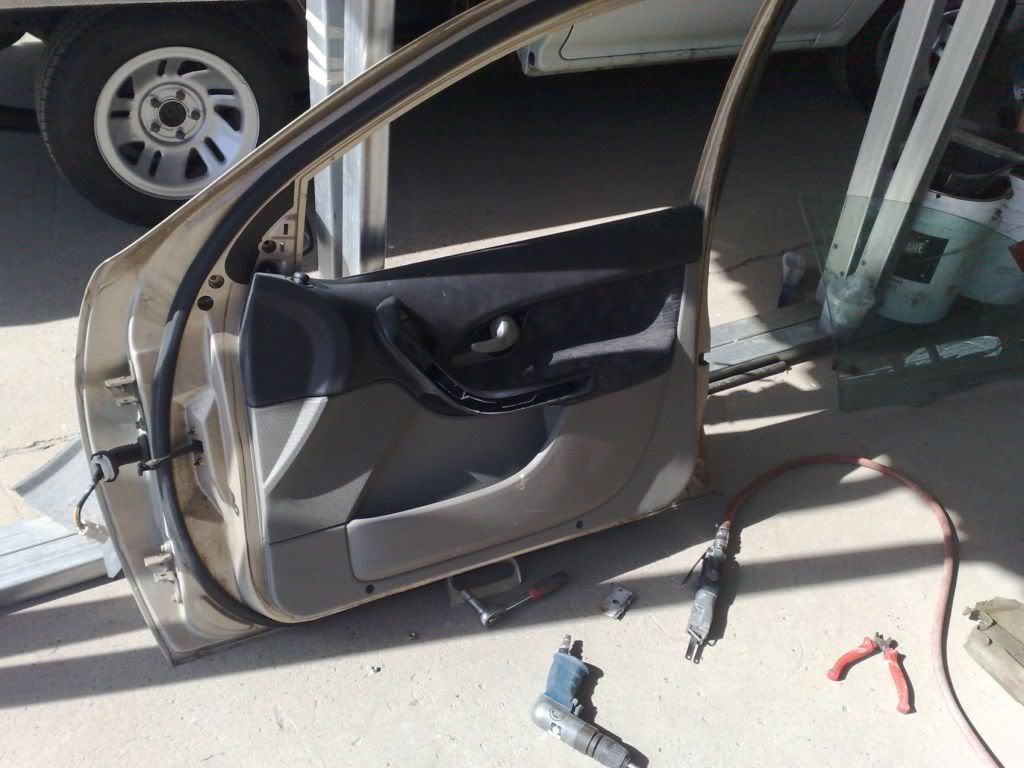 I started unpicking any necesary spot welds with a drill (in the end i think i didnt really need to) then i cut out the inside plate where the door trim sits on, and make sure you cut out more then you need, we can trim up any excess bits we dont need later on, check out the photos and youll see what i mean: 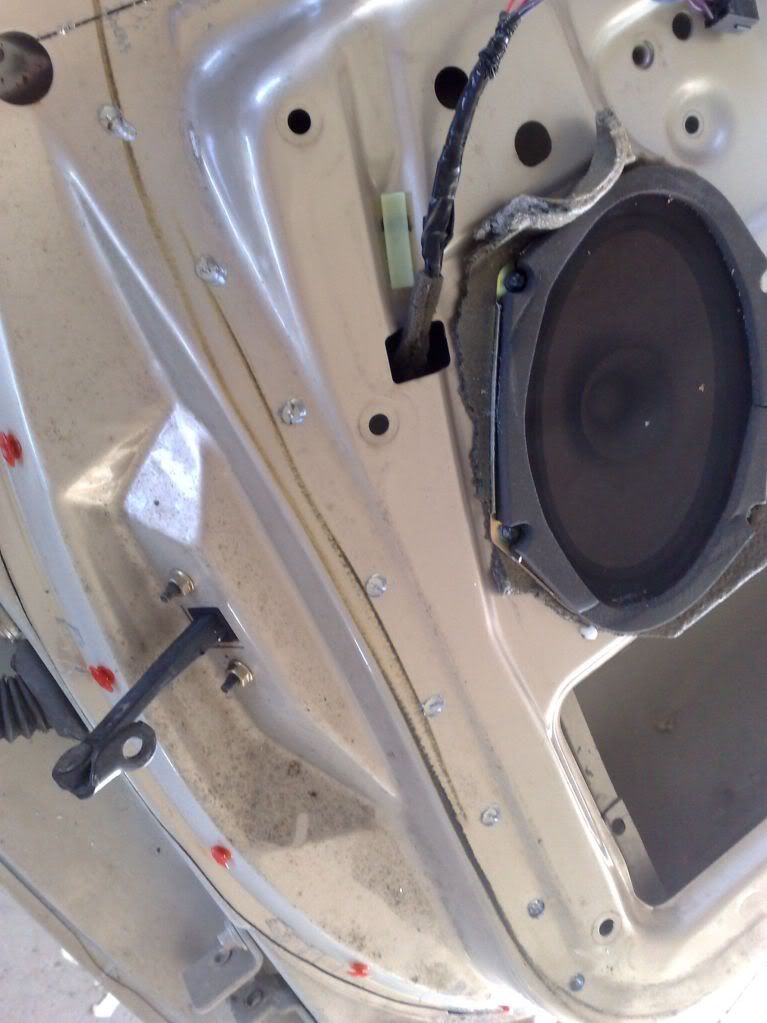 Now this is what you should have left over from the AU/BA door, just to give you an idea (let me guess, do i have a few confussed faces of what i am doing?????): 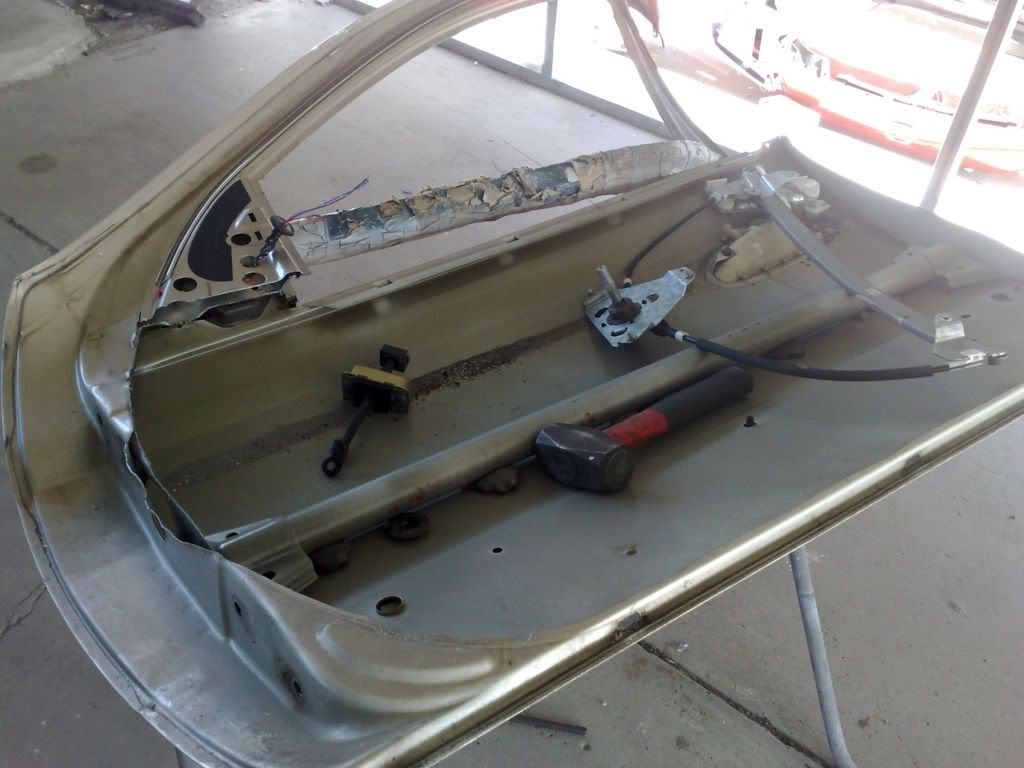 Heres the part that you need to have, pretty much you can bin the rest of the AU/BA door. Also i have just neatly trimed up a few bits, you can do this by sitting this piece up against your e-series door and having a quick scoop of what you dont need, if your confused then just follow the photos: 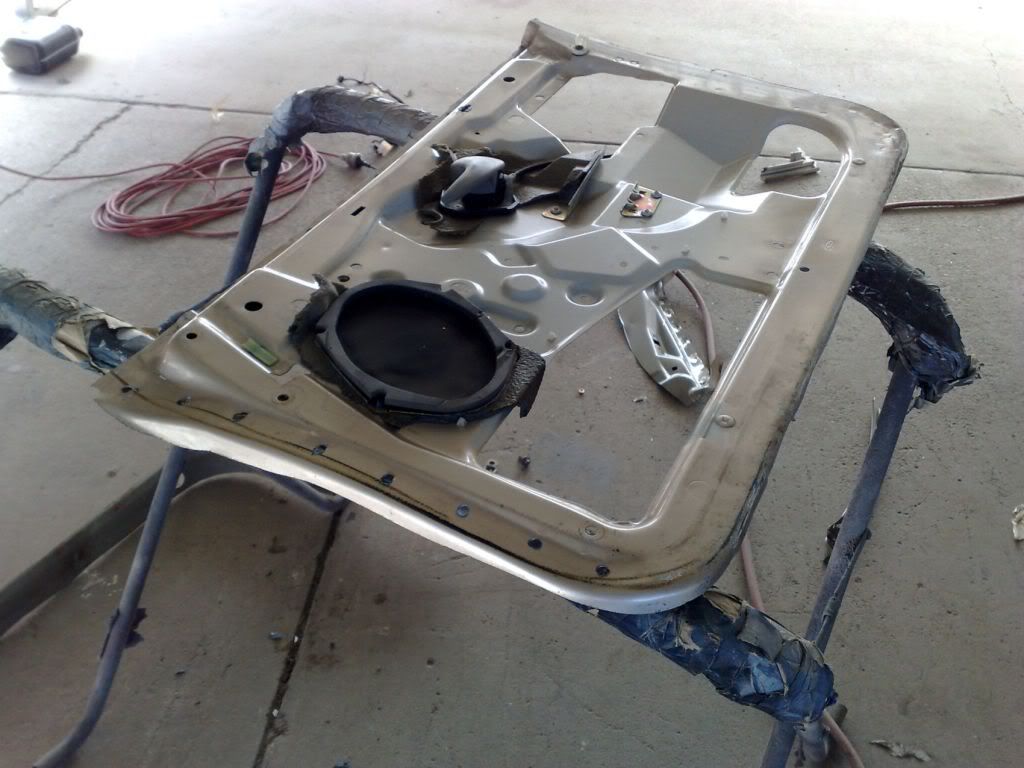 Now its the e-series door to go under the knife... cut out a appropriate size piece like in the photos, dont go to large just try and keep the job as small as possible: 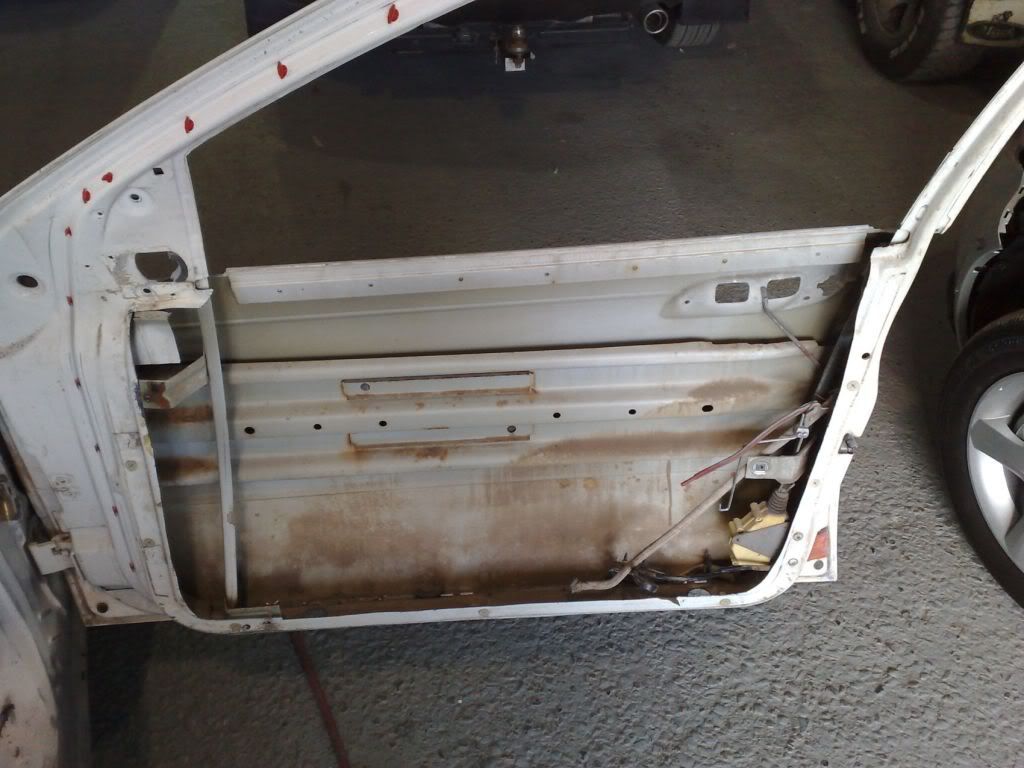 With a couple of vice gribs a quick check of how things are lining up with the new piece at home: 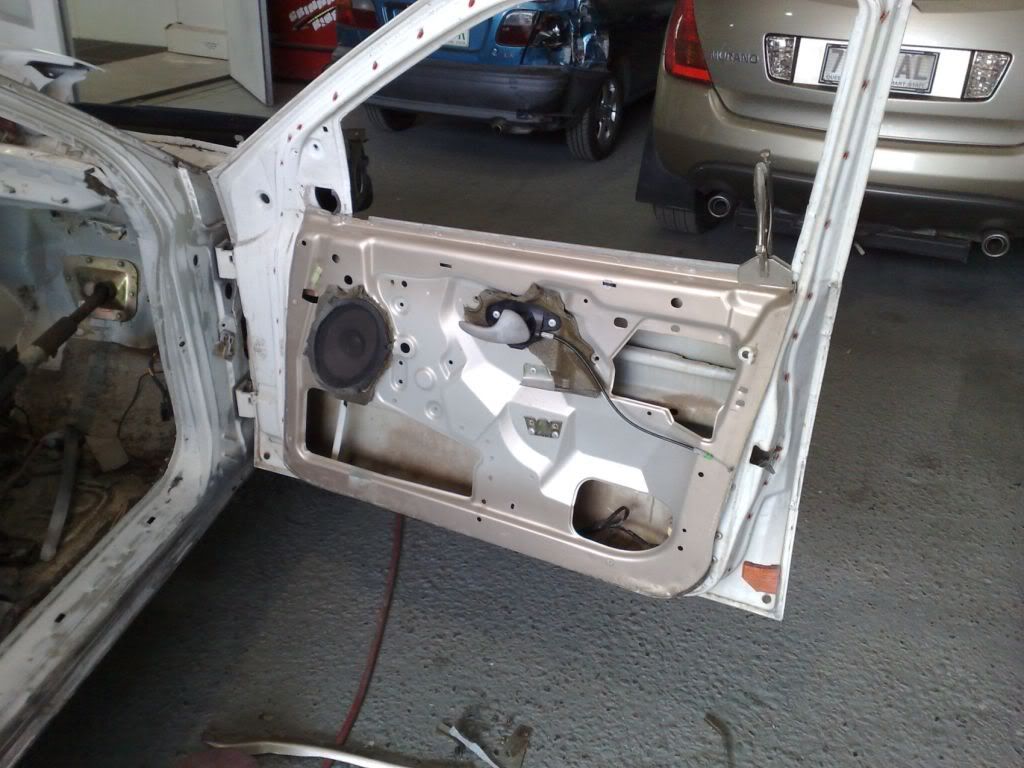 A quick nip and tuck at the top back corner to make the new piece fit: 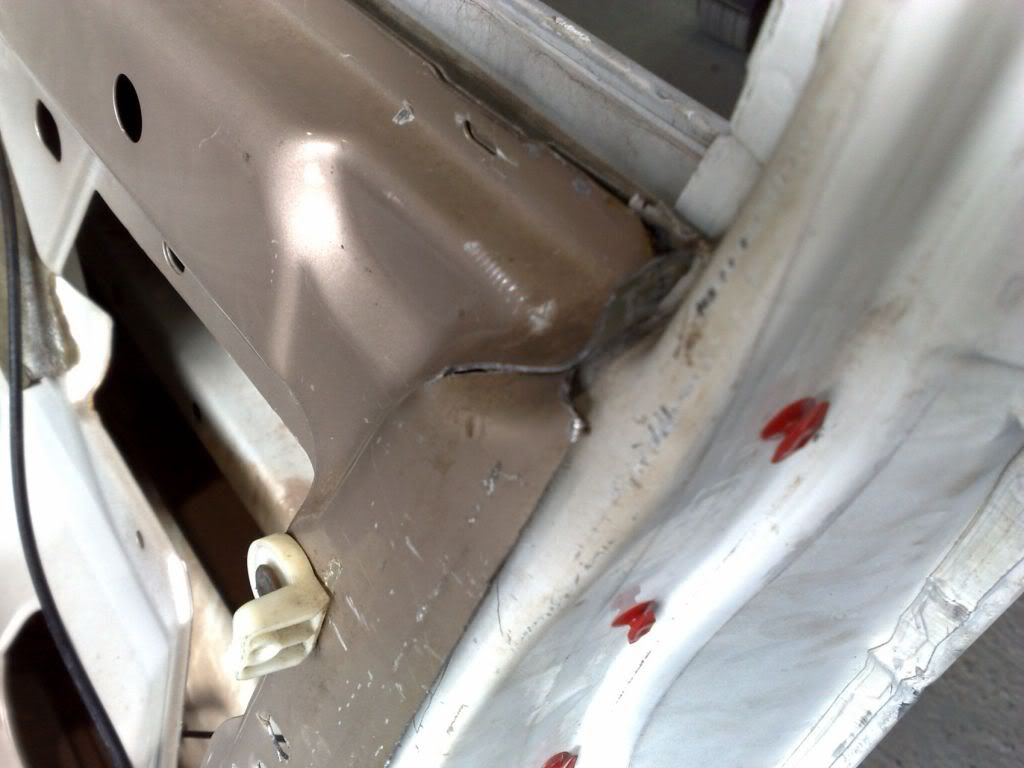 Now with the new piece you kinda want it slightly bigger then the piece you cut out on the E-series door. That way you can have the new piece over lap it and then you can cut threw both pieces and have a perfect fit. So what iv done is added some self tapping screws and screwed the new piece in place where i wanted it... refer to pic: 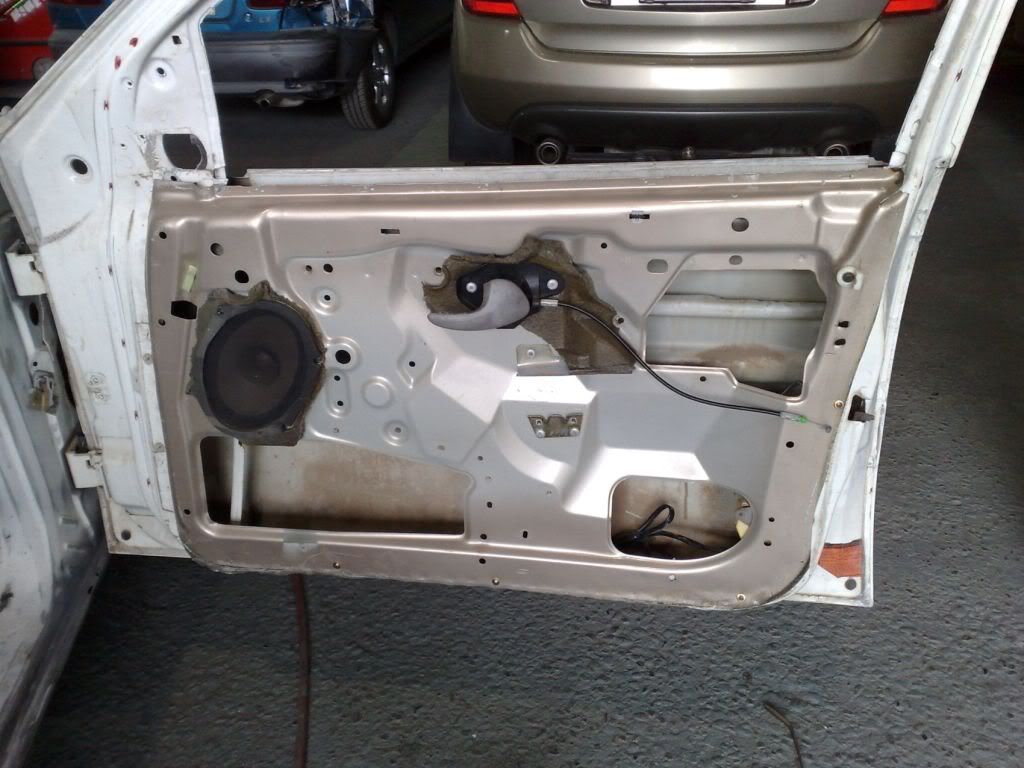 Before we do the final cut i do a quick check to make sure the trim looks good on it, it opens and shuts fine: 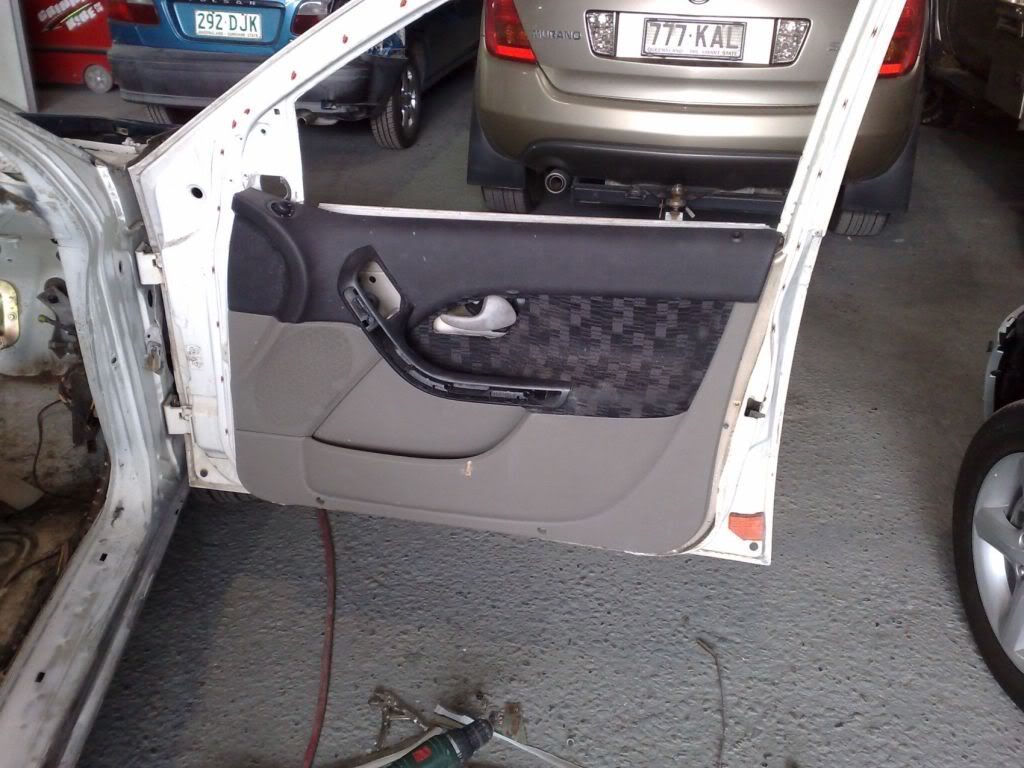 A shot of the inside of the car, the trim sits FANTABULIS and i dont have a giagantic gap at the back no more, YAY: 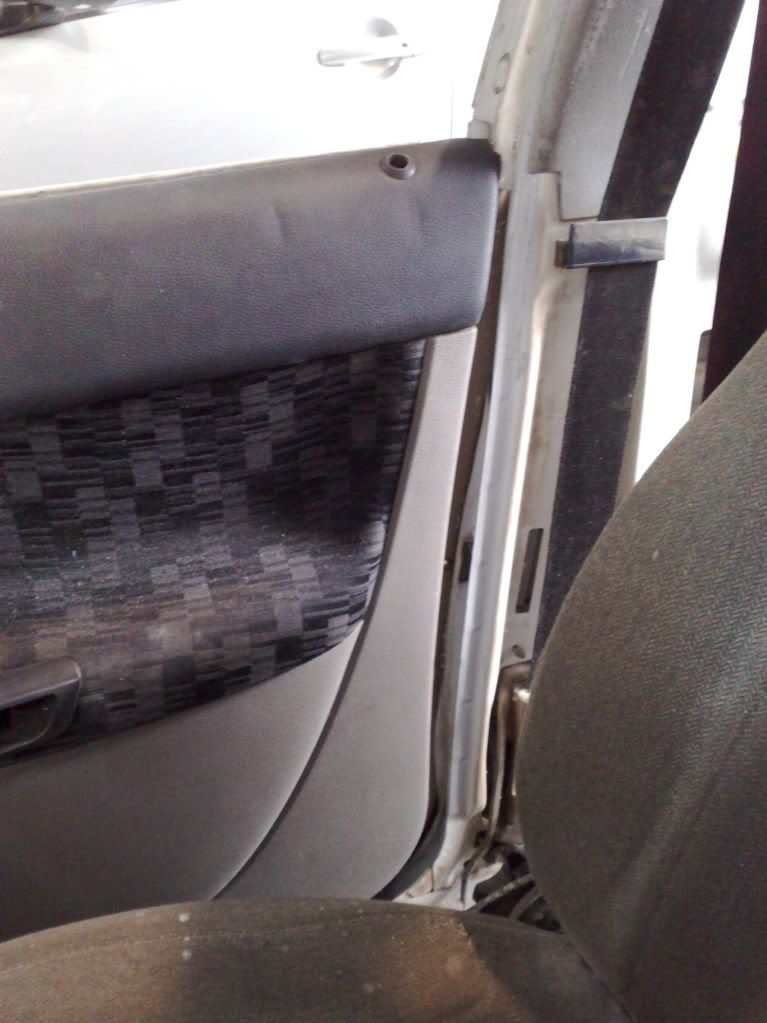 I start by hacksawing threw both trims, leaving it to be a perfect fit, this will allow me to but weld the 2 together, some people may leave the AU/BA piece overlap the door and weld it on, THIS IS A BIG NO... give it a year or 2 and there will be stacks of rust from water and moisteur getting trapped in the overlap. If you want a job that last and will look fantastic then take the time to do it properly: 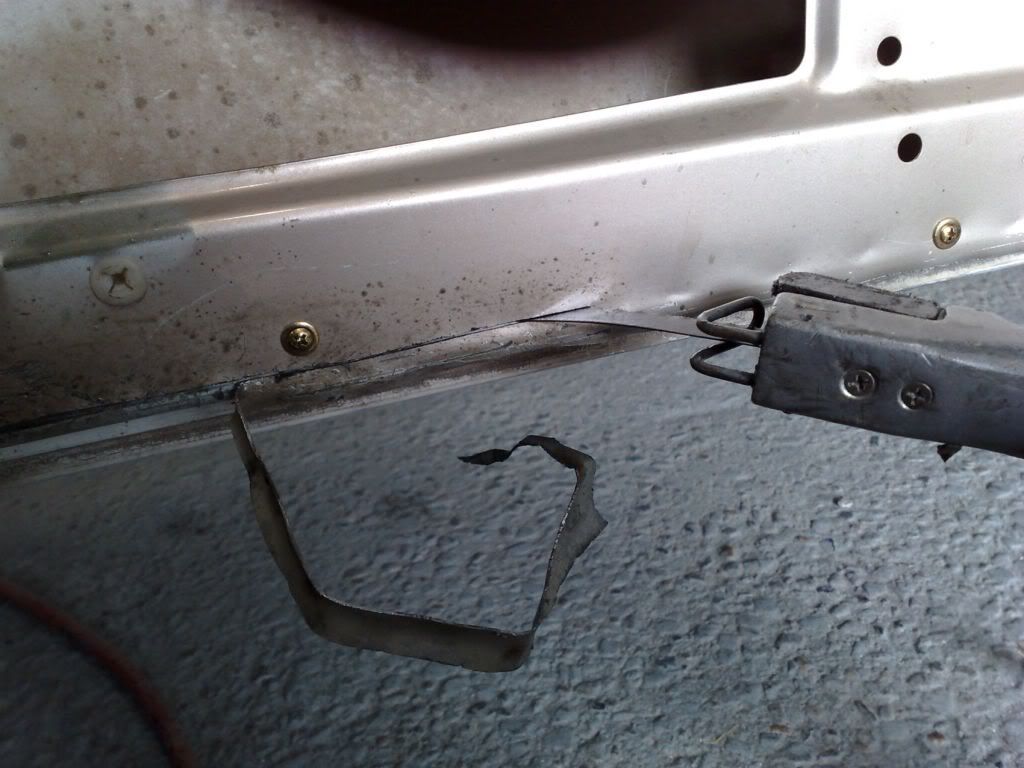 Now iv used a BRASS welder, this helps combat any rust from behind the door as some of you may know brass wont rust, this is no dearer in price compared to normal steel i believe, and you could hire out a welder from BOC or some where like that and weld all your doors up in one weekend providing you have them all cut out and ready to go, the reason i tack the piece on is to do a final test to make sure the trim sits right and the door open and shuts... best to be safe then sorry: 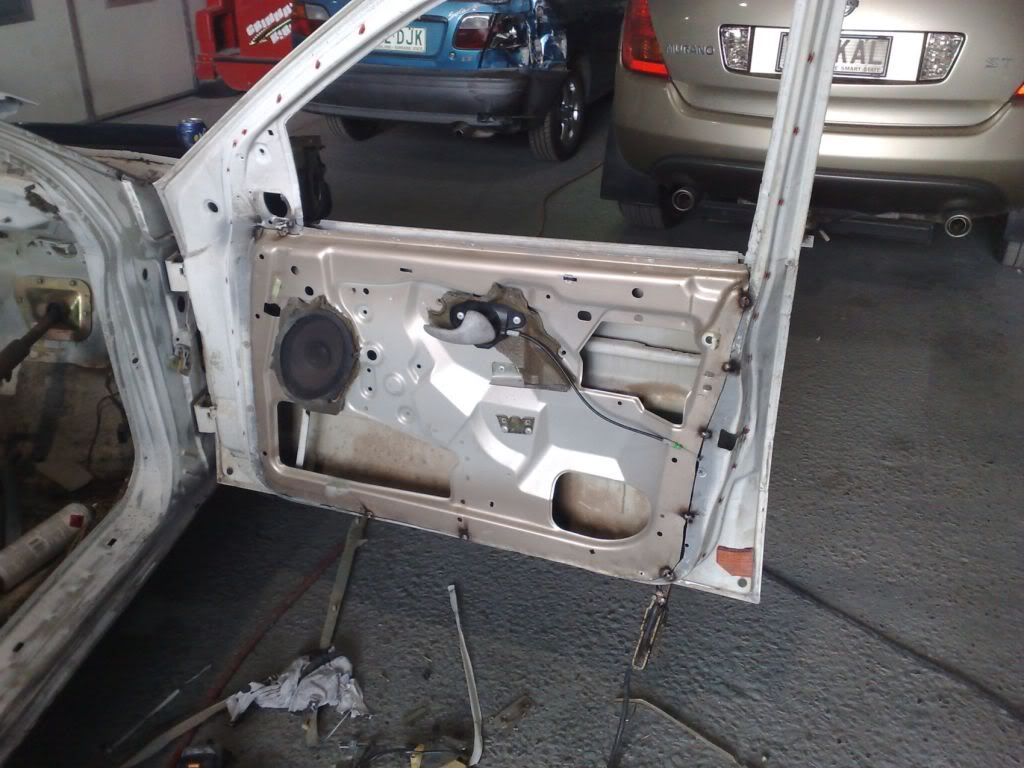 The welding process begins, weld in short bursts (meaning weld for about 10-15cms at a time, then cool off with a air blowere) heres the end product, i also welded up the unused holes: 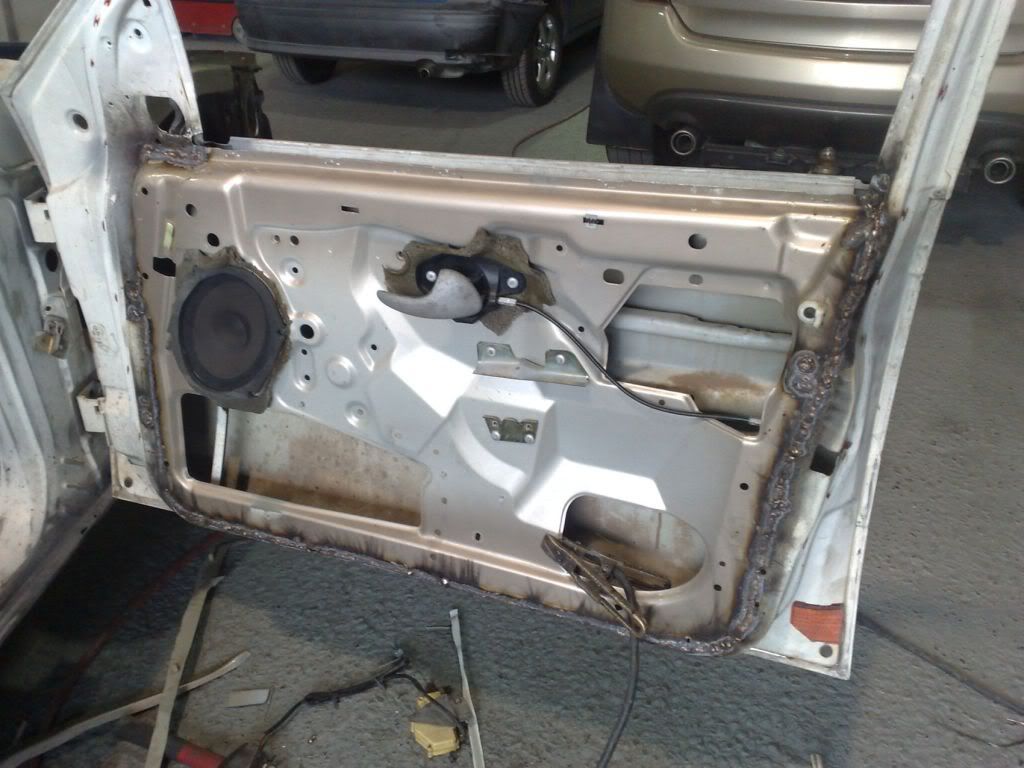 Now with a grinder or i used a large air sander with 40 grit on it, i got stuck into it, i clean up the back end of the welds and it came out superve... i then applied a simple skim of body filler across it, this is when i decided to call it a day because my back it killing me. Ill finish grinding and sanding it early next week, and if you think it looks like a mess now, then ill show some photos of it in primer. I reackon itll llok fantastic, ALSO big note, youll have to spot weld or weld the window runner on the e-series door to the Au/BA one, youll see what i mean when your doing it, As for the window winder i have thaught about getting some AU electric window mechanisms and converting the part where it bolts up to the glass to the EB style ones, this project will start later on. Theres alot more to consider besides just the window mechanism, like the actual locks and cabels, but ill cross that bridge when i get there, at the moment iam more focused on getting the trim to sit. So here it is: 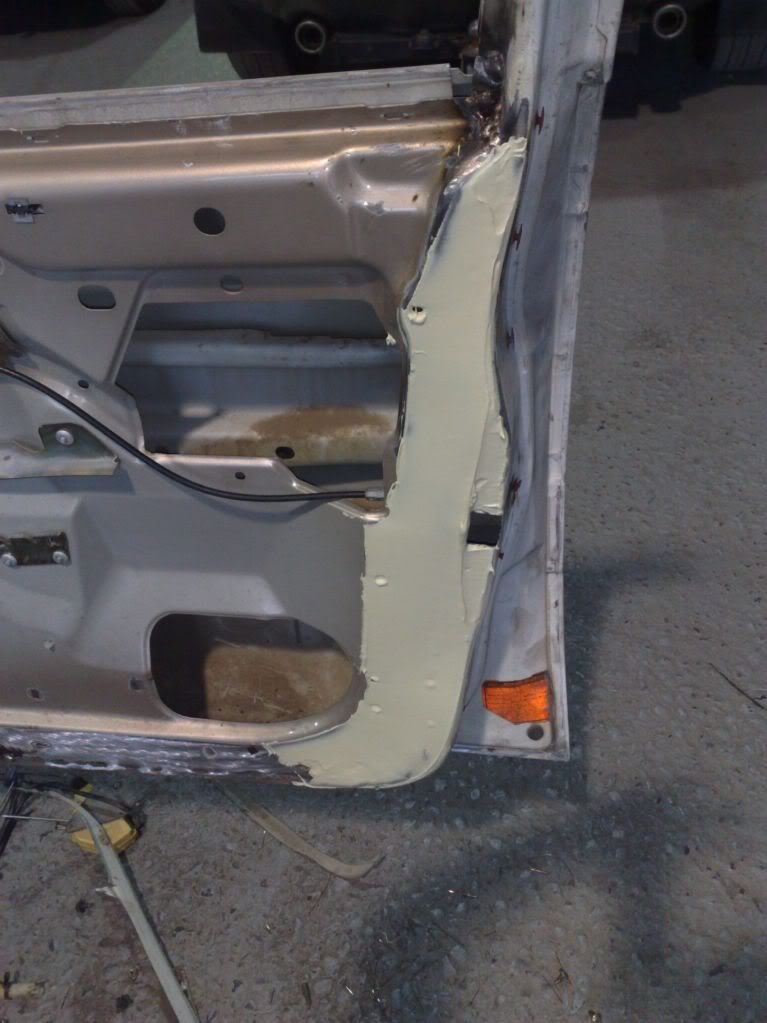 So i guess i did go a little crazy mwahh ha ha ha ha ha ha. And dont fear it may look ugly to some at the moment but after its primed itll look factory. Some of yous who want AU-BA-BF door trims may want to attempt a different root by modifying the e-series door, how ever i got fed up and annoyed with the gaps with the project i thaught of this idea. At least you know in the end if some one was to work on your car or had to repair your door, the trim could be removed exactly how it would in the original models and no extra screws or clips or any other crazy devieces are needed to help hold the trim on. Ill upload more pics later this week, as Iam going to attempt to do the other doors. Any coments or even ideas dont be scared to throw them on the tabel as this is the first time i have ever highly modified a car, and i hope my advice helps some one out there. L8erz. o yeah before i go a big thanks to itlookslikeaxr6 for telling me about photo bucket. cheers mate.
_________________ Weapon of choice, EB shell with a EL XR front powered by a BA engine. |
||
| Top | |
||
| Froudey |
|
||
|
your in-sane man, nah if ya done right the first time do it yaself. how much did ya pick the doors up for or were they damaged ones?
_________________ R.I.P Tobias my son. |
||
| Top | |
||
| smithykicks85 |
|
||
|
{USERNAME} wrote: your in-sane man, nah if ya done right the first time do it yaself. how much did ya pick the doors up for or were they damaged ones? Dude to save BIG BUCKS just pick up some damaged ones, make sure the damage it just on the outside skin, and take a few tools down and tell them youll take it off yourself. I got my 4 for around the hundred mark, they were badly damaged on the outside also check for rust.
_________________ Weapon of choice, EB shell with a EL XR front powered by a BA engine. |
||
| Top | |
||
| ef mick |
|
|||
|
keep up the good work mate hope all works out for u its going to be a weapon when ur finished
|
|||
| Top | |
|||
| smithykicks85 |
|
||
|
{USERNAME} wrote: keep up the good work mate hope all works out for u its going to be a weapon when ur finished thanks ef mick, i hope so, still have a fair few mods to go thew, so the next month or 2 will be buzy. but ill be sure to keep you's up to date with my progess.
_________________ Weapon of choice, EB shell with a EL XR front powered by a BA engine. |
||
| Top | |
||
| Who is online |
|---|
Users browsing this forum: No registered users and 28 guests |