

|
| nicco |
|
|||
|
{USERNAME} wrote: {USERNAME} wrote: if i were you, i'd be going a different path again, i would remove the orange lens from the boot garnish and tail lights, but leave the red ones in (unlike the altezzas) cause then you have something which looks stock, but f**k awesome at the same time! in case you were interested, the EB/ED tail lights actually are all clear lenses with a coloured insert inside them, so all the altezza lights are is the standard ones opened and the coloured lens removed. ive got the orange inserts removed from my tail lights... here is a pic.. Attachment: DSC01302.JPG spot on, thats exactly what im talking about. they look perfect imo |
|||
| Top | |
|||
| duvauchellemotors |
|
|||
|
Have you thought about shaving the boot? that would look mint with the scorcher bar and the number plate on the bar
|
|||
| Top | |
|||
| TROYMAN |
|
||
|
{USERNAME} wrote: {USERNAME} wrote: {USERNAME} wrote: if i were you, i'd be going a different path again, i would remove the orange lens from the boot garnish and tail lights, but leave the red ones in (unlike the altezzas) cause then you have something which looks stock, but f**k awesome at the same time! in case you were interested, the EB/ED tail lights actually are all clear lenses with a coloured insert inside them, so all the altezza lights are is the standard ones opened and the coloured lens removed. ive got the orange inserts removed from my tail lights... here is a pic.. Attachment: DSC01302.JPG how hard is that to do troyman, is there any cutting or does it just pull out? its a bit of stuffing around.. you need to cut through the factory plasic glue between the backing and the lense with an extremely hot knife or cut just behind the lense with a dremel..then the colour can be removed from inside..then stick the lense back on with black sikaflex. it took me about 3 hours on each one being carefull not to crack the lense. if you dont have patience its not a job to attempt.. |
||
| Top | |
||
| nicco |
|
|||
|
sorry to take this kinda off topic, but with the tail lights, couldnt you open the EA - ED ones the same as the EF/EL ones? I know when i did mine i chucked them in the oven for a few minutes until the glue got nice and soft, and then simply pulled them apart by hand. took about 2 minutes to open them each
when i tried to open it with a tub of boiling water and a pocket knife that took significantly longer though! |
|||
| Top | |
|||
| smithykicks85 |
|
||
|
GOOD NEWS, got the paint sample made up today. It looks great! Iv got a bit of paint in a container and we also sprayed a bit on a sample card and cleared it so you get a better idea. Its a 2 and half coat colour, which means they put 2 full coats on then fan out the spray gun to apply a thin mist. Any ways, it has several pearls in it such as green emerald, red and blue. Heres the sample in the container:
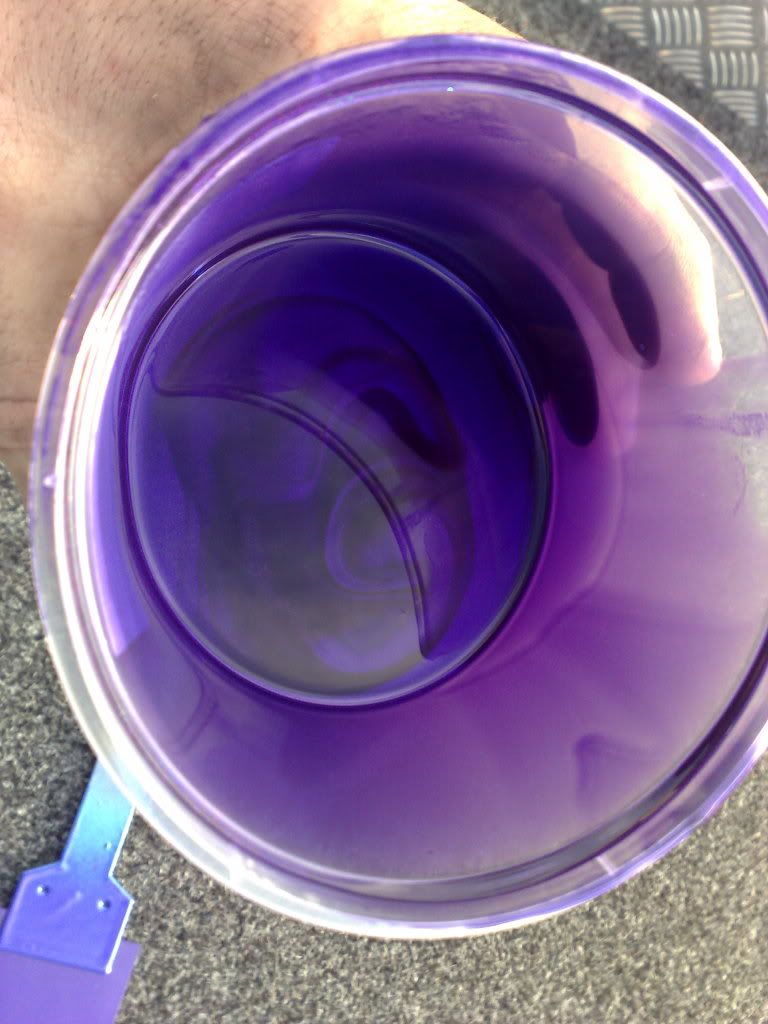 I was lucky enough to catch a bit of the afternoon sun to get this one, mind you the pictures and small paint sample really dont do it justice: 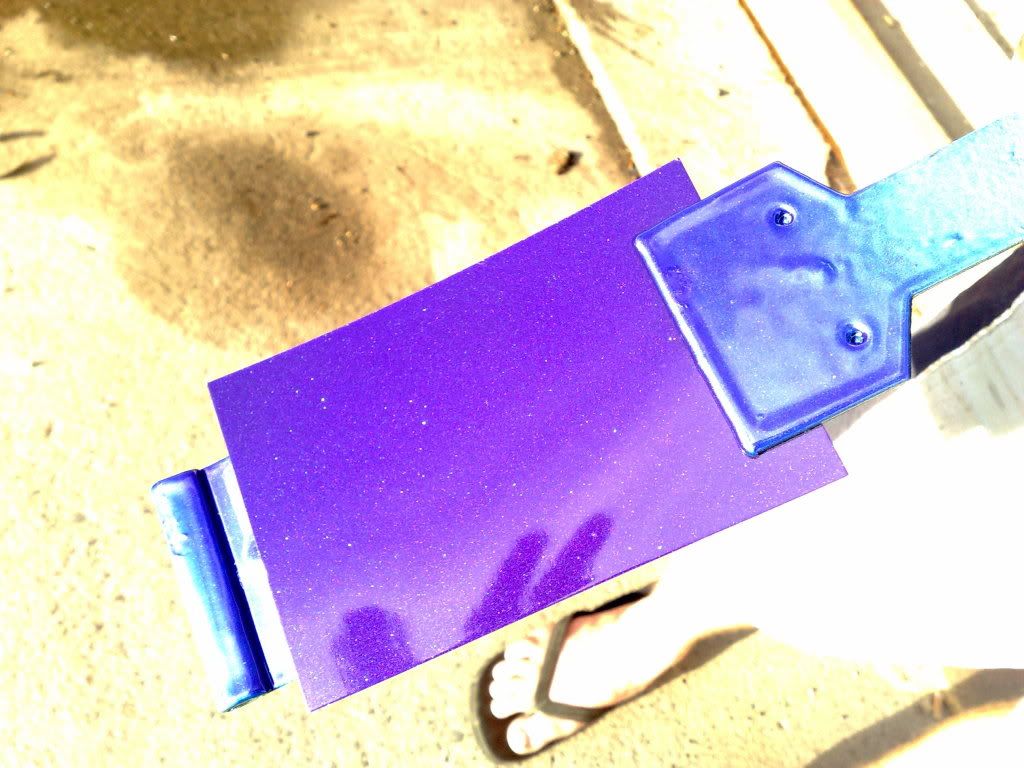 And heres a night time shot of it with my basic camera flash: 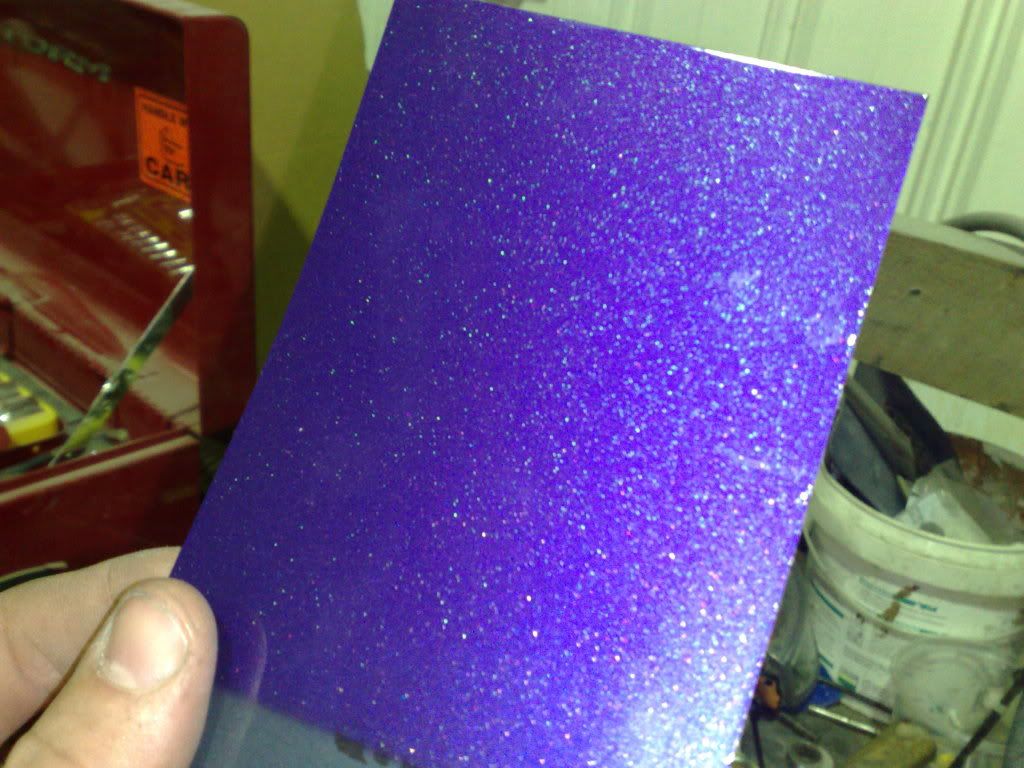 And finally heres the paint code and all that, doesnt make much sense to me but if some one is ever wanting to paint there car the same here it is: 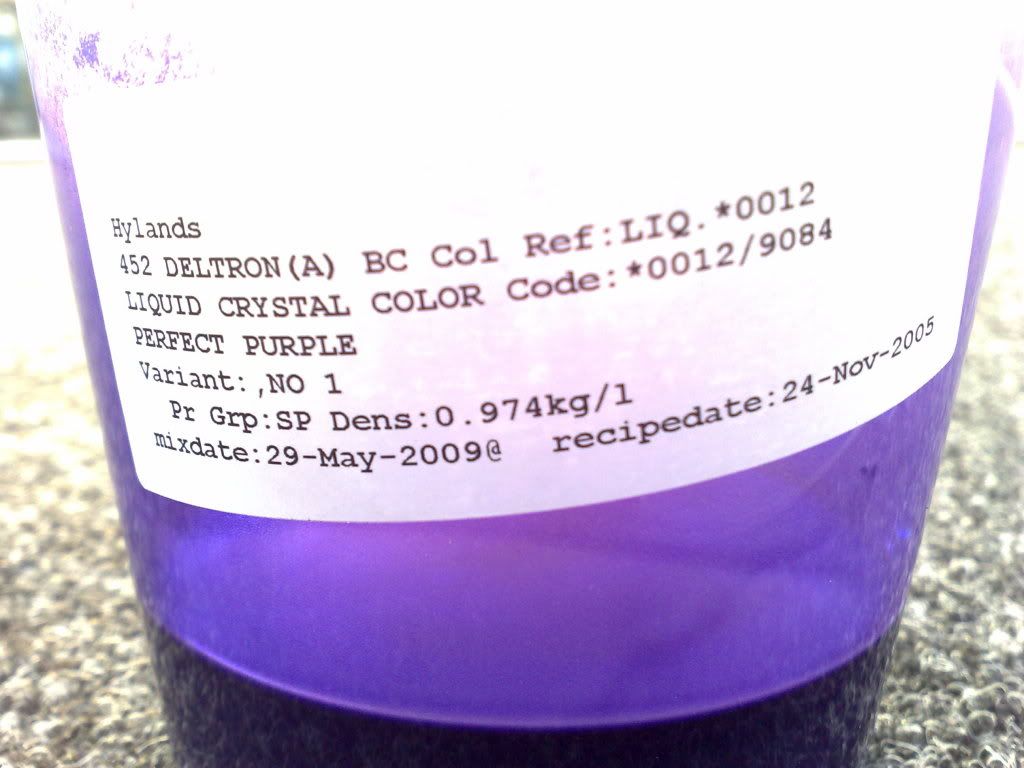 Also i have know idea what type of car this paint came out on, but i think its just a PPG special FX paint. Ill find out next week if it ever came out on a vehicle of such. FRANKIEH : I think your right, i mish colour the garnish and tint the tail lights, ill try tinting the stock and the clearies and see which ones best suit, if neither look appealing ill try what TROYMAN and NICCO are talking about with removing the orange inserts. FIEND : Thanks for your comment champ, yeah iam just building the car Ford should have built in between ED and EF. Thanks for all the cool comments and ideas guys. DUVANCHELLEMOTORS : I did a stack of research on shaven boots on the box cars before i even started on mine, i was going to put a EA boot on it but i really prefered the EB garnish and lights. However i did see someone on here who welded up the garnish area to have it dead flat. It looked really neat however it did come across a bit VN ish to me IMO. TROYMAN AND NICCO : The break light idea is great, i never knew about it, ill try the tint effect how ever if it makes the car look ricey or over done then i would deffinetly try your idea. NICCO : With the oven idea that may work, but could you use a heat gun or even a hair dryer? Also when you mentioned a heated knife, what if you bought a cheap solderin iron from bunnings and grinded the tip so it was flat like a knife and melted threw it? Just ideas. Once again thanks for other people comments. Ill be doing a massive weekender on the rest of the body. Will keep you posted like always. Keep your ideas comming to. Still have a long way to go. Cheers guys.
_________________ Weapon of choice, EB shell with a EL XR front powered by a BA engine. |
||
| Top | |
||
| Froudey |
|
||
|
{USERNAME} wrote: GOOD NEWS, got the paint sample made up today. It looks great! Iv got a bit of paint in a container and we also sprayed a bit on a sample card and cleared it so you get a better idea. Its a 2 and half coat colour, which means they put 2 full coats on then fan out the spray gun to apply a thin mist. Any ways, it has several pearls in it such as green emerald, red and blue. Heres the sample in the container:  I was lucky enough to catch a bit of the afternoon sun to get this one, mind you the pictures and small paint sample really dont do it justice:  And heres a night time shot of it with my basic camera flash:  And finally heres the paint code and all that, doesnt make much sense to me but if some one is ever wanting to paint there car the same here it is:  Also i have know idea what type of car this paint came out on, but i think its just a PPG special FX paint. Ill find out next week if it ever came out on a vehicle of such. FRANKIEH : I think your right, i mish colour the garnish and tint the tail lights, ill try tinting the stock and the clearies and see which ones best suit, if neither look appealing ill try what TROYMAN and NICCO are talking about with removing the orange inserts. FIEND : Thanks for your comment champ, yeah iam just building the car Ford should have built in between ED and EF. Thanks for all the cool comments and ideas guys. DUVANCHELLEMOTORS : I did a stack of research on shaven boots on the box cars before i even started on mine, i was going to put a EA boot on it but i really prefered the EB garnish and lights. However i did see someone on here who welded up the garnish area to have it dead flat. It looked really neat however it did come across a bit VN ish to me IMO. TROYMAN AND NICCO : The break light idea is great, i never knew about it, ill try the tint effect how ever if it makes the car look ricey or over done then i would deffinetly try your idea. NICCO : With the oven idea that may work, but could you use a heat gun or even a hair dryer? Also when you mentioned a heated knife, what if you bought a cheap solderin iron from bunnings and grinded the tip so it was flat like a knife and melted threw it? Just ideas. Once again thanks for other people comments. Ill be doing a massive weekender on the rest of the body. Will keep you posted like always. Keep your ideas comming to. Still have a long way to go. Cheers guys. That colour will look awesome.
_________________ R.I.P Tobias my son. |
||
| Top | |
||
| mitchell g |
|
||
|
{USERNAME} wrote: GOOD NEWS, got the paint sample made up today. It looks great! Iv got a bit of paint in a container and we also sprayed a bit on a sample card and cleared it so you get a better idea. Its a 2 and half coat colour, which means they put 2 full coats on then fan out the spray gun to apply a thin mist. Any ways, it has several pearls in it such as green emerald, red and blue. Heres the sample in the container:  I was lucky enough to catch a bit of the afternoon sun to get this one, mind you the pictures and small paint sample really dont do it justice:  And heres a night time shot of it with my basic camera flash:  And finally heres the paint code and all that, doesnt make much sense to me but if some one is ever wanting to paint there car the same here it is:  Also i have know idea what type of car this paint came out on, but i think its just a PPG special FX paint. Ill find out next week if it ever came out on a vehicle of such. FRANKIEH : I think your right, i mish colour the garnish and tint the tail lights, ill try tinting the stock and the clearies and see which ones best suit, if neither look appealing ill try what TROYMAN and NICCO are talking about with removing the orange inserts. FIEND : Thanks for your comment champ, yeah iam just building the car Ford should have built in between ED and EF. Thanks for all the cool comments and ideas guys. DUVANCHELLEMOTORS : I did a stack of research on shaven boots on the box cars before i even started on mine, i was going to put a EA boot on it but i really prefered the EB garnish and lights. However i did see someone on here who welded up the garnish area to have it dead flat. It looked really neat however it did come across a bit VN ish to me IMO. TROYMAN AND NICCO : The break light idea is great, i never knew about it, ill try the tint effect how ever if it makes the car look ricey or over done then i would deffinetly try your idea. NICCO : With the oven idea that may work, but could you use a heat gun or even a hair dryer? Also when you mentioned a heated knife, what if you bought a cheap solderin iron from bunnings and grinded the tip so it was flat like a knife and melted threw it? Just ideas. Once again thanks for other people comments. Ill be doing a massive weekender on the rest of the body. Will keep you posted like always. Keep your ideas comming to. Still have a long way to go. Cheers guys. that will look awsome almost looks like the purple in the ba's |
||
| Top | |
||
| XR-Lane |
|
|||
|
Looks great smithy, cant wait to see it painted.
Froudey and Mitchell G can you stop with the quoting of all the pics please i only need to see them once. Your killing my dial up ffs. |
|||
| Top | |
|||
| Froudey |
|
||
|
{USERNAME} wrote: Looks great smithy, cant wait to see it painted. Froudey and Mitchell G can you stop with the quoting of all the pics please i only need to see them once. Your killing my dial up ffs. Sorry man, Ya wanna take it to feinds thread lol
_________________ R.I.P Tobias my son. |
||
| Top | |
||
| EFFalcon |
|
|||
|
It almost looks like the VE purple.
will look fantastic!
_________________ FALCN6 - EF GLi Turbo, 20" Rims, Air Bag Suspension, Straight LPG, 225rwkw |
|||
| Top | |
|||
| FordFairmont |
|
||
Posts: 6113 Joined: 8th May 2007 |
the build is coming along great, i probably wouldve gone with a purple 'not as light' though
maybe something that goes dark in full sun, with light purple highlights on the curvature of the panels.... something similar to the factory bordeaux colour 
|
||
| Top | |
||
| itlookslikeaxr6 |
|
|||
|
{USERNAME} wrote: I didn't know you could do a LED conversion on the brake lights, very interesting... is it hard to do? or as simple as changing bulbs? Iv seen the EA ones but for some reason they just don't do it for me. Well iv got some dark tint here i guess i could do a quick trial on the old lights and garnish to see how it looks when i get the car back. You still got that xr6 garnish? Ill PM u in a bit then. Cheers again Mick. I'm sure there's a teco on here on how to do an LED conversion on the brake lights. I've still got the XR6 garnish, do that tinting on the the lights and a fairmont garnish? if you don't like it ill be interested in the fairmont garnish and maybe the lights mine have little cracks, so would be good if yours are in good condition. Edit: just read about removing the orange lens in the lights. Sounds the go for me.
_________________
|
|||
| Top | |
|||
| smithykicks85 |
|
||
|
Hey all again. thanks for your comments and ideas, much appreciated. Well i got what i wanted done on the weekend. But i decided to attempt another mod on the rear bar. Iam sure alot of you may find this helpful and interesting.
MODIFYING THE READ BAR FOR A DUAL EXHAUST SYSTEM: Some of you may have read earlier that I really want a dual exhaust system, as iv seen a few pics of people who have done it and in my oppinion it looks f*@#ing tuff. However some people have left the fuel tank in and not had any troubles witch it blowing up. Iv decided to get rid of the stock tank and either locate it in the boot or put in in the centre and make a drop tank... dont know yet. Any ways this small project should only really tank you about 8-10 hours to do. It can be done on your stock plastic bars with a piece of plastic welded on, however your gonna wanna have some idea on plastic welding to attempt it or someone who knows how to weld it. Any ways if you dont have the confidence in plastic welding you can pick up a fibre glass bar for pretty cheap these days, (thats what i did) any ways hope you enjoy this write up Heres my scorcher rear bar exhaust cut out: 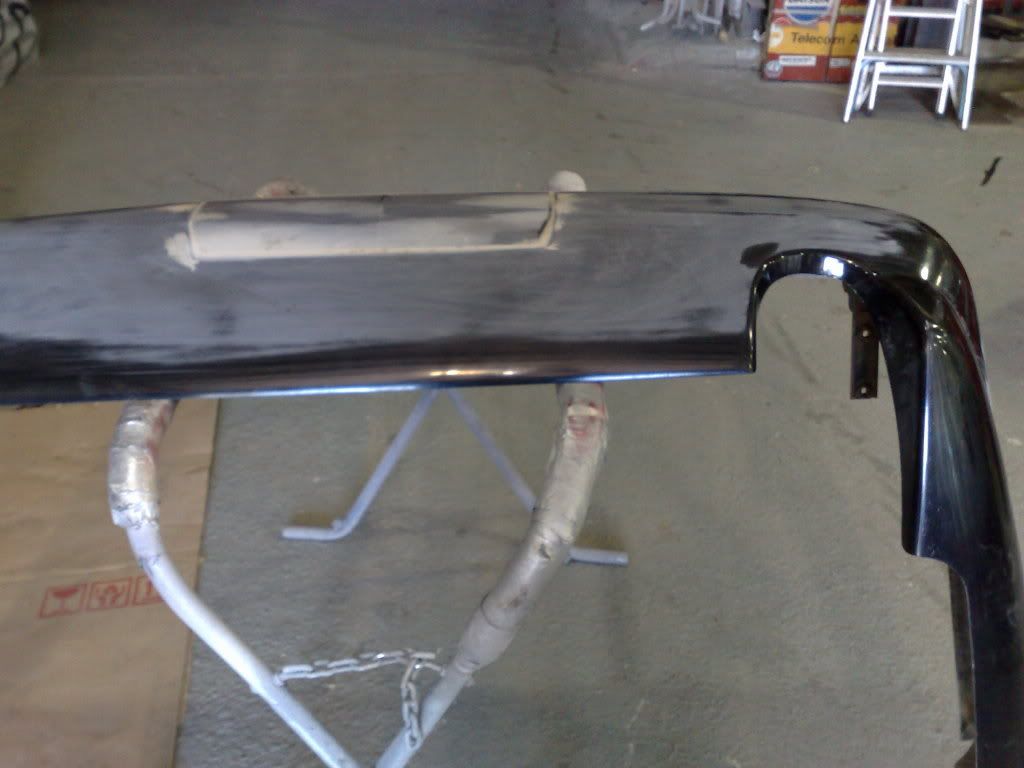 With some masking tape, simply tape over the cut out like so: 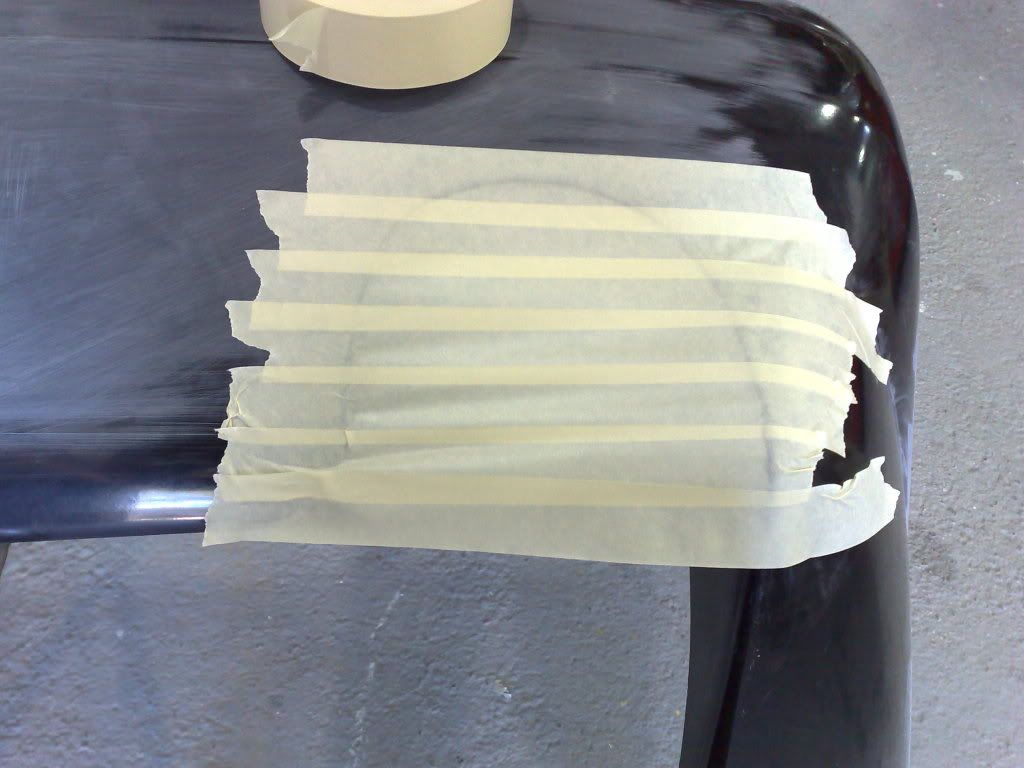 Grab a sharp razor or stanly knife and cut it out and making a template: 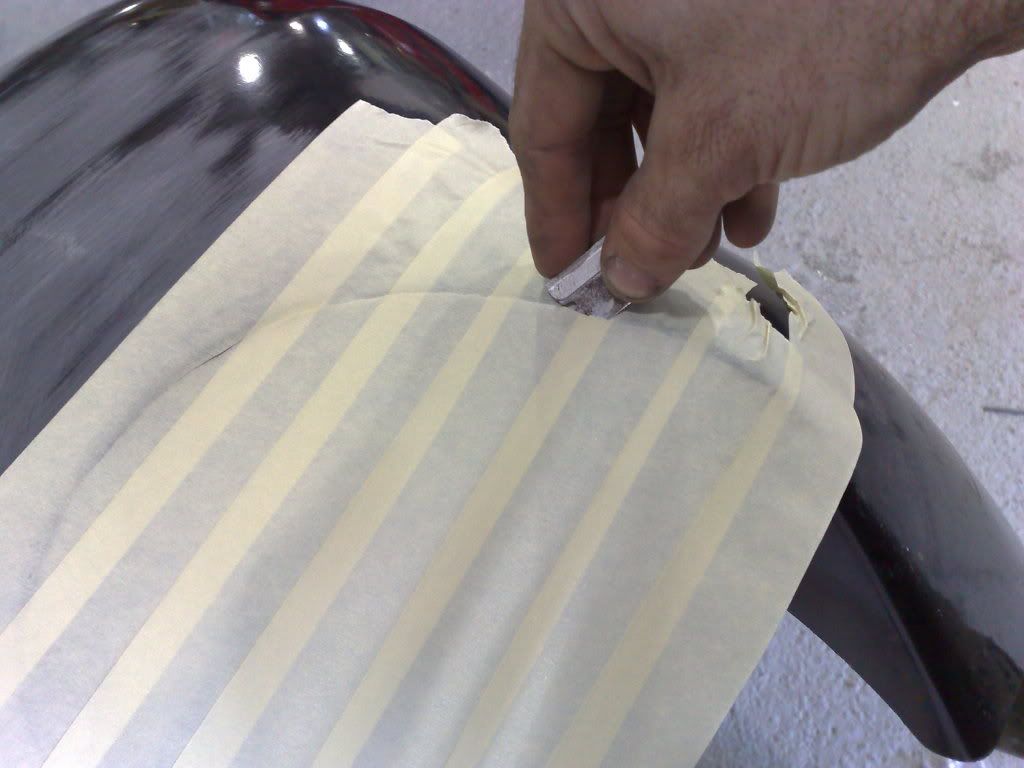 With your template go to the opposite end of the rear bar, and flip the template over creating the opposite effect, if your lost just follow the pics: 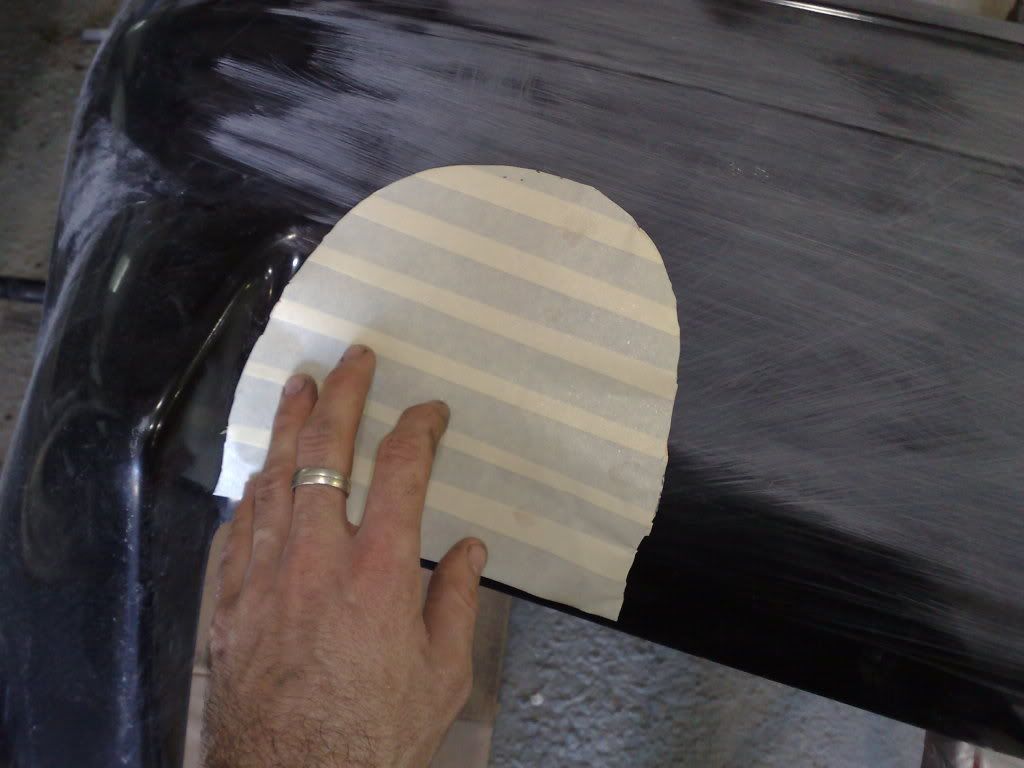 Tape your stencel down in your desired place and grab a niko or pen and trace the templat out like so: 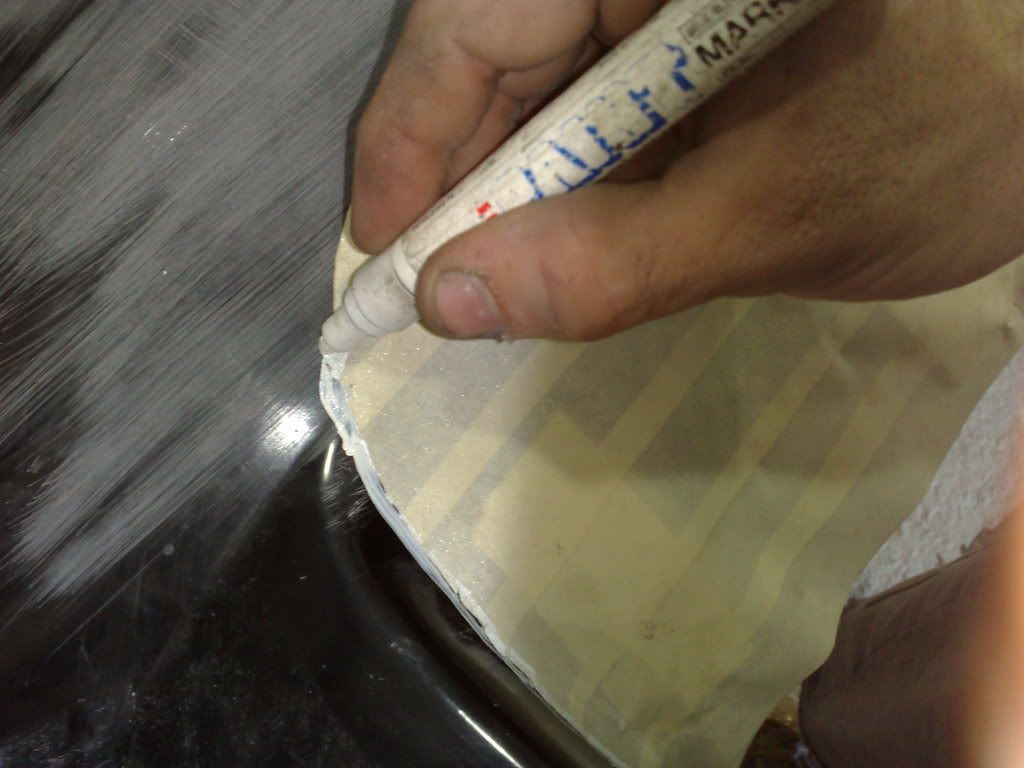 Make sure you grab a ruler and measure the original cut out as you can see with me i was about 7mm out, best to take your time with this and not rush it, you dont want a uneven looking rear bar: 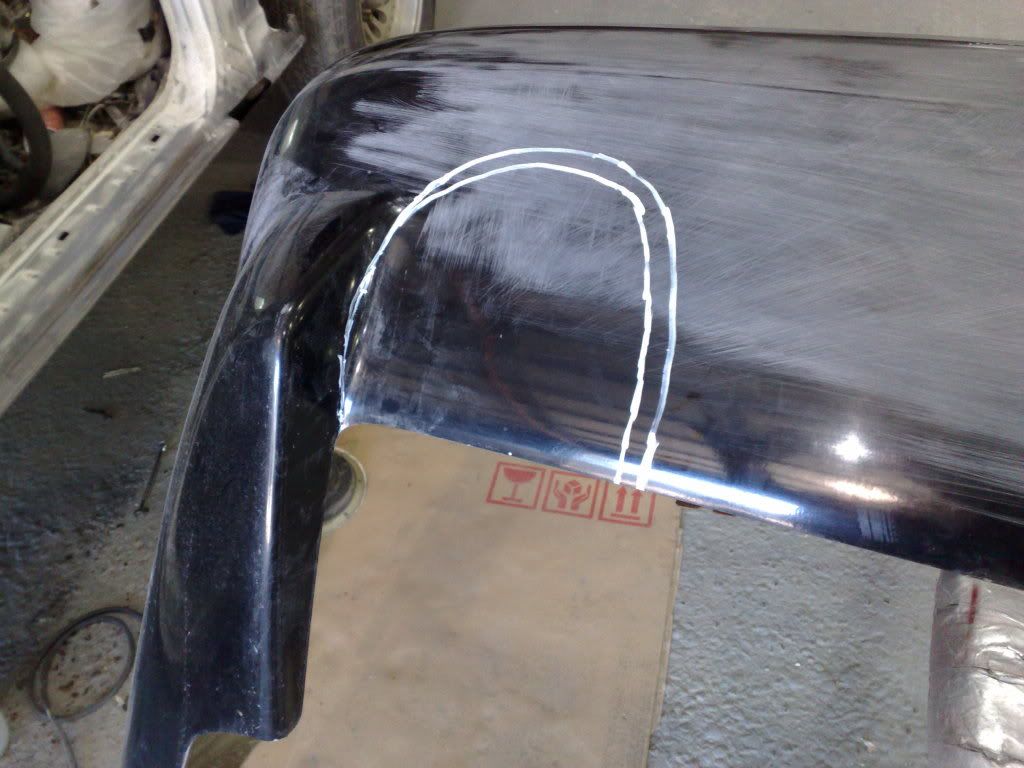 Cut it out with a air hacksaw like so, also try to cut it in a few mil, that way you have a bit of room for error and also a bit of room to sand up and perfect the shape: 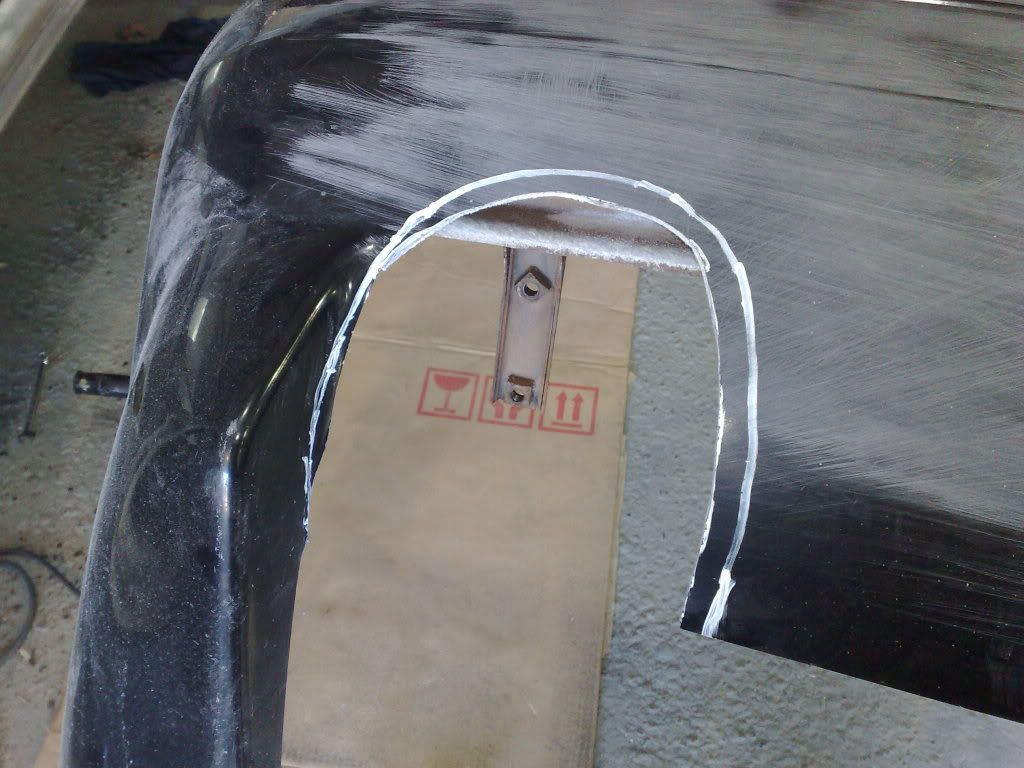 Sand the shape up with a orbital, can also be done by hand but may take a while: 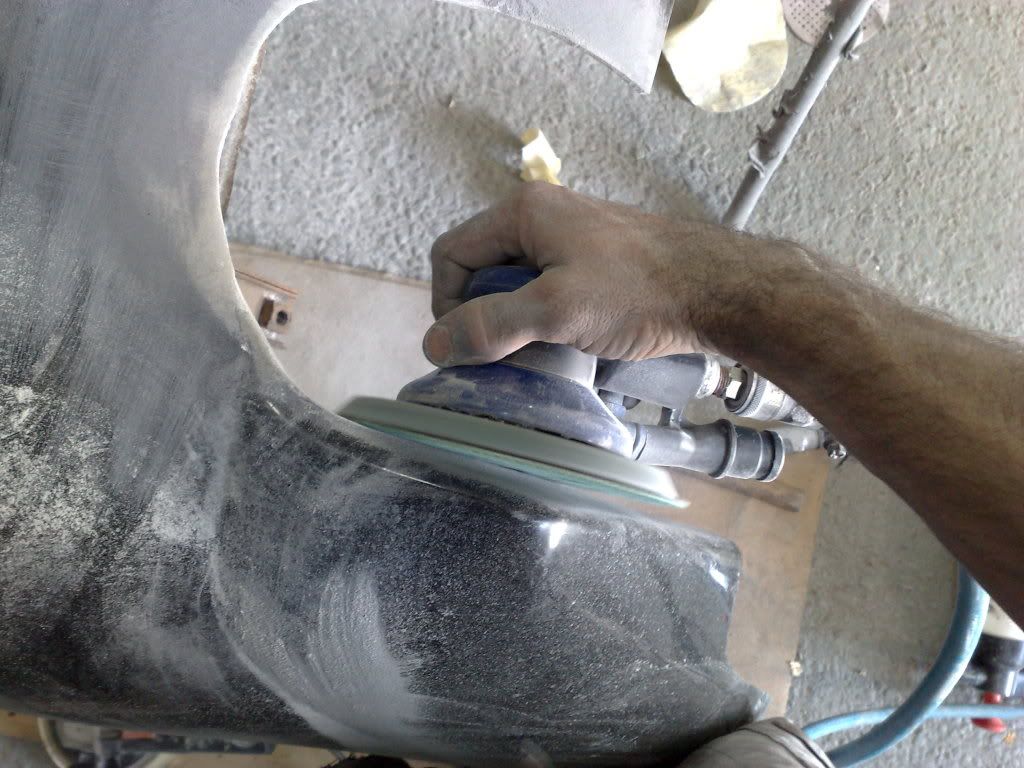 Sand around the exhause hole until its paper thin, this will allow the new fibre glass to grip on to the bar, and also youll be able to sand it off flush with out it breaking off or having a huge high spot around the exhause hole: 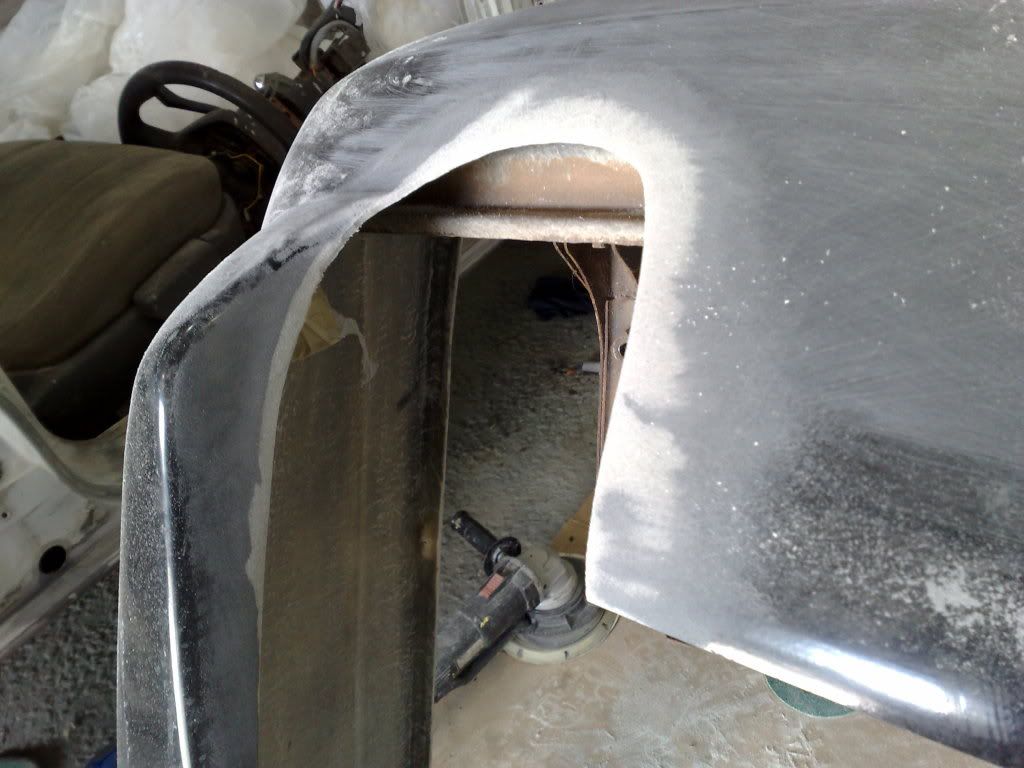 With several layers of masking tape, aliminium tape or even sound deadner as iv used create the shape that you need for the fibre glass to flow back, if your lost just follow the pics: 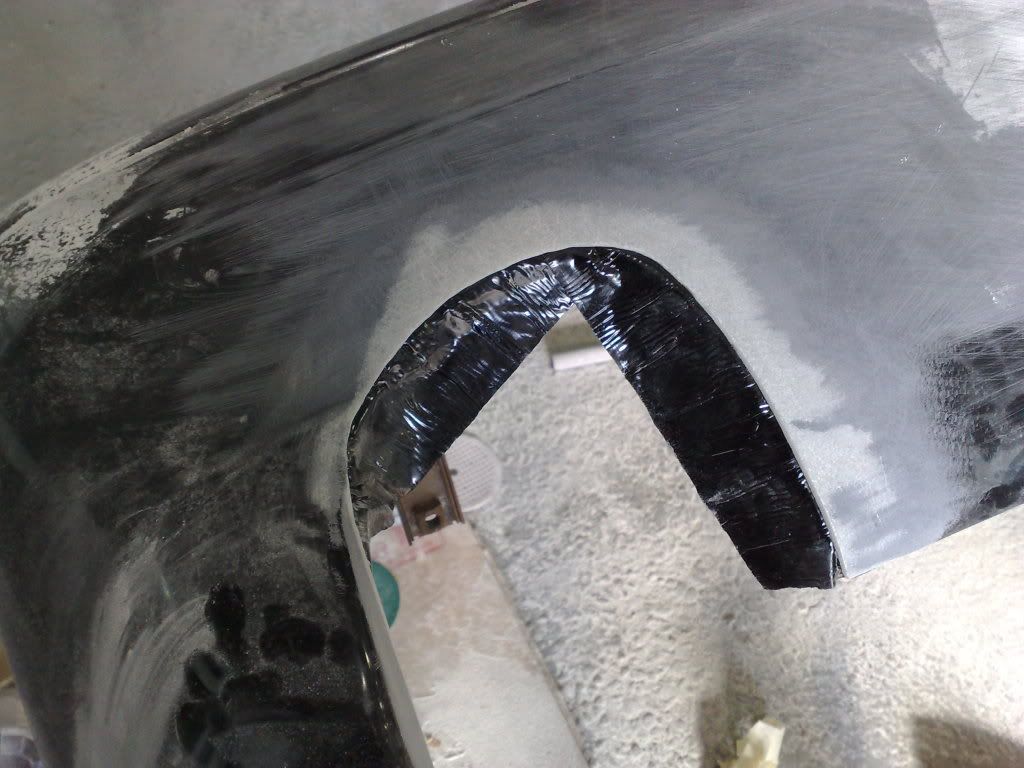 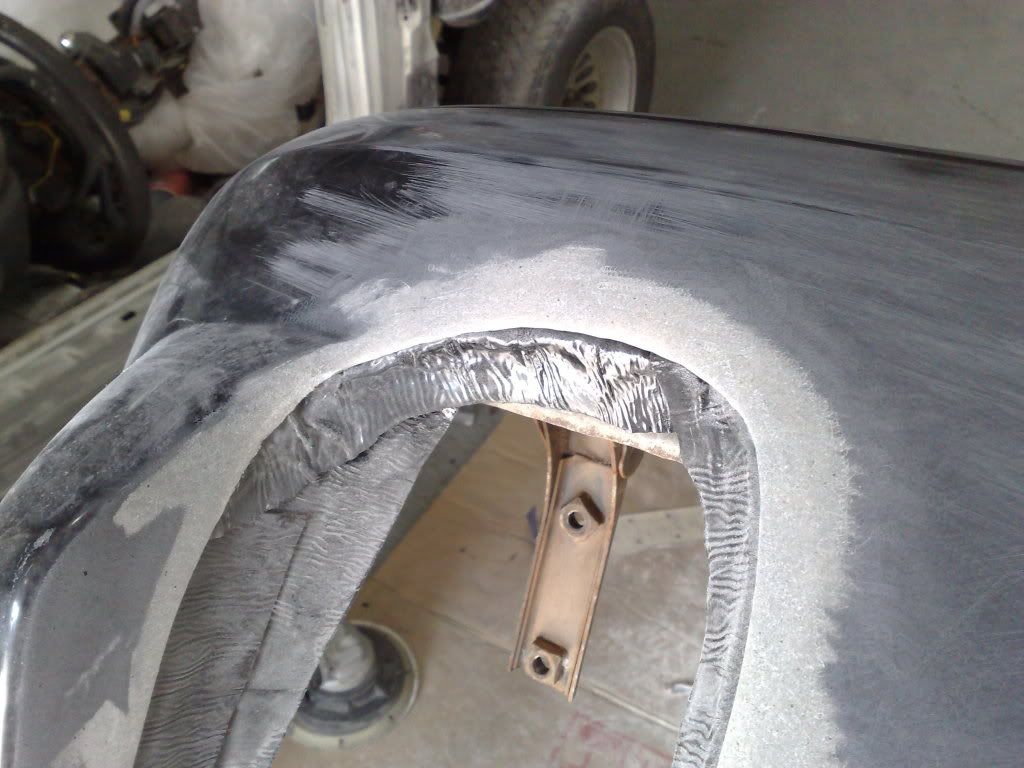 Once dne trim it up with a razor blade and make sure you have the right angel and shape as the original: 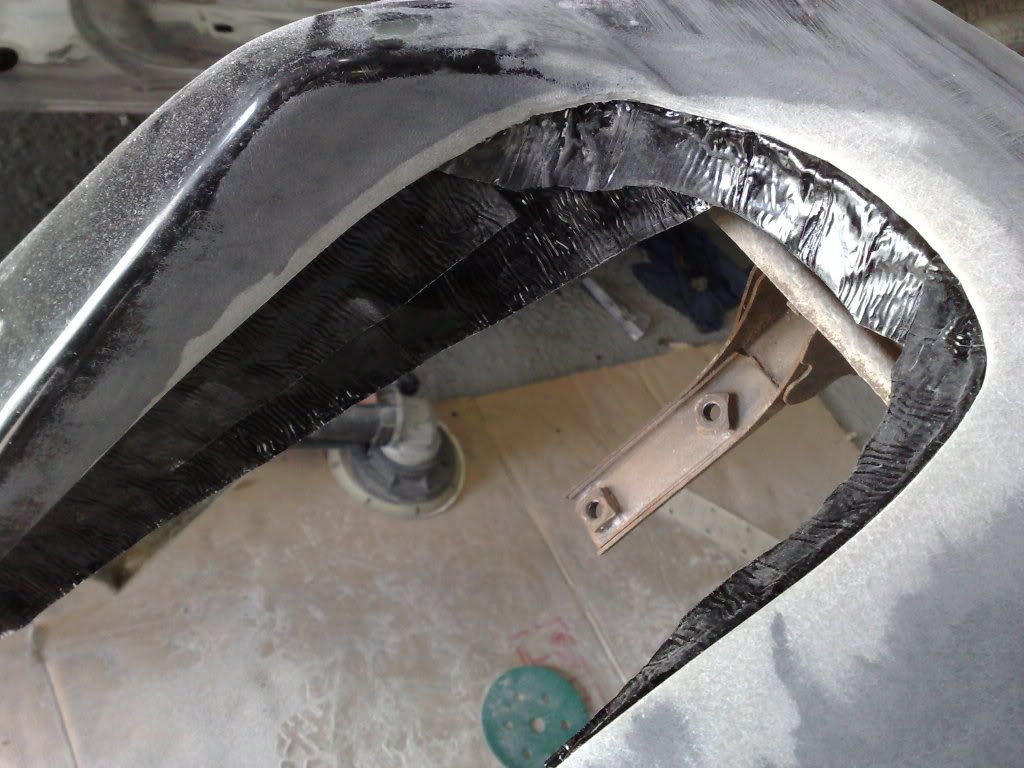 You can go to super cheap and pick up a fibre glass kit for around the 20 bob mark, in this kit youll have more then enough to do this mod: 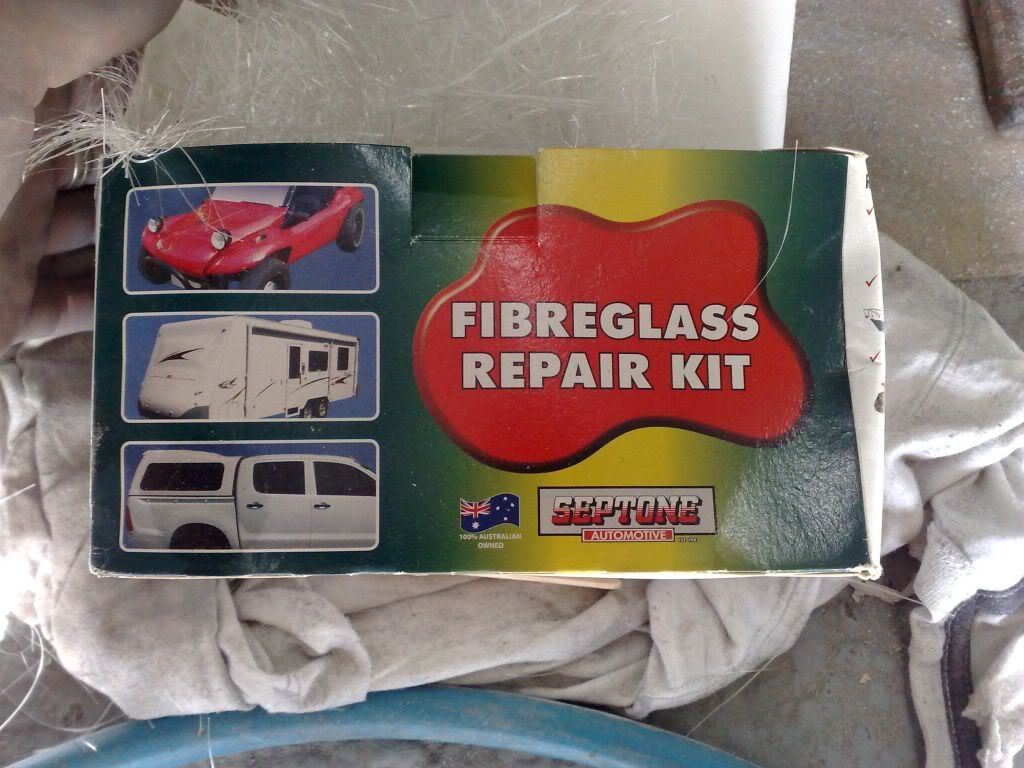 Mix and apply the fibre glass, apply the fibre glass so it flows back in the bar, as in the picture: 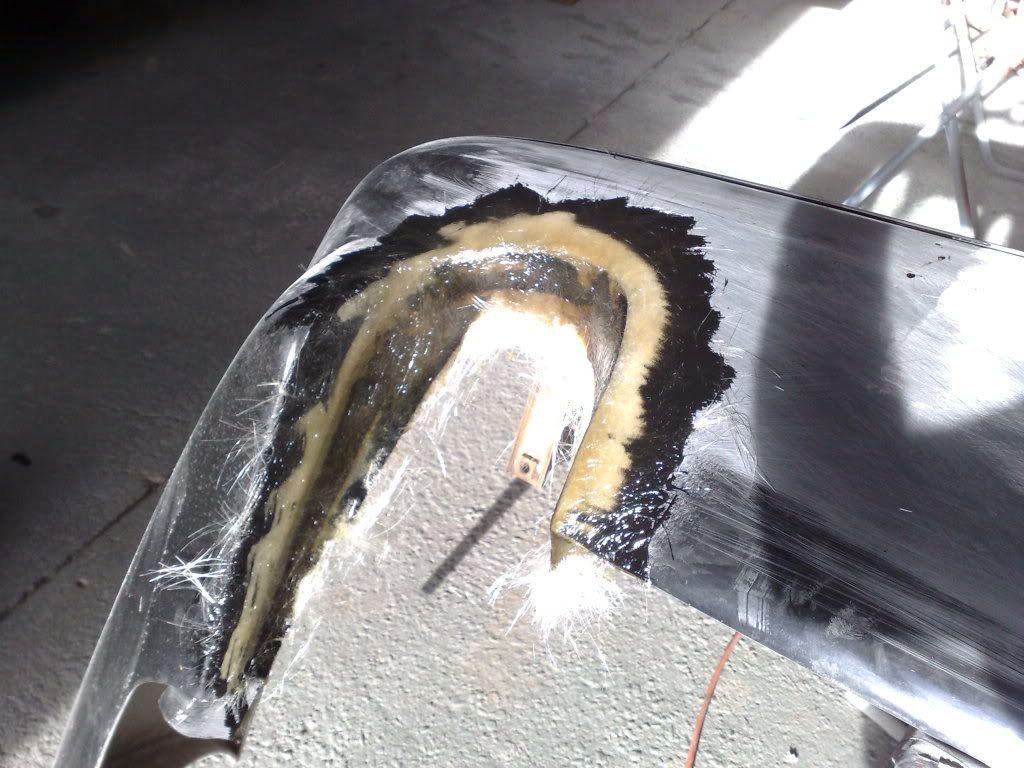 Heres a close up: 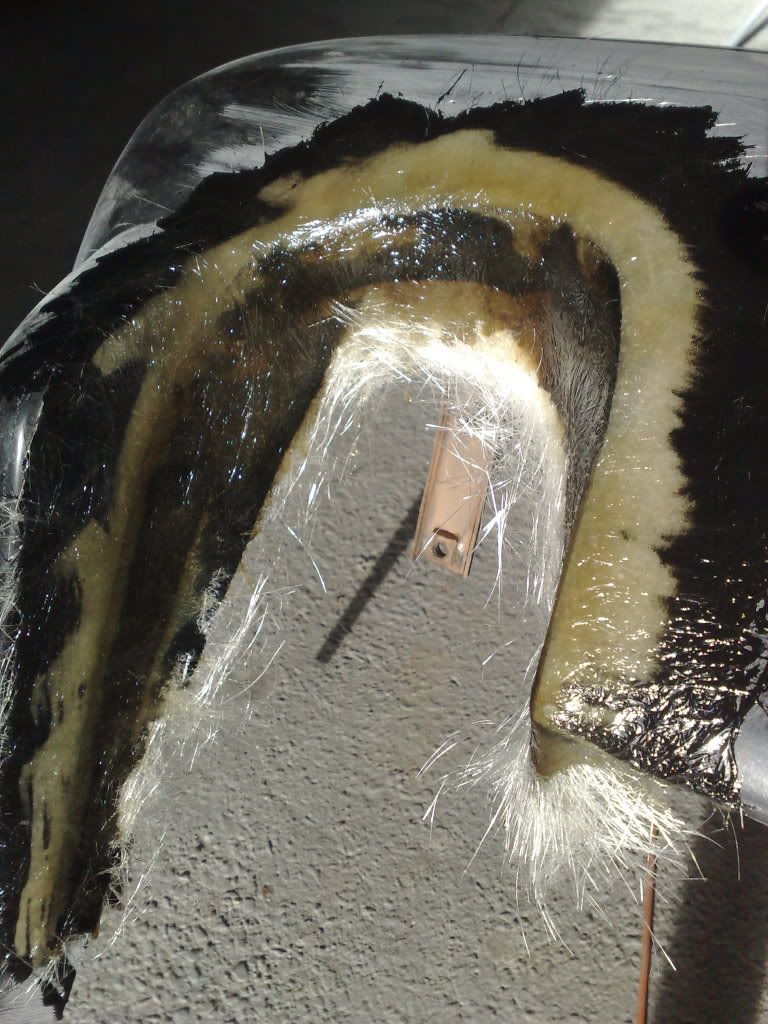 Put the rear bar in the sun for an hour or 2. Let it fully cure before sanding it. Also once dry remove the tape from behind the bar, you can choose to either glass the inside to strengthing it up or simple apply some pannel bond on from 3m. Once thats done trim it up as picturedL 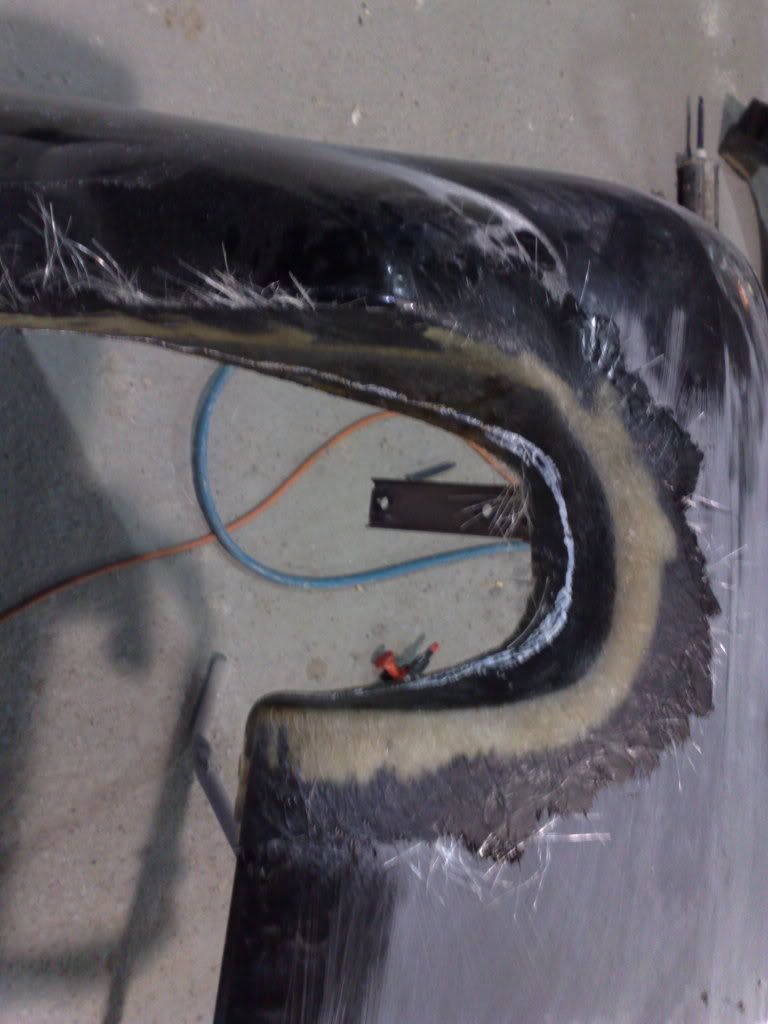 Heres a pic of it trimed, this is as far as i got, however to complet the job, sand the fibre glass down, apply body fill to shape it and fill the pin holes in, finally throw a few coats of prime on it, try and put 4-5. This way itll help you block it down and blend it in the rear bar. Heres a pic of where i got up 2: 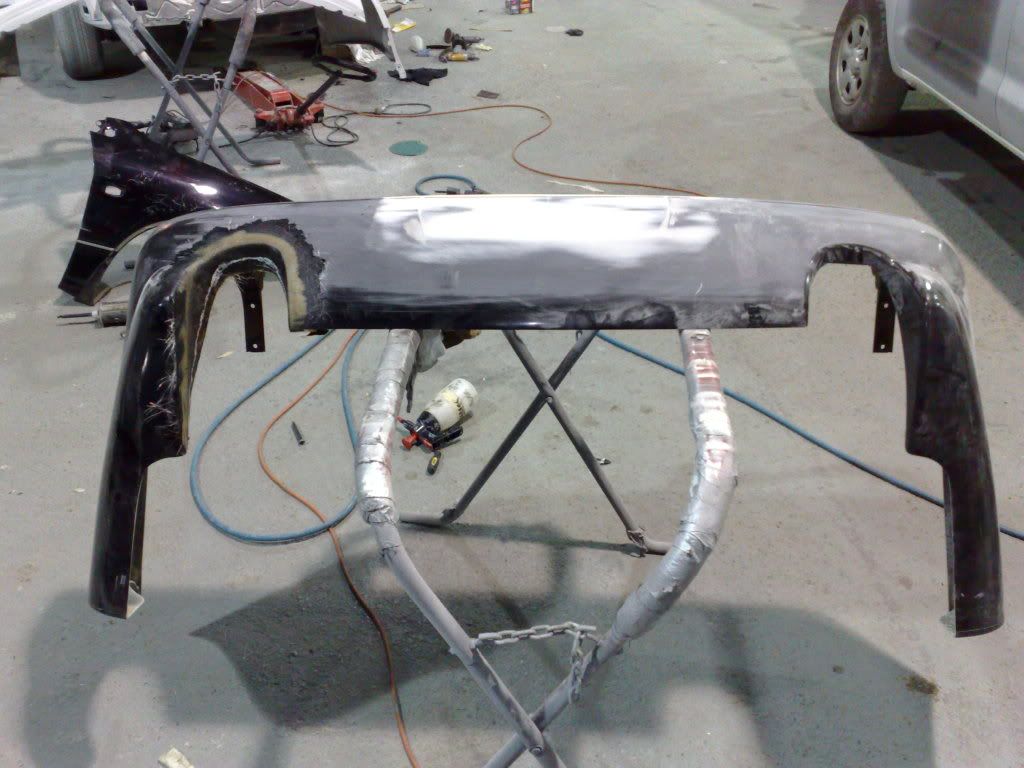 Ill post some more pics of it as time goes. Ill be sure to keep you guys always updated. Hope this mod helps out. Cheers for the comments and views. Any questions and comments feel free to leave as ill try my best to answer them.
_________________ Weapon of choice, EB shell with a EL XR front powered by a BA engine. |
||
| Top | |
||
| Froudey |
|
||
|
hmm looks interesting.
_________________ R.I.P Tobias my son. |
||
| Top | |
||
| smithykicks85 |
|
||
|
As for the tail lights and garnish guys, i think iam going to have a crack with opening the fairmont ones up and painting the insides the same colour as the car and seeing what they look like. If they dont turn out any good ill tint my old ones and finally if they still dont suit it ill order some clearyies off ebay. Ill definetly put pics up of the different lights and garnishs up on here so you guys can have a oppinion on whats best.
_________________ Weapon of choice, EB shell with a EL XR front powered by a BA engine. |
||
| Top | |
||
| Who is online |
|---|
Users browsing this forum: No registered users and 151 guests |